yum使用,http2.4编译安装,磁盘分区,格式化,逻辑卷创建与挂载
2021-01-02 17:32
标签:primary erb centos7 err files loaded 内存 mfs ext4 [13:51:53 root@centos7 dnf]# [13:52:38 root@centos7 dnf]# [13:57:09 root@centos7 yum.repos.d]# [14:14:46 root@centos7 ~]# [14:20:17 root@centos7 ~]# [14:51:36 root@centos7 ~]# [14:52:24 root@centos7 ~]# [14:52:32 root@centos7 ~]# [14:53:28 root@centos7 ~]# [15:08:38 root@centos7 ~]# [15:10:04 root@centos7 ~]# [11:04:35 root@centos7 test]# [11:07:20 root@centos7 test]# [11:07:43 root@centos7 test]# [11:12:08 root@centos7 test]# [11:20:45 root@centos7 test]# [11:21:44 root@centos7 test]# [11:29:45 root@centos7 test]# [11:31:07 root@centos7 test]# [11:31:15 root@centos7 test]# yum使用,http2.4编译安装,磁盘分区,格式化,逻辑卷创建与挂载 标签:primary erb centos7 err files loaded 内存 mfs ext4 原文地址:https://blog.51cto.com/8683332/25322081、自建yum仓库,分别为网络源和本地源
操作步骤解释:
1、将现有的RPM 包,放到同一个目录下,使用“createrepo” 命令进行元数据创建repodata。
2、将光盘镜像,挂载到某一目录下,里面自带repodata。
3、使用http服务或者nfs,以及vsftp服务进行网络共享。
4、客户端配置:必须在/etc/yum.repos.d/ 目录下,创建以 repo结尾的文件。
[base]
name=base                #仓库取名字
baseurl=file:///misc/cd  #共享方式及路径,必须是有repodata所在的目录
enabled=1    #是否开启本yum源
gpgcheck=0   #密钥检查   公网的源 建议开启,确保安全
1)、创建yum仓库,生成repodta目录
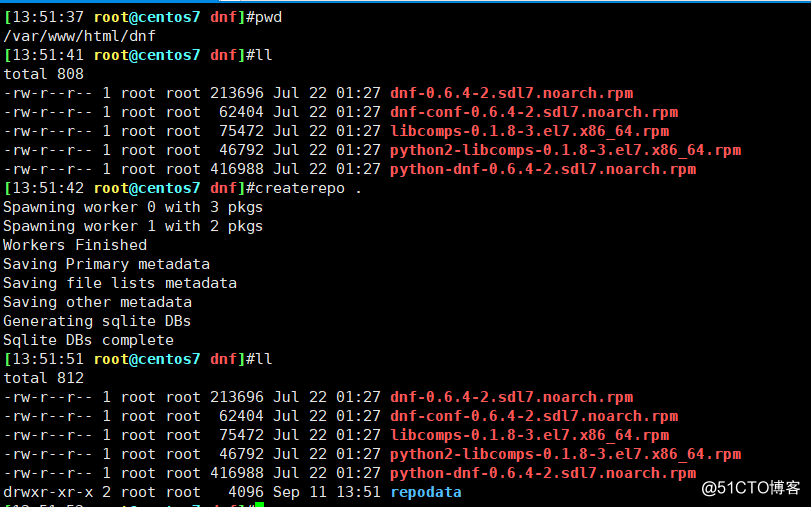
2)、本地yum源,以光盘为例
[13:44:07 root@centos7 yum.repos.d]#
mount /dev/sr0 /mnt
mount: /dev/sr0 is write-protected, mounting read-only[13:44:31 root@centos7 yum.repos.d]#
vim base.repo
[13:44:49 root@centos7 yum.repos.d]#
cat base.repo #本地资源,光盘镜像共享[base]
name=base
baseurl=file:///mnt
enabled=1
gpgcheck=0[13:44:54 root@centos7 yum.repos.d]#
yum clean all
Loaded plugins: fastestmirror, langpacks
Cleaning repos: base
Cleaning up list of fastest mirrors
Other repos take up 120 M of disk space (use --verbose for details)
[13:45:04 root@centos7 yum.repos.d]#
yum repolist
Loaded plugins: fastestmirror, langpacks
Determining fastest mirrors
base                                                                                                                                    | 3.6 kB  00:00:00
(1/2): base/group_gz                                                                                                                    | 166 kB  00:00:00
(2/2): base/primary_db                                                                                                                  | 3.1 MB  00:00:00
repo id                                                                       repo name                                                                  status
base                                                                          base                                                                       4,021
repolist: 4,021
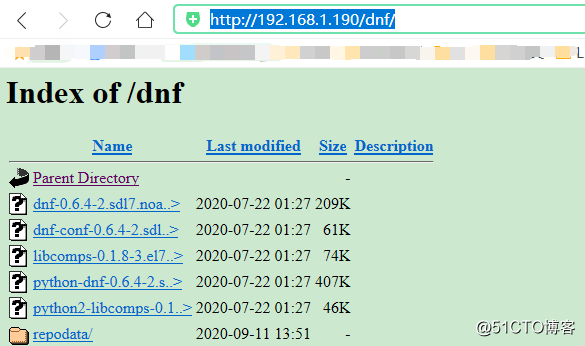
3)、安装httpd 服务,用于网络共享资源 (一定要先用浏览器测试下,资源是否可用)
yum install httpd -y #安装http 服务systemctl start httpd #开启http 服务cat dnf.repo #dnf 网络源配置[dnf]
name=dnf
baseurl=http://192.168.1.190/dnf/
enbaled=1
gpgcheck=0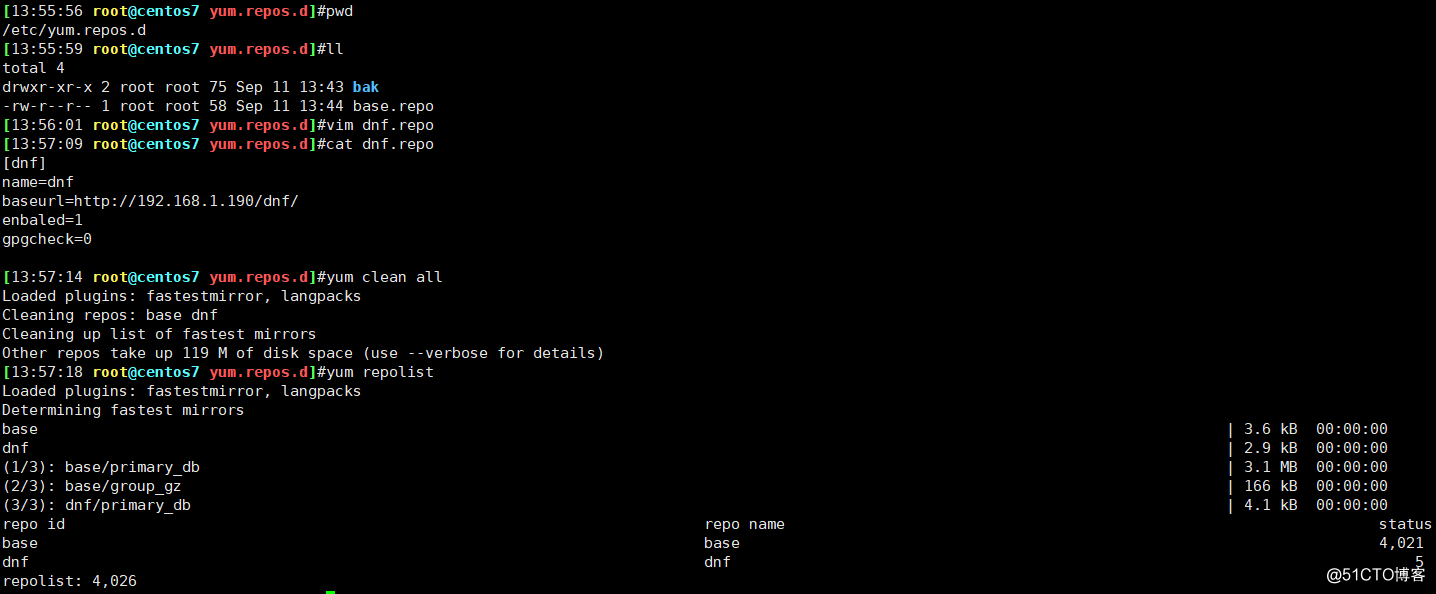
2、编译安装http2.4,实现可以正常访问,并将编译步骤和结果提交。
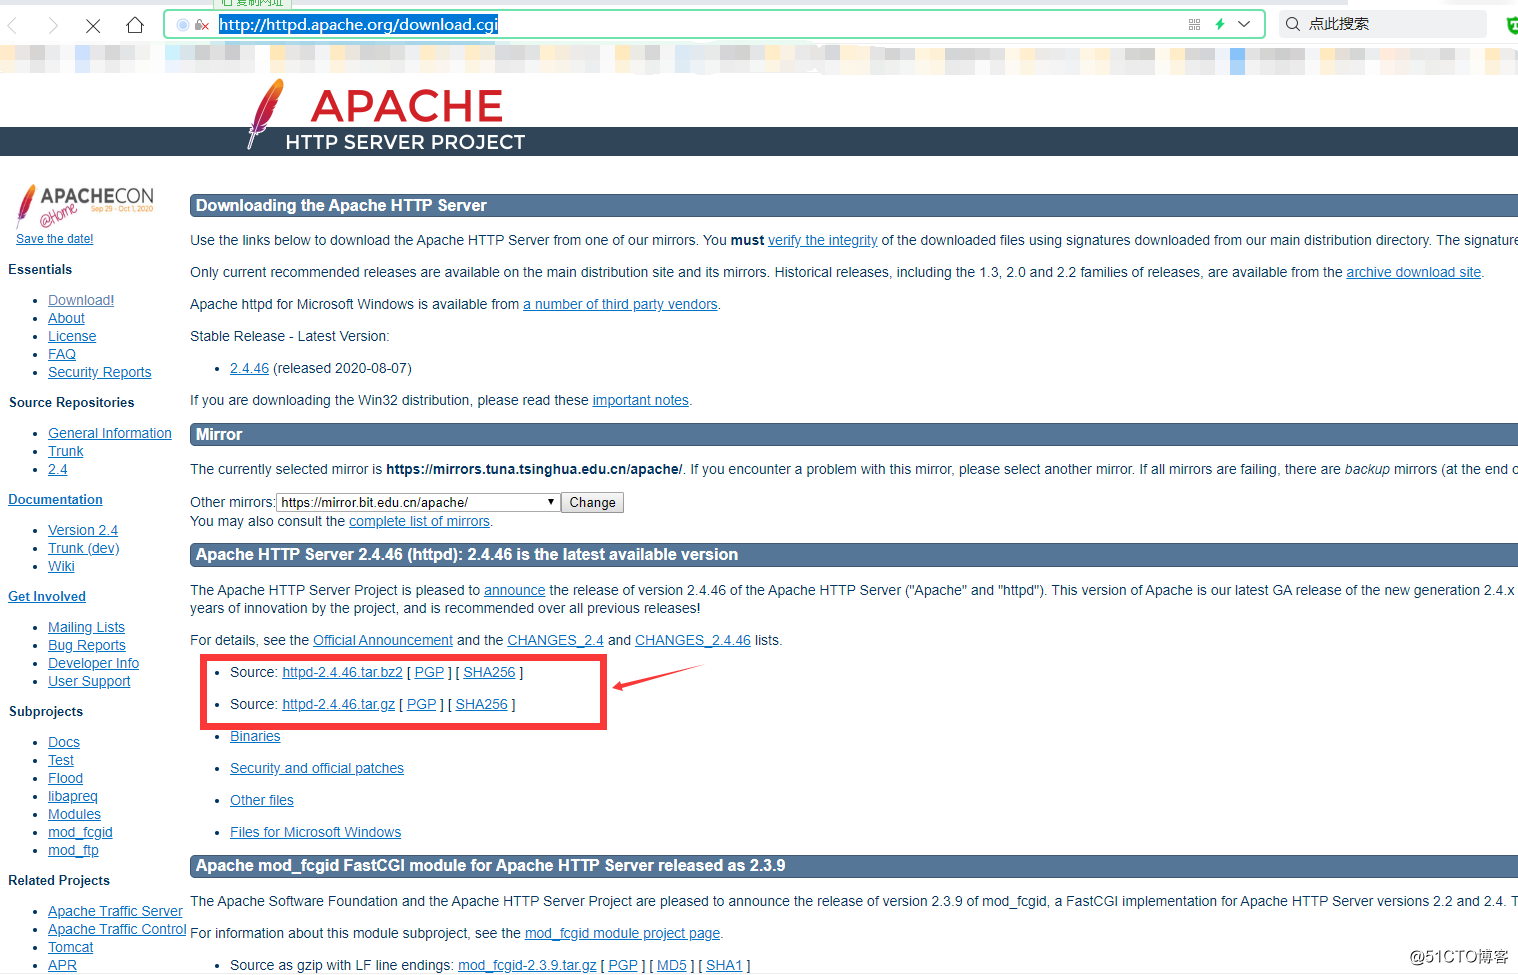
1)、http2.4.6 安装包下载:http://httpd.apache.org/download.cgi 并上传至服务器
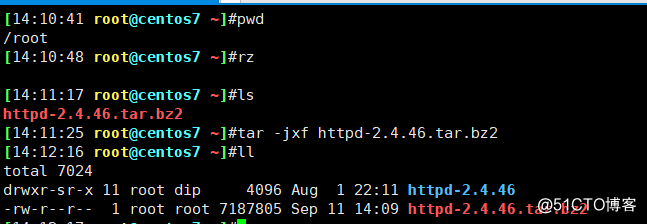
2)、编译环境安装
yum install pcre-devel zlib-devel openssl openssl-devel gcc -y3)、进到目录,开始编译安装
cd httpd-2.4.46/
[14:20:19 root@centos7 httpd-2.4.46]#pwd/root/httpd-2.4.46./configure
make
make install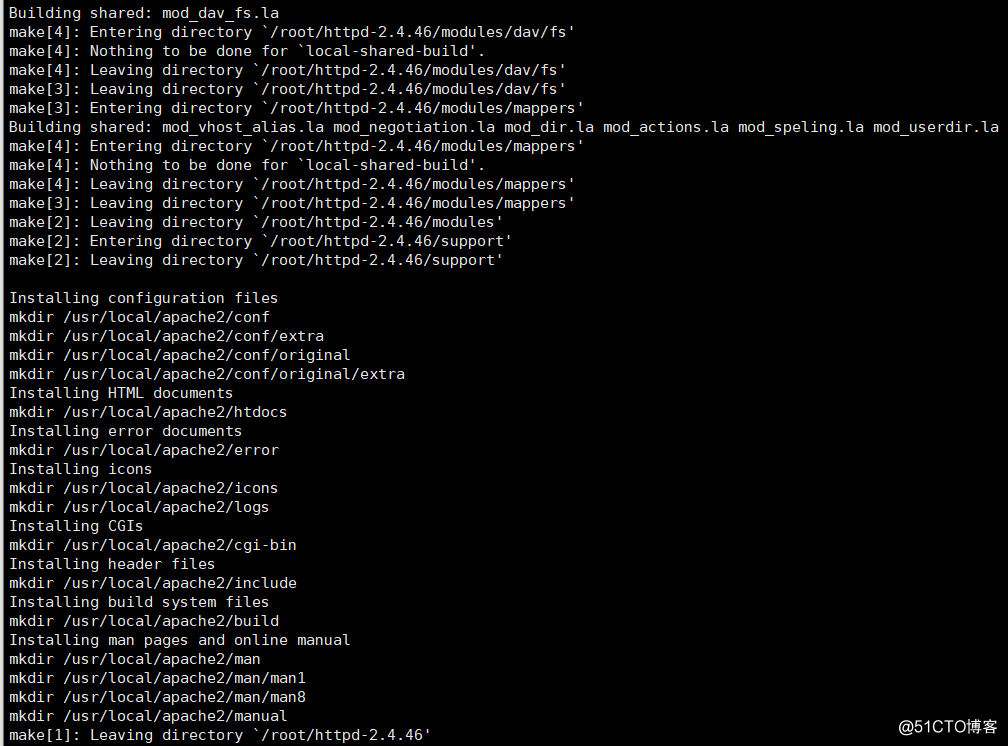

4)、默认编译路径及服务启动与访问验证


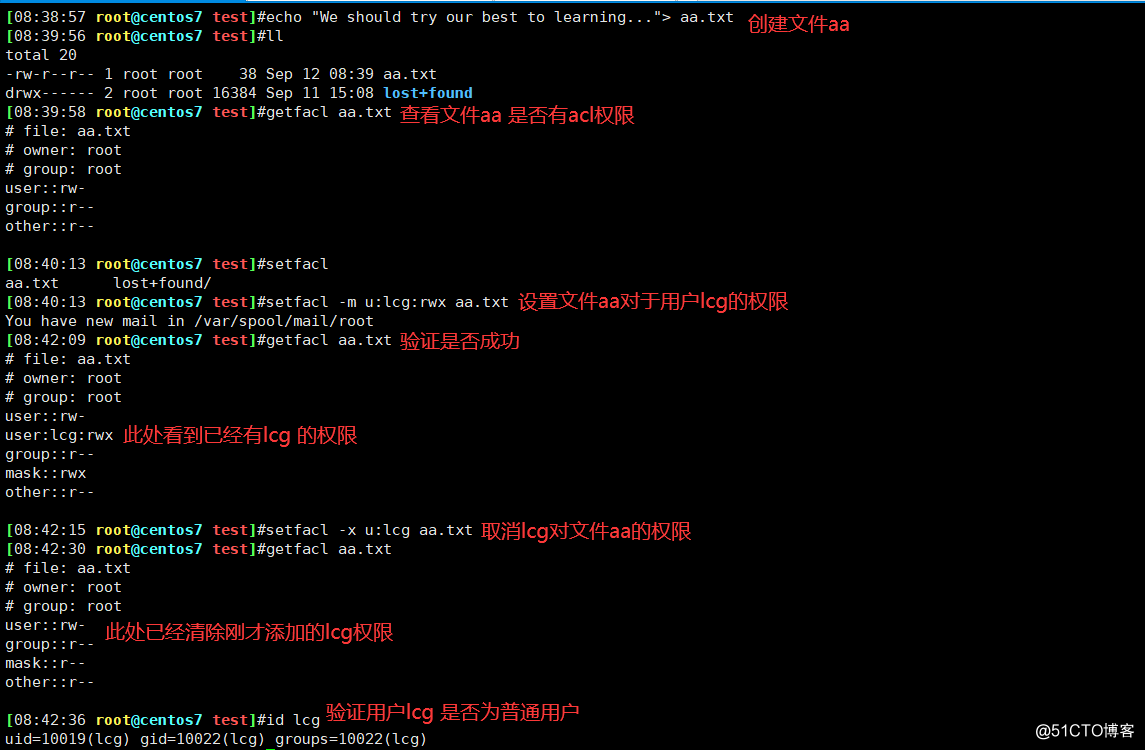
3、创建一个2G的文件系统,块大小为2048byte,预留1%可用空间,文件系统 ext4,卷标为TEST,要求此分区开机后自动挂载至/test目录,且默认有acl挂载选项
1)、查看磁盘,将sda 进行新创建分区作为本次测试。磁盘信息如下:
fdisk /dev/sdaWelcome to fdisk (util-linux 2.23.2).
Changes will remain in memory only, until you decide to write them.
Be careful before using the write command.
Command (m for help): p
Disk /dev/sda: 214.7 GB, 214748364800 bytes, 419430400 sectors
Units = sectors of 1 * 512 = 512 bytes
Sector size (logical/physical): 512 bytes / 512 bytes
I/O size (minimum/optimal): 512 bytes / 512 bytes
Disk label type: dos
Disk identifier: 0x0001dba8
Device Boot Start End Blocks Id System
/dev/sda1 * 2048 2050047 1024000 83 Linux
/dev/sda2 2050048 22530047 10240000 83 Linux
/dev/sda3 22530048 24627199 1048576 83 Linux
Command (m for help): n
Partition type:
p primary (3 primary, 0 extended, 1 free)
e extended
Select (default e):
Using default response e
Selected partition 4
First sector (24627200-419430399, default 24627200):
Using default value 24627200
Last sector, +sectors or +size{K,M,G} (24627200-419430399, default 419430399):
Using default value 419430399
Partition 4 of type Extended and of size 188.3 GiB is set
Command (m for help): p
Disk /dev/sda: 214.7 GB, 214748364800 bytes, 419430400 sectors
Units = sectors of 1 * 512 = 512 bytes
Sector size (logical/physical): 512 bytes / 512 bytes
I/O size (minimum/optimal): 512 bytes / 512 bytes
Disk label type: dos
Disk identifier: 0x0001dba8
Device Boot Start End Blocks Id System
/dev/sda1 * 2048 2050047 1024000 83 Linux
/dev/sda2 2050048 22530047 10240000 83 Linux
/dev/sda3 22530048 24627199 1048576 83 Linux
/dev/sda4 24627200 419430399 197401600 5 Extended
Command (m for help): n
All primary partitions are in use
Adding logical partition 5
First sector (24629248-419430399, default 24629248):
Using default value 24629248
Last sector, +sectors or +size{K,M,G} (24629248-419430399, default 419430399): +2G
Partition 5 of type Linux and of size 2 GiB is set
Command (m for help): p
Disk /dev/sda: 214.7 GB, 214748364800 bytes, 419430400 sectors
Units = sectors of 1 * 512 = 512 bytes
Sector size (logical/physical): 512 bytes / 512 bytes
I/O size (minimum/optimal): 512 bytes / 512 bytes
Disk label type: dos
Disk identifier: 0x0001dba8
Device Boot Start End Blocks Id System
/dev/sda1 * 2048 2050047 1024000 83 Linux
/dev/sda2 2050048 22530047 10240000 83 Linux
/dev/sda3 22530048 24627199 1048576 83 Linux
/dev/sda4 24627200 419430399 197401600 5 Extended
/dev/sda5 24629248 28823551 2097152 83 Linux
Command (m for help): w
The partition table has been altered!
Calling ioctl() to re-read partition table.
WARNING: Re-reading the partition table failed with error 16: Device or resource busy.
The kernel still uses the old table. The new table will be used at
the next reboot or after you run partprobe(8) or kpartx(8)
Syncing disks.partprobe /dev/sda #同步磁盘与内存中的数据一致lsblkNAME MAJ:MIN RM SIZE RO TYPE MOUNTPOINT
sda 8:0 0 200G 0 disk
├─sda1 8:1 0 1000M 0 part /boot
├─sda2 8:2 0 9.8G 0 part /
├─sda3 8:3 0 1G 0 part
├─sda4 8:4 0 1K 0 part 这是扩展分区
└─sda5 8:5 0 2G 0 part 这是逻辑分区 本次实验以他为主2)、格式化文件系统为ext4,卷标为TEST,并指定块大小
mke2fs -t ext4 -b 2048 -L ‘TEST‘ -m 1 /dev/sda5mke2fs 1.42.9 (28-Dec-2013)
Filesystem label=TEST
OS type: Linux
Block size=2048 (log=1)
Fragment size=2048 (log=1)
Stride=0 blocks, Stripe width=0 blocks
131072 inodes, 1048576 blocks
10485 blocks (1.00%) reserved for the super user
First data block=0
Maximum filesystem blocks=269484032
64 block groups
16384 blocks per group, 16384 fragments per group
2048 inodes per group
Superblock backups stored on blocks:
16384, 49152, 81920, 114688, 147456, 409600, 442368, 802816
Allocating group tables: done
Writing inode tables: done
Creating journal (32768 blocks): done
Writing superblocks and filesystem accounting information: done
You have new mail in /var/spool/mail/rootmke2fs /dev/sda5mke2fs 1.42.9 (28-Dec-2013)
Filesystem label=
OS type: Linux
Block size=4096 (log=2)
Fragment size=4096 (log=2)
Stride=0 blocks, Stripe width=0 blocks
131072 inodes, 524288 blocks
26214 blocks (5.00%) reserved for the super user
First data block=0
Maximum filesystem blocks=536870912
16 block groups
32768 blocks per group, 32768 fragments per group
8192 inodes per group
Superblock backups stored on blocks:
32768, 98304, 163840, 229376, 294912
Allocating group tables: done
Writing inode tables: done
Writing superblocks and filesystem accounting information: done3)、写进/etc/fstab 自动挂载至/test,且默认有acl 挂载选项
blkid/dev/sr0: UUID="2018-11-25-23-54-16-00" LABEL="CentOS 7 x86_64" TYPE="iso9660" PTTYPE="dos"
/dev/sdb1: UUID="yZ16Cg-PGpj-3oAs-vsg1-qopN-4tKs-mVYOkh" TYPE="LVM2_member"
/dev/sdb2: UUID="sp1RAv-KEJq-soOc-ryfd-2u2G-kdaR-P8EpbR" TYPE="LVM2_member"
/dev/sdb3: UUID="n2I2DR-IvJd-dBIV-z1vQ-QEgP-MB2p-KUBrRw" TYPE="LVM2_member"
/dev/sdc: UUID="69jQYA-pOFx-CyiB-1C4d-qtH9-M20S-z48lbu" TYPE="LVM2_member"
/dev/sda1: UUID="0745e236-6619-43df-929f-78cef14f3713" TYPE="xfs"
/dev/sda2: UUID="296fe92a-a09a-4a43-b0bf-38302e32e228" TYPE="xfs"
/dev/sda3: UUID="6eba734c-311d-4cbf-88ca-adf9312c9366" TYPE="xfs"
/dev/sda5: UUID="17db2a07-e240-4816-b2e5-8cb1ccd01421" TYPE="ext2" 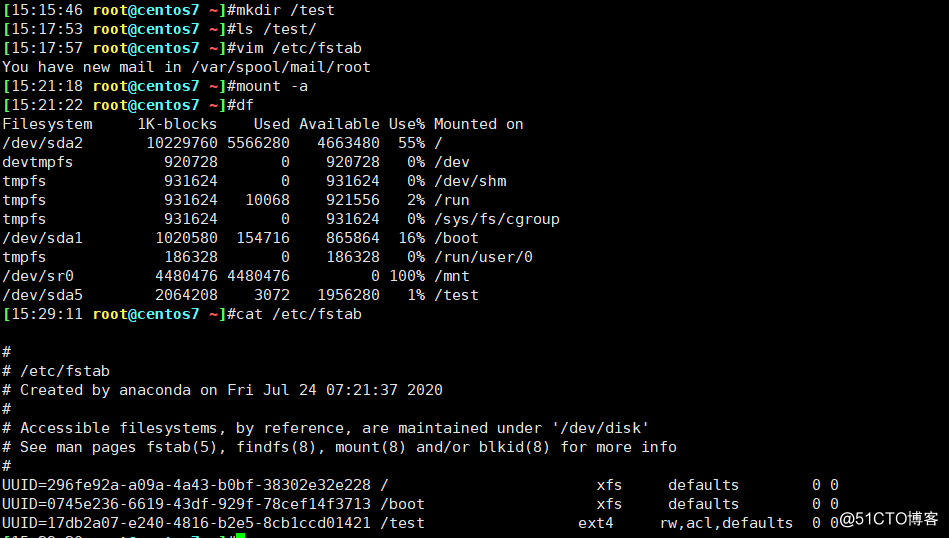
4、创建一个至少有两个PV组成的大小为20G的名为testvg的VG;要求PE大小 为16MB, 而后在卷组中创建大小为5G的逻辑卷testlv;挂载至/users目录
1)、将磁盘sda 新添加两个分区,并更改分区属性为lvm 类型,作为pv使用
fdisk /dev/sdaWelcome to fdisk (util-linux 2.23.2).
Changes will remain in memory only, until you decide to write them.
Be careful before using the write command.
Command (m for help): n
All primary partitions are in use
Adding logical partition 6
First sector (28825600-419430399, default 28825600):
Using default value 28825600
Last sector, +sectors or +size{K,M,G} (28825600-419430399, default 419430399): +1G
Partition 6 of type Linux and of size 1 GiB is set
Command (m for help): n
All primary partitions are in use
Adding logical partition 7
First sector (30924800-419430399, default 30924800):
Using default value 30924800
Last sector, +sectors or +size{K,M,G} (30924800-419430399, default 419430399): +1G
Partition 7 of type Linux and of size 1 GiB is set
Command (m for help): t
Partition number (1-7, default 7): 6
Hex code (type L to list all codes): L
0 Empty 24 NEC DOS 81 Minix / old Lin bf Solaris
1 FAT12 27 Hidden NTFS Win 82 Linux swap / So c1 DRDOS/sec (FAT-
2 XENIX root 39 Plan 9 83 Linux c4 DRDOS/sec (FAT-
3 XENIX usr 3c PartitionMagic 84 OS/2 hidden C: c6 DRDOS/sec (FAT-
4 FAT16 partprobe /dev/sda
[11:07:40 root@centos7 test]#lsblkNAME MAJ:MIN RM SIZE RO TYPE MOUNTPOINT
sda 8:0 0 200G 0 disk
├─sda1 8:1 0 1000M 0 part /boot
├─sda2 8:2 0 9.8G 0 part /
├─sda3 8:3 0 1G 0 part
├─sda4 8:4 0 1K 0 part
├─sda5 8:5 0 2G 0 part /test
├─sda6 8:6 0 1G 0 part
└─sda7 8:7 0 1G 0 part fdisk /dev/sdaWelcome to fdisk (util-linux 2.23.2).
Changes will remain in memory only, until you decide to write them.
Be careful before using the write command.
Command (m for help): n
All primary partitions are in use
Adding logical partition 8
First sector (33024000-419430399, default 33024000):
Using default value 33024000
Last sector, +sectors or +size{K,M,G} (33024000-419430399, default 419430399): +28G
Partition 8 of type Linux and of size 28 GiB is set
Command (m for help): t
Partition number (1-8, default 8): 8
Hex code (type L to list all codes): 8e
Changed type of partition ‘Linux‘ to ‘Linux LVM‘
Command (m for help): p
Disk /dev/sda: 214.7 GB, 214748364800 bytes, 419430400 sectors
Units = sectors of 1 * 512 = 512 bytes
Sector size (logical/physical): 512 bytes / 512 bytes
I/O size (minimum/optimal): 512 bytes / 512 bytes
Disk label type: dos
Disk identifier: 0x0001dba8
Device Boot Start End Blocks Id System
/dev/sda1 * 2048 2050047 1024000 83 Linux
/dev/sda2 2050048 22530047 10240000 83 Linux
/dev/sda3 22530048 24627199 1048576 83 Linux
/dev/sda4 24627200 419430399 197401600 5 Extended
/dev/sda5 24629248 28823551 2097152 83 Linux
/dev/sda6 28825600 30922751 1048576 8e Linux LVM
/dev/sda7 30924800 33021951 1048576 8e Linux LVM
/dev/sda8 33024000 91744255 29360128 8e Linux LVM
Command (m for help): w
The partition table has been altered!
Calling ioctl() to re-read partition table.
WARNING: Re-reading the partition table failed with error 16: Device or resource busy.
The kernel still uses the old table. The new table will be used at
the next reboot or after you run partprobe(8) or kpartx(8)
Syncing disks.
You have new mail in /var/spool/mail/root
[11:10:18 root@centos7 test]#partprobe /dev/sda
[11:10:27 root@centos7 test]#lsblk
NAME MAJ:MIN RM SIZE RO TYPE MOUNTPOINT
sda 8:0 0 200G 0 disk
├─sda1 8:1 0 1000M 0 part /boot
├─sda2 8:2 0 9.8G 0 part /
├─sda3 8:3 0 1G 0 part
├─sda4 8:4 0 1K 0 part
├─sda5 8:5 0 2G 0 part /test
├─sda6 8:6 0 1G 0 part
├─sda7 8:7 0 1G 0 part
└─sda8 8:8 0 28G 0 part 2)、将sda6,sda7, sda8, 创建pv
pvcreate /dev/sda{6..8} Physical volume "/dev/sda6" successfully created.
Physical volume "/dev/sda7" successfully created.
Physical volume "/dev/sda8" successfully created.
3)、创建testvg,PE为16MB ,查看组成个数
vgcreate testvg -s 16MB /dev/sda{6..8}Volume group "testvg" successfully createdvgdisplay --- Volume group ---
VG Name testvg
System ID
Format lvm2
Metadata Areas 3
Metadata Sequence No 1
VG Access read/write
VG Status resizable
MAX LV 0
Cur LV 0
Open LV 0
Max PV 0
Cur PV 3
Act PV 3
VG Size 29.95 GiB
PE Size 16.00 MiB #此处为PE大小
Total PE 1917
Alloc PE / Size 0 / 0
Free PE / Size 1917 / 29.95 GiB
VG UUID SXDuvV-oNqk-H1Tq-q33b-jyvs-fXmB-d2TLLg[11:24:56 root@centos7 test]#pvs
PV VG Fmt Attr PSize PFree
/dev/sda6 testvg lvm2 a-- 1008.00m 1008.00m
/dev/sda7 testvg lvm2 a-- 1008.00m 1008.00m
/dev/sda8 testvg lvm2 a-- 27.98g 27.98g4)、创建testlv 大小为5G
lvcreate -n testlv -L +5G testvgLogical volume "testlv" created.
You have new mail in /var/spool/mail/rootlvs LV VG Attr LSize Pool Origin Data% Meta% Move Log Cpy%Sync Convert
testlv testvg -wi-a----- 5.00g
binlog vg1 owi-a-s--- 5.00g
binlog-snapshot vg1 sri-a-s--- 256.00m binlog 0.09
binlog-snapshot2 vg1 sri-a-s--- 256.00m binlog 0.02
mysql vg1 -wi-a----- 4.94g lvdisplay
--- Logical volume ---
  LV Path                /dev/testvg/testlv
  LV Name                testlv
  VG Name                testvg
  LV UUID                7sYrLA-FNam-xJav-2XfL-Pxdi-1vTR-qTkl6j
  LV Write Access        read/write
  LV Creation host, time centos7, 2020-09-12 11:31:07 +0800
  LV Status              available

  # open                 0

  LV Size                5.00 GiB
  Current LE             320
  Segments               1
  Allocation             inherit
  Read ahead sectors     auto

  - currently set to     8192
    Block device           253:7
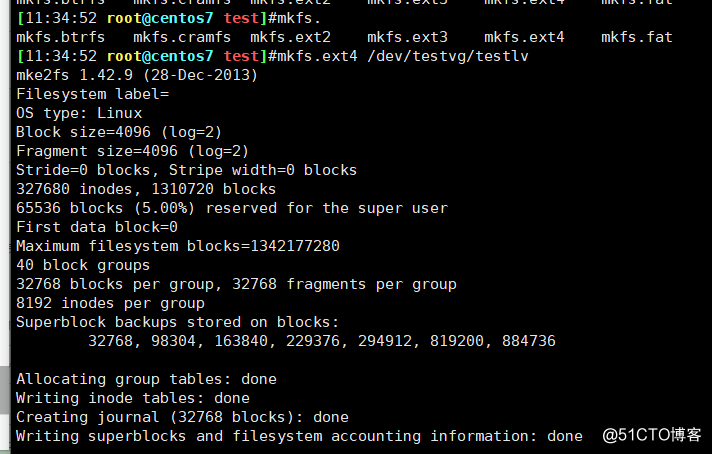
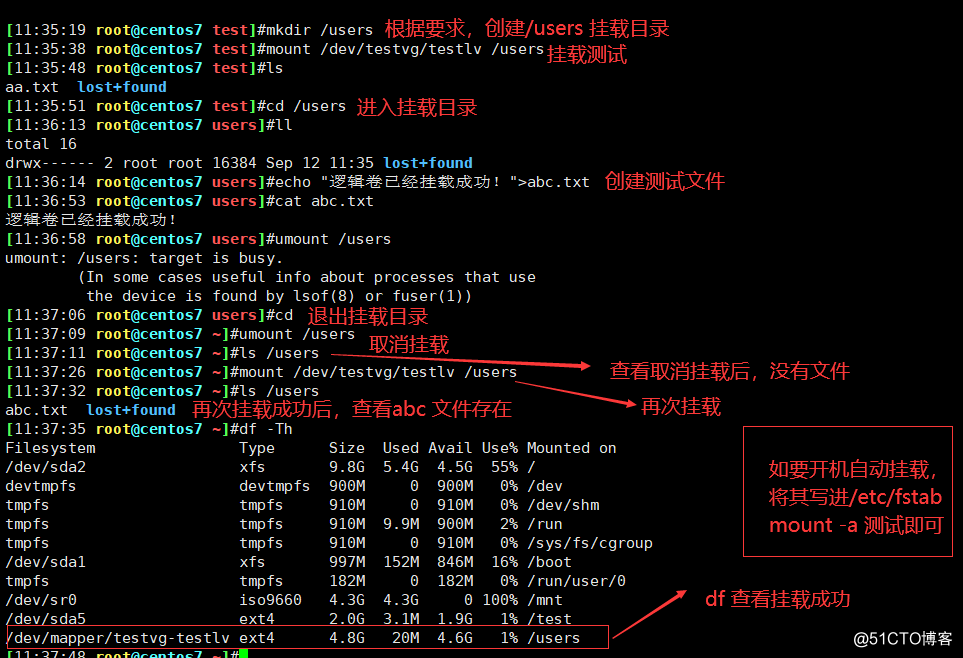
5)、格式化testlv 与挂载至 /users目录
文章标题:yum使用,http2.4编译安装,磁盘分区,格式化,逻辑卷创建与挂载
文章链接:http://soscw.com/essay/39631.html