自动部署Asp.Net Core到Docker
2021-01-07 23:29
标签:ubuntu安装 spn 发布 pfile key 服务器部署 studio list image 原文链接:个人博客:自动部署Asp.Net Core至Docker 最近在开发一个管理系统,代码框架是用的前后台分离的方式 后端的开发工具使用的是Visual Studio 2019 在这前我也写过通过PowerShell自动部署Asp.Net Core程序到Windows服务器 使用PowerShell自动编译部署 为了使项目实现运行在全开源平台,实现低成本、安全、高可用的目的 本文章只实现后端接口项目(Rest API)的部署 部署成功后,我们在浏览器里打开 自动部署Asp.Net Core到Docker 标签:ubuntu安装 spn 发布 pfile key 服务器部署 studio list image 原文地址:https://www.cnblogs.com/liuju150/p/Deploy-AspNetCore-Docker-Ubuntu.html
本文简介
后台使用的是Asp.Net Core平台,开发所有业务,向前台提供Rest API接口。
使用的认证方式是JWT
前端有两个项目,一个是Web端,一个是Mobild端
都是使用Vue + Ant Design of Vue架构
前端的开发工具使用的是Visual Studio Code
并使用IIS向外提供服务。
所以写这个文章以实现自动部署系统至Ubuntu平台使用Docker对外提供服务
本文所有自动部署代码是基于PowerShell实现目标
前置条件
自动编译Asp.Net Core Web API接口
#设置代码目录和编译输出目录
$CurPath=(Resolve-Path .).Path
$OutputPath=$CurPath+"\bin\publish\"
#清空输出目录
Remove-Item -Path $OutputPath -Force -Recurse
#调用dotnet publish命令发布程序
#参考:https://docs.microsoft.com/zh-cn/dotnet/core/tools/dotnet-publish
Invoke-Command -ScriptBlock {param($o) dotnet publish -o $o -c "Release" --no-self-contained -r linux-arm64 -v m --nologo "05.Coldairarrow.Api.csproj"} -ArgumentList $OutputPath


#压缩编译后的发布文件
$CurDateString=Get-Date -Format "yyyyMMddHHmmss"
#压缩文件名加上日期,以后追溯
$ZIPFileName="Deploy"+$CurDateString+".zip"
$ZIPFilePath=$CurPath+"\"+$ZIPFileName
$CompressPath=$OutputPath+"*"
#压缩文件
#Path:压缩对象,DestinationPath:输出压缩文件全路径
Compress-Archive -Path $CompressPath -DestinationPath $ZIPFilePath
把压缩后的编译文件发布到服务器
#使用RSA Key免密登录Ubuntu SSH
$Session = New-PSSession -HostName 10.76.20.162 -UserName root -KeyFilePath "C:\Users\Administrator\.ssh\id_rsa"
#设置远程服务器部署路径
$RemotePath="/srv/Deploy/"
#复制文件到服务器
Copy-Item $ZIPFilePath -Destination $RemotePath -ToSession $Session
#设置程序部署目录
$RemoteDestinationPath=$RemotePath+"API/"
$RemoteZipPath=$RemotePath+$ZIPFileName
#清空程序部署目录
Invoke-Command -Session $Session -ScriptBlock {param($p) Remove-Item -Path $p -Recurse -Force} -ArgumentList $RemoteDestinationPath
#解压文件到程序部署目录
Invoke-Command -Session $Session -ScriptBlock {param($p,$dp) Expand-Archive -Path $p -DestinationPath $dp} -ArgumentList $RemoteZipPath,$RemoteDestinationPath
#删除本的压缩文件
Remove-Item -Path $ZIPFilePath

Docker对外提供服务
在程序部署目录配置Dockerfile
#拉取asp.net core镜像
FROM mcr.microsoft.com/dotnet/core/aspnet:3.1
ENV DOTNET_SYSTEM_GLOBALIZATION_INVARIANT=false
#设置工作目录
WORKDIR /app
#把服务器文件复制到Docker
COPY . .
#对外开放5000端口
EXPOSE 5000
#启动API命令
ENTRYPOINT ["dotnet","Coldairarrow.Api.dll"]
构建API镜像,并启动新容器
#停止容器
Invoke-Command -Session $Session -ScriptBlock {docker stop api}
#删除容器
Invoke-Command -Session $Session -ScriptBlock {docker rm api}
#删除镜像
Invoke-Command -Session $Session -ScriptBlock {docker rmi api}
#通过Dockerfile构建镜像
Invoke-Command -Session $Session -ScriptBlock {docker build -t api /srv/Deploy/API}
#启动新的容器
Invoke-Command -Session $Session -ScriptBlock {docker run -d -p 5000:5000 --name api api}

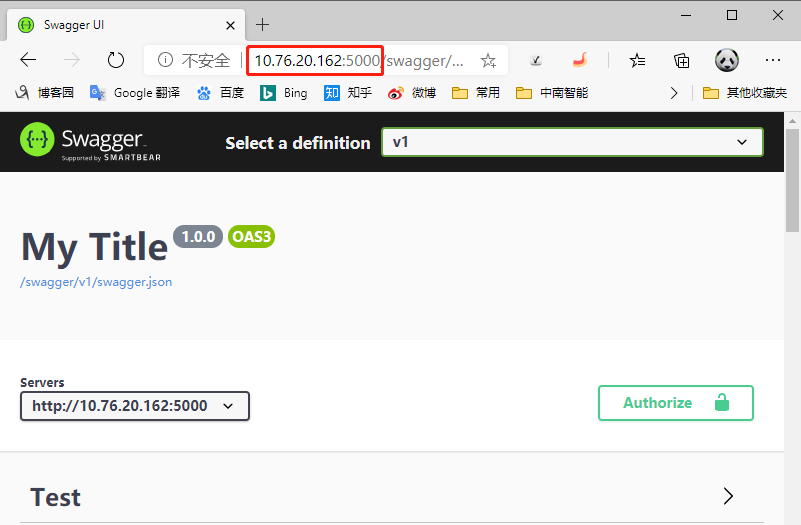
部署结果
http://10.76.20.162:5000/swagger/
就可以看到我们发布的API接口
源代码
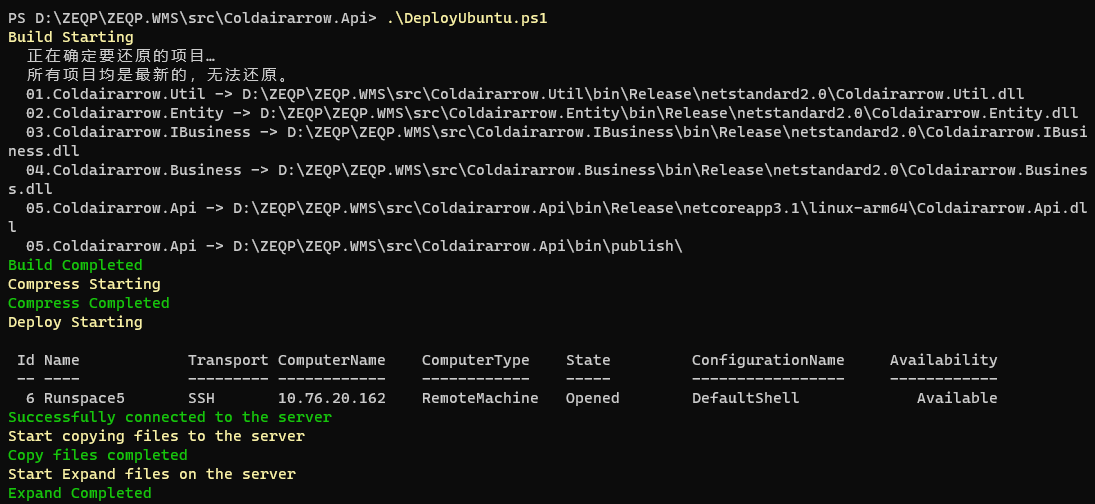
Write-Host ‘Build Starting‘ -ForegroundColor Yellow
$CurPath=(Resolve-Path .).Path
$OutputPath=$CurPath+"\bin\publish\"
Remove-Item -Path $OutputPath -Force -Recurse
Invoke-Command -ScriptBlock {param($o) dotnet publish -o $o -c "Release" --no-self-contained -r linux-arm64 -v m --nologo "05.Coldairarrow.Api.csproj"} -ArgumentList $OutputPath
Write-Host ‘Build Completed‘ -ForegroundColor Green

Write-Host ‘Compress Starting‘ -ForegroundColor Yellow
$CurDateString=Get-Date -Format "yyyyMMddHHmmss"
$ZIPFileName="Deploy"+$CurDateString+".zip"
$ZIPFilePath=$CurPath+"\"+$ZIPFileName
$CompressPath=$OutputPath+"*"
Compress-Archive -Path $CompressPath -DestinationPath $ZIPFilePath
Write-Host ‘Compress Completed‘ -ForegroundColor Green

Write-Host ‘Deploy Starting‘ -ForegroundColor Yellow
$Session = New-PSSession -HostName 10.76.20.162 -UserName root -KeyFilePath "C:\Users\Administrator\.ssh\id_rsa"
$Session
Write-Host ‘Successfully connected to the server‘ -ForegroundColor Green
Write-Host ‘Start copying files to the server‘ -ForegroundColor Yellow
$RemotePath="/srv/Deploy/"
Copy-Item $ZIPFilePath -Destination $RemotePath -ToSession $Session
Write-Host ‘Copy files completed‘ -ForegroundColor Green
Write-Host ‘Start Expand files on the server‘ -ForegroundColor Yellow
$RemoteDestinationPath=$RemotePath+"API/"
$RemoteZipPath=$RemotePath+$ZIPFileName
Invoke-Command -Session $Session -ScriptBlock {param($p) Remove-Item -Path $p -Recurse -Force} -ArgumentList $RemoteDestinationPath
Invoke-Command -Session $Session -ScriptBlock {param($p,$dp) Expand-Archive -Path $p -DestinationPath $dp} -ArgumentList $RemoteZipPath,$RemoteDestinationPath

$ConfigProductionFile=$RemoteDestinationPath+"appsettings.Production.json"
Invoke-Command -Session $Session -ScriptBlock {param($p) Remove-Item -Path $p -Force} -ArgumentList $ConfigProductionFile
Write-Host ‘Expand Completed‘ -ForegroundColor Green

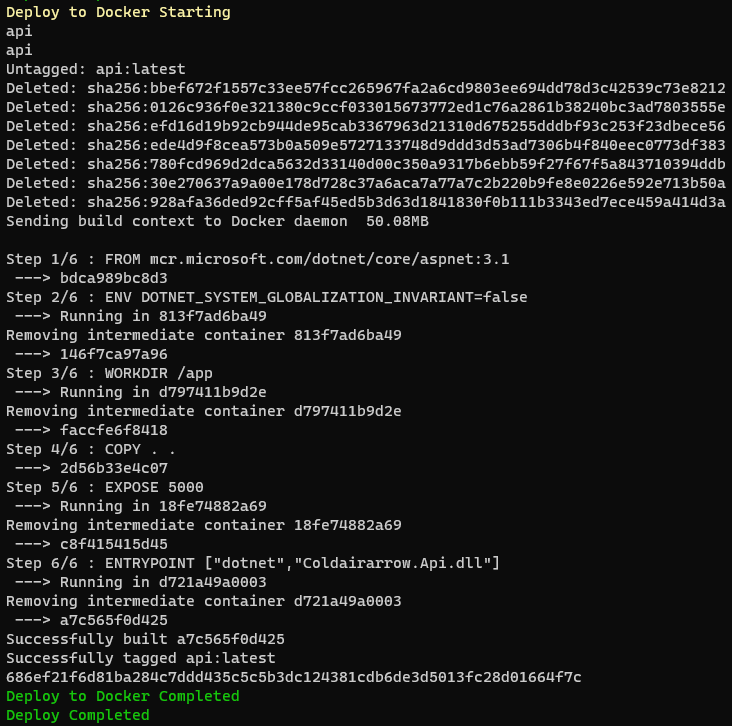
Write-Host ‘Deploy to Docker Starting‘ -ForegroundColor Yellow
Invoke-Command -Session $Session -ScriptBlock {docker stop api}
Invoke-Command -Session $Session -ScriptBlock {docker rm api}
Invoke-Command -Session $Session -ScriptBlock {docker rmi api}
Invoke-Command -Session $Session -ScriptBlock {docker build -t api /srv/Deploy/API}
Invoke-Command -Session $Session -ScriptBlock {docker run -d -p 5000:5000 --name api api}
Write-Host ‘Deploy to Docker Completed‘ -ForegroundColor Green

Remove-Item -Path $ZIPFilePath
Write-Host ‘Deploy Completed‘ -ForegroundColor Green
下一篇:WebSocket简介