用C# WPF简单实现仪表控件
2021-01-21 20:15
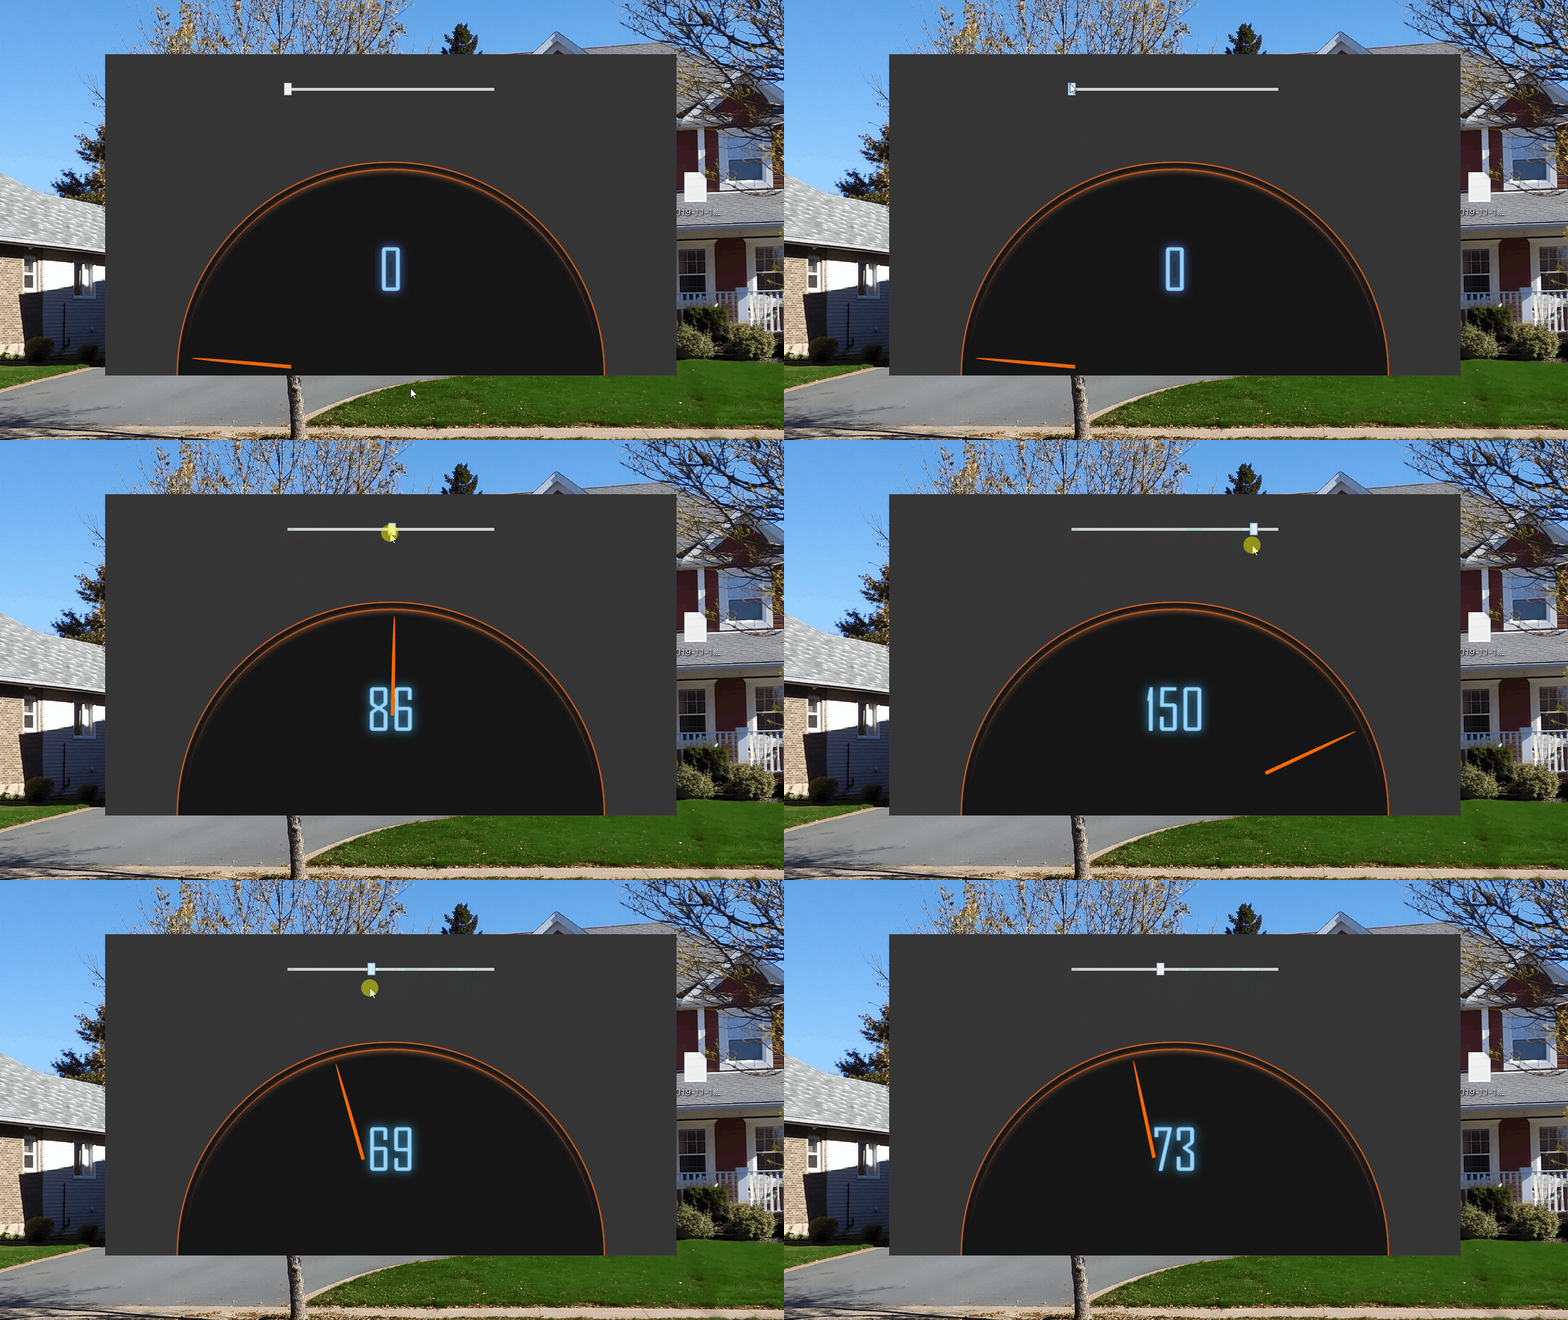
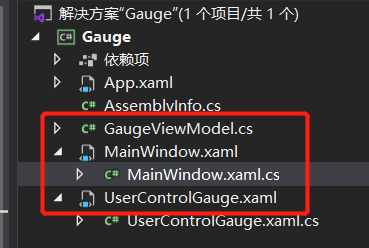
标签:长度 pat init 新技术 支持 htm sla ops 根据 时间如流水,只能流去不流回! 点赞再看,养成习惯,这是您给我创作的动力! 本文 Dotnet9 https://dotnet9.com 已收录,站长乐于分享dotnet相关技术,比如Winform、WPF、ASP.NET Core等,亦有C++桌面相关的Qt Quick和Qt Widgets等,只分享自己熟悉的、自己会的。 阅读导航: 一、先看效果 小编全程是看 Design com WPF 大神视频手敲的仪表控件代码,视频长度19:28,只有背景声音,无国界的视频传播课程,和大神只有代码交流,大家有兴趣,可以到大神YouTube上膜拜,看视频学C# WPF技术我看行。 整个解决方案结构: 1、站长使用.Net Core 3.1创建的WPF工程,创建的名称为“Gauge”的解决方案。 2、添加一个用户控件,命名为“UserControlGauge.xaml” 下面就是仪表控件的xaml部分,代码不多,总体上就是用两个Border绘制出仪表盘的轮廓,再加一个表针Border、一个数值展示TextBlock,外加一个控制仪表值的Slider,就这么简单做出了仪表控件的一个大致样子: 3、添加仪表控件ViewModel 仪表控件实际使用场景,可能要在仪表盘上加上显示的刻度值,仪表值会根据业务实时变化等 ,这些都方便添加,读者可以自己扩展,下面的ViewModel只是绑定了仪表控件的指针摆动角度及显示的实际刻度值: 4、主窗体MainWindow xaml部分简单,直接加入仪表控件即可: 后台绑定控件ViewModel 建议直接打开大神视频学习,他的YouTube上还有很多代码视频哦,参考: 文章中代码几乎已经全部贴出,就是这么多。 除非注明,文章均由 Dotnet9 整理发布,欢迎转载。 转载请注明本文地址:https://dotnet9.com/6662.html 欢迎扫描下方二维码关注 Dotnet9 的微信公众号,本站会及时推送最新技术文章(微信公众号“dotnet9_com”): 如有收获,请大力转发,给Dotnet9赞助和支持,谢谢大家对dotnet技术的关注和支持 。 用C# WPF简单实现仪表控件 标签:长度 pat init 新技术 支持 htm sla ops 根据 原文地址:https://www.cnblogs.com/Dotnet9-com/p/12098584.html
二、本文背景
三、代码实现
四、文章参考
五、代码下载一、先看效果

二、本文背景
三、代码实现

 1 UserControl x:Class="Gauge.UserControlGauge"
 2              xmlns="http://schemas.microsoft.com/winfx/2006/xaml/presentation"
 3              xmlns:x="http://schemas.microsoft.com/winfx/2006/xaml"
 4              xmlns:mc="http://schemas.openxmlformats.org/markup-compatibility/2006"
 5              xmlns:d="http://schemas.microsoft.com/expression/blend/2008"
 6              xmlns:local="clr-namespace:Gauge"
 7              mc:Ignorable="d"
 8              d:DesignHeight="450" d:DesignWidth="800">
 9     Grid>
10         Slider Minimum="0" Maximum="170" Width="300" HorizontalAlignment="Center" VerticalAlignment="Top" Margin="40" Value="{Binding Path=Value}"/>
11         Border HorizontalAlignment="Center" VerticalAlignment="Bottom" Height="300"    Width="600" BorderBrush="#FFCF5D1D"
12                 BorderThickness="2 2 2 0" CornerRadius="300 300 0 0" Background="#FF151515"/>
13         Border HorizontalAlignment="Center" VerticalAlignment="Bottom" Height="290"    Width="580" BorderBrush="#FFCF5D1D"
14                 BorderThickness="0 2 0 0" CornerRadius="300 300 0 0">
15             Border.Effect>
16                 DropShadowEffect Color="#FFFFC7A7" BlurRadius="10" ShadowDepth="2"/>
17             Border.Effect>
18         Border>
19         TextBlock HorizontalAlignment="Center" VerticalAlignment="Bottom" Margin="100" FontSize="80"
20                    FontFamily="Agency FB" Foreground="#FF95D4FF" Text="{Binding Path=Value,Mode=TwoWay}">
21             TextBlock.Effect>
22                 DropShadowEffect BlurRadius="20" Color="#FF91DEFB" ShadowDepth="0" />
23             TextBlock.Effect>
24         TextBlock>
25         Border Width="5" CornerRadius="120 120 0 0" Background="#FFFF6901" RenderTransformOrigin="0.5 2" Height="140" Margin="0 0 0 140"
26                 VerticalAlignment="Bottom" HorizontalAlignment="Center">
27             Border.RenderTransform>
28                 TransformGroup>
29                     ScaleTransform/>
30                     SkewTransform/>
31                     RotateTransform Angle="{Binding Path=Angle}"/>
32                     TranslateTransform/>
33                 TransformGroup>
34             Border.RenderTransform>
35         Border>
36     Grid>
37 UserControl>
 1 using System.ComponentModel;
 2
 3 namespace Gauge
 4 {
 5     public class GaugeViewModel : INotifyPropertyChanged
 6     {
 7         public event PropertyChangedEventHandler PropertyChanged;
 8         private void NotifyPropertyChanged(string info)
 9         {
10             if (PropertyChanged != null)
11             {
12                 PropertyChanged(this, new PropertyChangedEventArgs(info));
13             }
14         }
15
16         public GaugeViewModel()
17         {
18             Angle = -85;
19             Value = 0;
20         }
21
22         private int _angle;
23         public int Angle
24         {
25             get { return _angle; }
26             private set
27             {
28                 if (value != _angle)
29                 {
30                     _angle = value;
31                     NotifyPropertyChanged("Angle");
32                 }
33             }
34         }
35
36         private int _value;
37         public int Value
38         {
39             get { return _value; }
40             set
41             {
42                 if (value != _value && value >= 0 && value 170)
43                 {
44                     _value = value;
45                     Angle = value - 85;
46                     NotifyPropertyChanged("Value");
47                 }
48             }
49         }
50     }
51 }
 1 Window x:Class="Gauge.MainWindow"
 2         xmlns="http://schemas.microsoft.com/winfx/2006/xaml/presentation"
 3         xmlns:x="http://schemas.microsoft.com/winfx/2006/xaml"
 4         xmlns:d="http://schemas.microsoft.com/expression/blend/2008"
 5         xmlns:mc="http://schemas.openxmlformats.org/markup-compatibility/2006"
 6         xmlns:local="clr-namespace:Gauge"
 7         mc:Ignorable="d"
 8         Title="MainWindow" Height="450" Width="800" Background="#FF363636" WindowStyle="None" ResizeMode="NoResize" WindowStartupLocation="CenterScreen">
 9     Grid>
10         local:UserControlGauge/>
11     Grid>
12 Window>
1 using System.Windows;
2
3 namespace Gauge
4 {
5 ///
四、文章参考
Design com WPF: https://www.youtube.com/watch?v=KElruOV2EfE&t=930s 。五、代码下载
