Spring Cloud Eureka服务注册与发现
2021-01-24 22:13
标签:eve 本机 exp git 服务器 架构 net ever local Spring Cloud Eureka是Spring Cloud Netflix 子项目的核心组件之一,主要用于微服务架构中的服务治理。 本文将对搭建Eureka注册中心,搭建Eureka客户端,搭建Eureka集群及给Eureka注册中心添加登录认证进行介绍。 在微服务架构中往往会有一个注册中心,每个微服务都会向注册中心去注册自己的地址及端口信息,注册中心维护着服务名称与服务实例的对应关系。每个微服务都会定时从注册中心获取服务列表,同时汇报自己的运行情况,这样当有的服务需要调用其他服务时,就可以从自己获取到的服务列表中获取实例地址进行调用,Eureka实现了这套服务注册与发现机制。 选择 填写模块名称 修正模块名称 ---> 点击 创建成功 ---> 点击 模块新建方法与之类似,后面将不再赘述模块新建过程。 Spring Cloud Eureka服务注册与发现
Eureka简介
搭建Eureka注册中心(单节点)
创建 cloud-eureka-server 模块
右键 --> new ---> Module...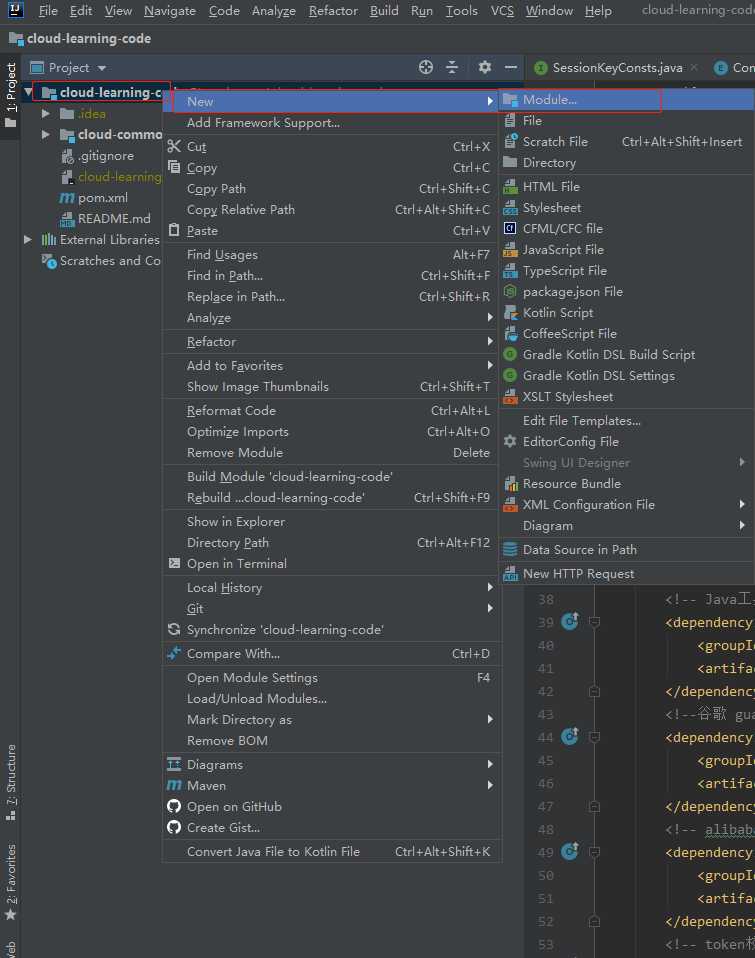
maven ---> 点击 next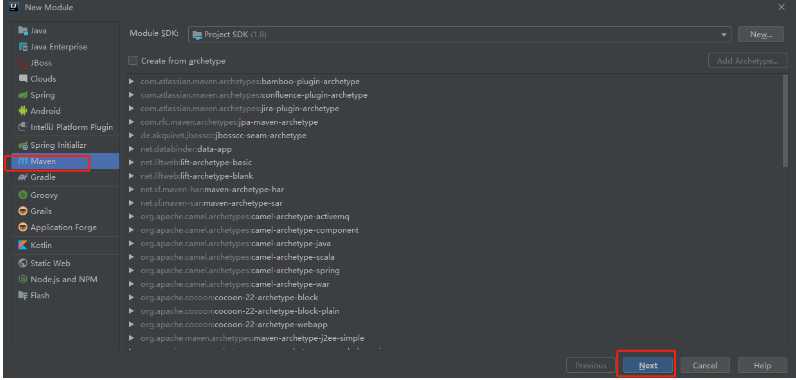
cloud-eureka-server,点击 next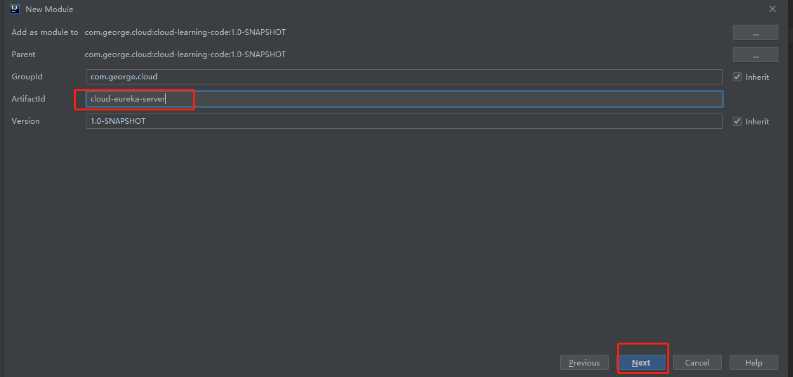
Finish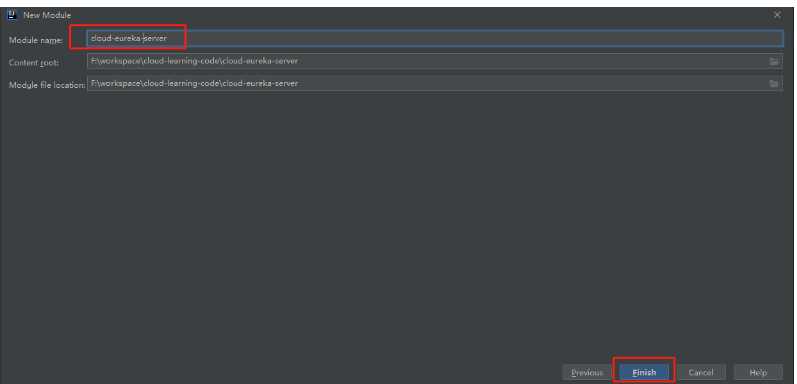
import Changes 刷新maven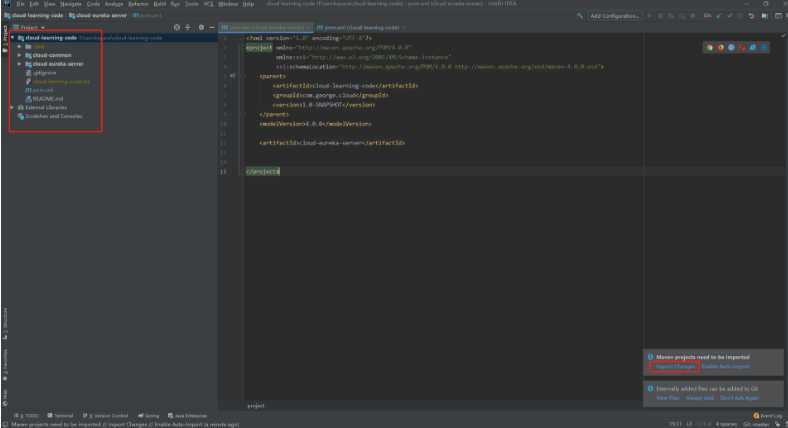
添加Eureka依赖
dependency>
    groupId>org.springframework.cloudgroupId>
    artifactId>spring-cloud-starter-netflix-eureka-serverartifactId>
dependency>
创建启动类
新建注册中心启动类
EurekaServerApplication,并在启动类上添加注解@EnableEurekaServer,启用Euerka注册中心功能
@EnableEurekaServer
@SpringBootApplication
public class EurekaServerApplication {
    private static final Logger LOGGER = LoggerFactory.getLogger(EurekaServerApplication.class);
    public static void main(String[] args) {
        SpringApplication.run(EurekaServerApplication.class, args);
        LOGGER.info("eureka注册中心启动成功......");
    }
}
创建配置文件
新建配置文件
application.yml并添加Eureka相关配置
###################################### 服务配置 ######################################
server:
  # 服务端口
  port: 8761
spring:
  application:
    # 实例名称,唯一标识
    name: cloud-eureka-server
###################################### 注册中心相关配置 ######################################
eureka:
  instance:
    # 主机地址(获取本地ip地址)
    hostname: ${spring.cloud.client.ip-address}
    # 实例ID( Ip + 端口)
    instance-id: ${spring.cloud.client.ip-address}:${server.port}
  server:
    # eureka缓存,true开启缓存,false关闭,生产环境建议为true
    enable-self-preservation: false
  client:
    # 是否要注册到注册中心(注册中心不需要开启
    register-with-eureka: true
    # 是否要从注册中心获取服务(注册中心不需要开启)
    fetch-registry: false
启动注册中心服务

为了便于服务的启动管理,这里使用 run dashboard 启动服务
启动成功后,访问: http://localhost:8761/
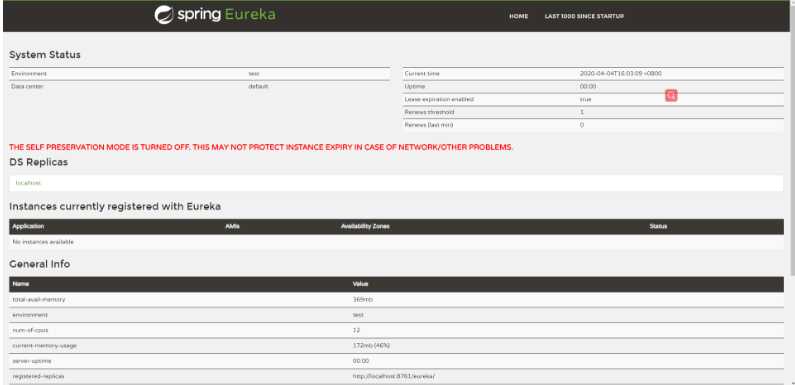
这样,单节点的 Eureka注册中心就搭建完成了
搭建Eureka客户端
创建 cloud-eureka-client 模块
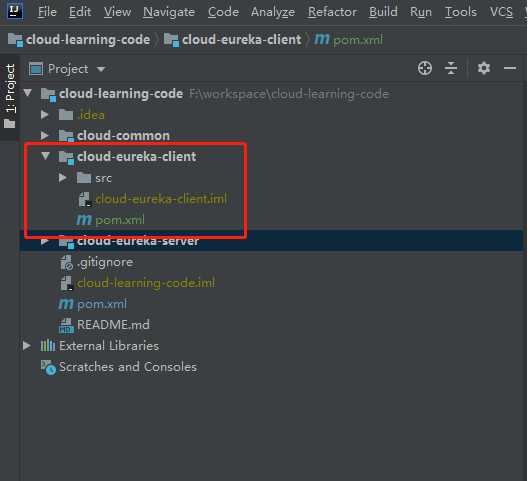
引入 common 模块
common模块中有我们需要的依赖,为简少重复代码,我们在cloud-eureka-client模块中引入common模块依赖
dependency>
    groupId>com.george.cloudgroupId>
    artifactId>cloud-commonartifactId>
    version>${moduleVersion.cloud-common}version>
dependency>
moduleVersion.cloud-common定义在父模块的 pom文件中,用于统一设置版本信息,父模块pom如下:
properties>

    moduleVersion.cloud-common>1.0.0-SNAPSHOTmoduleVersion.cloud-common>
    moduleVersion.cloud-eureka-server>1.0.0-SNAPSHOTmoduleVersion.cloud-eureka-server>
    moduleVersion.cloud-eureka-client>1.0.0-SNAPSHOTmoduleVersion.cloud-eureka-client>
properties>
添加依赖
dependency>
    groupId>org.springframework.cloudgroupId>
    artifactId>spring-cloud-starter-netflix-eureka-clientartifactId>
dependency>
创建启动类
@EnableDiscoveryClient
@SpringBootApplication
public class EurekaClientApplication {
    private static final Logger LOGGER = LoggerFactory.getLogger(EurekaClientApplication.class);
    public static void main(String[] args) {
        SpringApplication.run(EurekaClientApplication.class, args);
        LOGGER.info("Eureka Client 启动成功......");
    }
}
@EnableDiscoveryClient 注解表明是一个Eureka客户端
创建配置文件
新建配置文件
application.yml并添加Eureka客户端相关配置
###################################### 服务配置 ######################################
server:
  # 服务端口
  port: 8001
spring:
  application:
    # 实例名称,唯一标识
    name: cloud-eureka-client
  http:
    # springboot解决中文乱码问题
    encoding:
      charset: UTF-8
      enabled: true
      # 是否强制对HTTP请求和响应上配置的字符集进行编码
      force: true
###################################### Eureka相关配置 ######################################
eureka:
  instance:
    # 主机地址(获取本地ip地址)
    hostname: ${spring.cloud.client.ip-address}
    # 实例ID( Ip + 端口)
    instance-id: ${spring.cloud.client.ip-address}:${server.port}
    # 客户端在注册时使用自己的IP而不是主机名,缺省:false
    prefer-ip-address: true
  client:
    # 是否要注册到注册中心
    register-with-eureka: true
    # 是否要从注册中心获取服务
    fetch-registry: true
    service-url:
      # 注册中心地址
      defaultZone: http://localhost:8761/eureka/
启动客户端服务

启动成功,刷新 注册中心主页
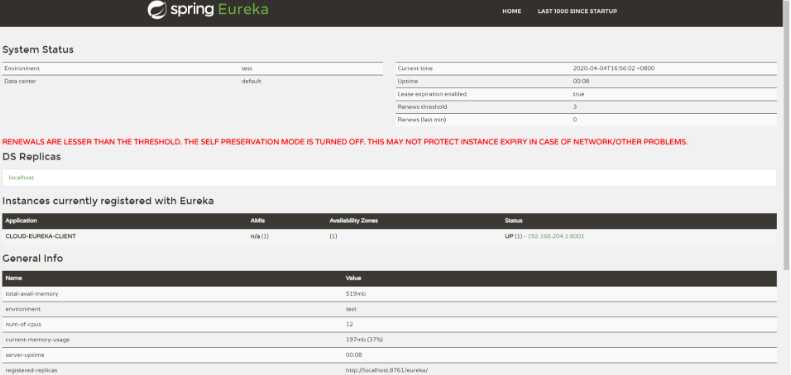
客户端成功注册进入注册中心
搭建Eureka注册中心集群
由于所有服务都会注册到注册中心去,服务之间的调用都是通过从注册中心获取的服务列表来调用,注册中心一旦宕机,所有服务调用都会出现问题。所以我们需要多个注册中心组成集群来提供服务,下面将搭建一个双节点的注册中心集群。
创建 replica-eureka-server 模块
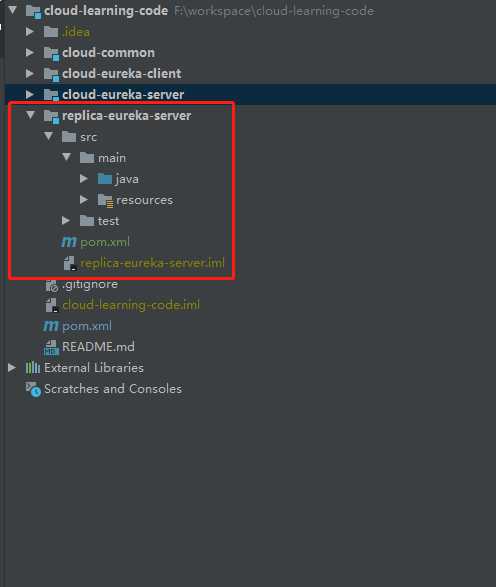
-
pom 添加
eureka-server依赖
dependency>
    groupId>org.springframework.cloudgroupId>
    artifactId>spring-cloud-starter-netflix-eureka-serverartifactId>
dependency> -
启动类
@EnableEurekaServer
@SpringBootApplication
public class EurekaServerApplication {
    private static final Logger LOGGER = LoggerFactory.getLogger(EurekaServerApplication.class);
    public static void main(String[] args) {
        SpringApplication.run(EurekaServerApplication.class, args);
        LOGGER.info("eureka注册中心启动成功......");
    }
}
-
配置文件
###################################### 服务配置 ######################################
server:
  # 服务端口
  port: 8762
spring:
  application:
    # 实例名称,唯一标识
    name: cloud-eureka-server
###################################### 注册中心相关配置 ######################################
eureka:
  instance:
    # 主机地址(获取本地ip地址)
    hostname: ${spring.cloud.client.ip-address}
    # 实例ID( Ip + 端口)
    instance-id: ${spring.cloud.client.ip-address}:${server.port}
    # 客户端在注册时使用自己的IP而不是主机名,缺省:false
    prefer-ip-address: true
  server:
    # 是否允许开启自我保护模式,缺省:true
    # 当Eureka服务器在短时间内丢失过多客户端时,自我保护模式可使服务端不再删除失去连接的客户端
    enable-self-preservation: false
  client:
    # 是否要注册到注册中心(注册中心不需要开启
    register-with-eureka: false
    # 是否要从注册中心获取服务(注册中心不需要开启)
    fetch-registry: false
    service-url:
      # 注册到另一个注册中心
      defaultZone: http://eureka-server-1:8761/eureka/
这里增加了
# 注册到另一个注册中心
defaultZone: http://eureka-server-1:8761/eureka/
修改 cloud-eureka-server 模块的配置文件
添加 defaultZone 配置
eureka:
  client:
    service-url:
      # 注册到另一个注册中心
      defaultZone: http://eureka-server-2:8762/eureka/
修改本机 host 文件
defaultZone 使用了域名,所以还需在本机的host文件中配置一下
127.0.0.1 eureka-server-1
127.0.0.1 eureka-server-2
启动注册中心集群

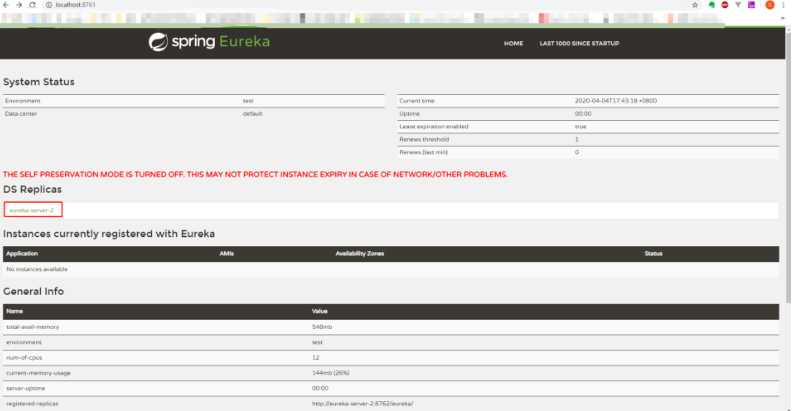
分别访问 http://localhost:8761/ 和 http://localhost:8762/
http://localhost:8761/
http://localhost:8762/
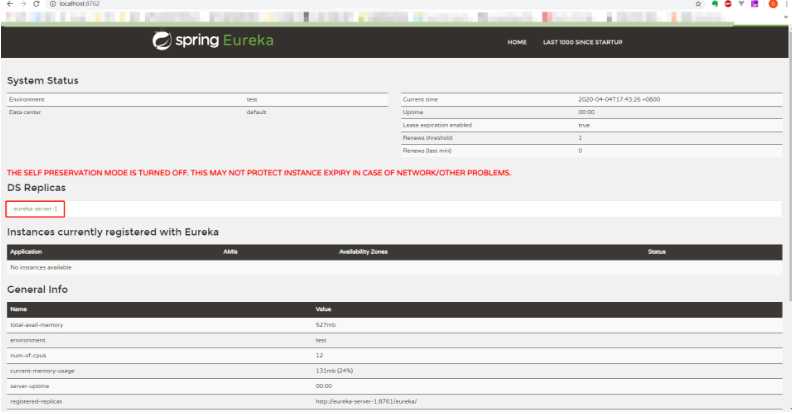
注册中心 cloud-eureka-server 模块和 replica-eureka-server 模块完成了互相注册
修改cloud-eureka-client,让其连接到集群
-
cloud-eureka-client的配置文件application.yml,让其同时注册到两个注册中心。
修改前
defaultZone: http://localhost:8761/eureka/
修改后
defaultZone: http://eureka-server-1:8761/eureka/,http://eureka-server-2:8762/eureka/
启动 cloud-eureka-client
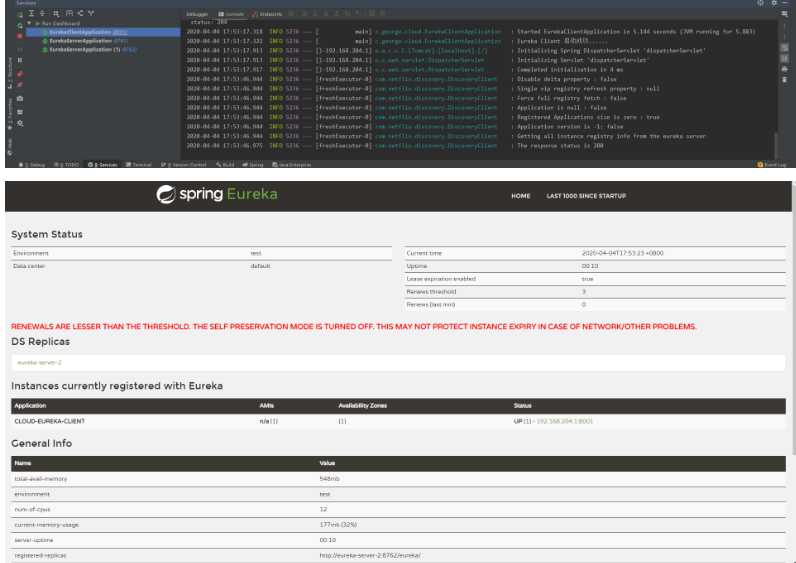
搭建有认证的Eureka注册中心
创建 cloud-eureka-security-server 模块
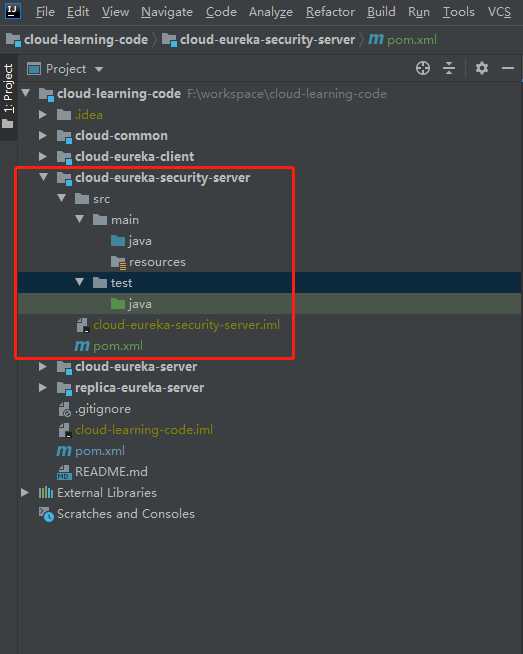
添加 Spring Security 依赖
dependency>
    groupId>org.springframework.cloudgroupId>
    artifactId>spring-cloud-starter-netflix-eureka-serverartifactId>
dependency>

dependency>
    groupId>org.springframework.bootgroupId>
    artifactId>spring-boot-starter-securityartifactId>
dependency>
创建启动类
创建启动类: EurekaSecurityApplication
@EnableEurekaServer
@SpringBootApplication
public class EurekaSecurityApplication {
    private static final Logger LOGGER = LoggerFactory.getLogger(EurekaSecurityApplication.class);
?
    public static void main(String[] args) {
        SpringApplication.run(EurekaSecurityApplication.class, args);
        LOGGER.info("Eureka 注册中心启动成功......");
    }
}
添加配置类 WebSecurityConfig
默认情况下添加SpringSecurity依赖的应用每个请求都需要添加CSRF token才能访问,Eureka客户端注册时并不会添加,所以需要配置/eureka/**路径不需要CSRF token。
@EnableWebSecurity
public class WebSecurityConfig extends WebSecurityConfigurerAdapter {
    @Override
    protected void configure(HttpSecurity http) throws Exception {
        // 设置不拦截的 uri
        http.csrf().ignoringAntMatchers("/eureka/**");
        super.configure(http);
    }
}
添加配置文件 application.yml
###################################### 服务配置 ######################################
server:
  # 服务端口
  port: 8763
spring:
  application:
    # 实例名称,唯一标识
    name: cloud-eureka-server-security
  security:
    # 配置SpringSecurity登录用户名和密码
    user:
      name: mmredu
      password: gerry
###################################### 注册中心相关配置 ######################################
eureka:
  instance:
    # 主机地址(获取本地ip地址)
    hostname: ${spring.cloud.client.ip-address}
    # 实例ID( Ip + 端口)
    instance-id: ${spring.cloud.client.ip-address}:${server.port}
    # 客户端在注册时使用自己的IP而不是主机名,缺省:false
    prefer-ip-address: true
  server:
    # 是否允许开启自我保护模式,缺省:true
    # 当Eureka服务器在短时间内丢失过多客户端时,自我保护模式可使服务端不再删除失去连接的客户端
    enable-self-preservation: false
  client:
    # 是否要注册到注册中心(注册中心不需要开启
    register-with-eureka: false
    # 是否要从注册中心获取服务(注册中心不需要开启)
    fetch-registry: false
启动 cloud-eureka-server-security

启动成功后,访问 http://localhost:8763/,此时需要登录

cloud-eureka-client注册到有登录认证的注册中心
application 配置文件中需要修改注册中心地址格式
http://${username}:${password}@${hostname}:${port}/eureka/
修改后为:
eureka:
  client:
    service-url:
      defaultZone: http://mmredu:gerry@localhost:8761/eureka/
启动cloud-eureka-client

可以在注册中心界面看到eureka-client已经成功注册
Eureka常用配置
eureka:
  client: #eureka客户端配置
    register-with-eureka: true #是否将自己注册到eureka服务端上去
    fetch-registry: true #是否获取eureka服务端上注册的服务列表
    service-url:
      defaultZone: http://localhost:8001/eureka/ # 指定注册中心地址
    enabled: true # 启用eureka客户端
    registry-fetch-interval-seconds: 30 #定义去eureka服务端获取服务列表的时间间隔
  instance: #eureka客户端实例配置
    lease-renewal-interval-in-seconds: 30 #定义服务多久去注册中心续约
    lease-expiration-duration-in-seconds: 90 #定义服务多久不去续约认为服务失效
    metadata-map:
      zone: chongqing #所在区域
    hostname: localhost #服务主机名称
    prefer-ip-address: false #是否优先使用ip来作为主机名
  server: #eureka服务端配置
    enable-self-preservation: false #关闭eureka服务端的保护机制
Eureka 工作流程
了解完 Eureka 核心概念,自我保护机制,以及集群内的工作原理后,我们来整体梳理一下 Eureka 的工作流程:
1、Eureka Server 启动成功,等待服务端注册。在启动过程中如果配置了集群,集群之间定时通过 Replicate 同步注册表,每个 Eureka Server 都存在独立完整的服务注册表信息
2、Eureka Client 启动时根据配置的 Eureka Server 地址去注册中心注册服务
3、Eureka Client 会每 30s 向 Eureka Server 发送一次心跳请求,证明客户端服务正常
4、当 Eureka Server 90s 内没有收到 Eureka Client 的心跳,注册中心则认为该节点失效,会注销该实例
5、单位时间内 Eureka Server 统计到有大量的 Eureka Client 没有上送心跳,则认为可能为网络异常,进入自我保护机制,不再剔除没有上送心跳的客户端
6、当 Eureka Client 心跳请求恢复正常之后,Eureka Server 自动退出自我保护模式
7、Eureka Client 定时全量或者增量从注册中心获取服务注册表,并且将获取到的信息缓存到本地
8、服务调用时,Eureka Client 会先从本地缓存找寻调取的服务。如果获取不到,先从注册中心刷新注册表,再同步到本地缓存
9、Eureka Client 获取到目标服务器信息,发起服务调用
10、Eureka Client 程序关闭时向 Eureka Server 发送取消请求,Eureka Server 将实例从注册表中删除
这就是Eurka基本工作流程
Eureka停更
https://github.com/Netflix/eureka/wiki
Spring Cloud Eureka服务注册与发现
标签:eve 本机 exp git 服务器 架构 net ever local
原文地址:https://www.cnblogs.com/lm970585581/p/12863696.html
上一篇:python查询文件信息
下一篇:使用python获取当前的时间