Windows Service 服务搭配FluentScheduler实现定时任务调度
2021-01-27 09:16
标签:app 清单 windows orm 资源管理 name object reg ppa 直接运行 使用 若需要直接运行项目来打开窗体安装服务,则需要使用UAC中Administrator的权限。在 重启项目后就可以直接在VS中安装服务了。 以上内容主要转载自 https://www.cnblogs.com/cncc/p/7170951.html 然后做了一些小改动。 关于 重新生成项目->运行->安装服务->运行服务,打开日志文件可以看到定时重新的任务的输出记录。 Windows Service 服务搭配FluentScheduler实现定时任务调度 标签:app 清单 windows orm 资源管理 name object reg ppa 原文地址:https://www.cnblogs.com/cplemom/p/11946047.htmlWindows Service 服务
创建Windows Service 项目
Windows Service项目,并将项目名称改为 TaskWindowService
Service1.cs改为TaskService.cs
protected override void OnStart(string[] args)
{
    LogHelper.Log("服务启动!");
}

protected override void OnStop()
{
    LogHelper.Log("服务停止!");
}
TaskService的设计界面,右键“添加安装程序”serviceInstaller1及serviceProcessInstaller1
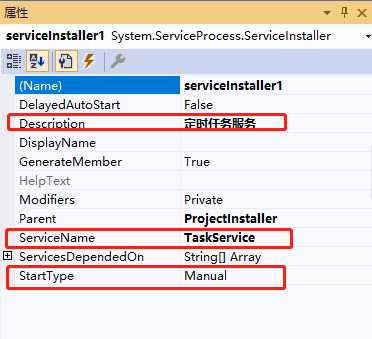
serviceInstaller1,在“属性”窗体将ServiceName改为TaskService,Description改为我的服务,StartType保持为Manual
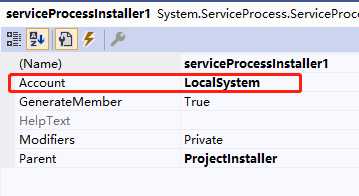
serviceProcessInstaller1,在“属性”窗体将Account改为LocalSystem(服务属性系统级别)
TaskWindowService,在弹出的上下文菜单中选择“生成”按钮,到此WindowService项目搭建完毕创建安装、启动、停止、卸载服务的Windows窗体
Windows Form项目,并命名为WindowsServiceClient
TaskWindowService添加到WindowsServiceClient中,并将其设置为“启动项目”string serviceFilePath = $"{Application.StartupPath}\\TaskWindowsService.exe";
string serviceName = "TaskService";
//事件:安装服务
private void button1_Click(object sender, EventArgs e)
{
if (this.IsServiceExisted(serviceName)) this.UninstallService(serviceName);
this.InstallService(serviceFilePath);
}
//事件:启动服务
private void button2_Click(object sender, EventArgs e)
{
if (this.IsServiceExisted(serviceName)) this.ServiceStart(serviceName);
}
//事件:停止服务
private void button4_Click(object sender, EventArgs e)
{
if (this.IsServiceExisted(serviceName)) this.ServiceStop(serviceName);
}
//事件:卸载服务
private void button3_Click(object sender, EventArgs e)
{
if (this.IsServiceExisted(serviceName))
{
this.ServiceStop(serviceName);
this.UninstallService(serviceFilePath);
}
}
//判断服务是否存在
private bool IsServiceExisted(string serviceName)
{
ServiceController[] services = ServiceController.GetServices();
foreach (ServiceController sc in services)
{
if (sc.ServiceName.ToLower() == serviceName.ToLower())
{
return true;
}
}
return false;
}
//安装服务
private void InstallService(string serviceFilePath)
{
using (AssemblyInstaller installer = new AssemblyInstaller())
{
installer.UseNewContext = true;
installer.Path = serviceFilePath;
IDictionary savedState = new Hashtable();
installer.Install(savedState);
installer.Commit(savedState);
MessageBox.Show("服务安装成功!");
}
}
//卸载服务
private void UninstallService(string serviceFilePath)
{
using (AssemblyInstaller installer = new AssemblyInstaller())
{
installer.UseNewContext = true;
installer.Path = serviceFilePath;
installer.Uninstall(null);
MessageBox.Show("服务卸载成功!");
}
}
//启动服务
private void ServiceStart(string serviceName)
{
using (ServiceController control = new ServiceController(serviceName))
{
if (control.Status == ServiceControllerStatus.Stopped)
{
control.Start();
MessageBox.Show("服务启动成功!");
}
}
}
//停止服务
private void ServiceStop(string serviceName)
{
using (ServiceController control = new ServiceController(serviceName))
{
if (control.Status == ServiceControllerStatus.Running)
{
control.Stop();
MessageBox.Show("服务停止成功!");
}
}
}WindowsServiceClient项目,并点击“安装服务”会报错提示权限不足。
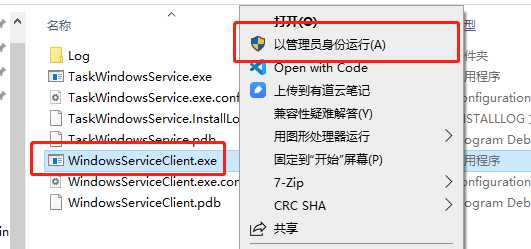
此时可以打开项目的Debug文件夹,找到WindowsServiceClient.exe文件,右键以管理员身份运行。
WIN+R的方式打开运行窗体,并在窗体内输入services.msc后打开服务,可以找到刚刚安装的TaskService。WindowsServiceClient项目中添加“应用程序清单文件”。
打开该文件将asInvoker修改为requireAdministratorFluentScheduler 定时任务
FluentScheduler详细的介绍可以看下github的说明文档,介绍了所有的调用方式 https://github.com/fluentscheduler/FluentScheduler
TaskWindowsService项目中通过nuget添加FluentScheduler包
TaskService中,服务启动的地方注册定时任务protected override void OnStart(string[] args)
{
LogHelper.Log("服务启动!");
//每10秒执行一次任务
var registry = new Registry();
registry.Schedule(() =>
{
LogHelper.Log("服务运行中,执行定时任务!");
}).ToRunEvery(10).Seconds();
JobManager.Initialize(registry);
}
上一篇:C# show Environment property info name and value retrieve, Maximize the Console Window based on wind
文章标题:Windows Service 服务搭配FluentScheduler实现定时任务调度
文章链接:http://soscw.com/essay/47693.html