kubernetes(三)之Docker网络详解
2021-02-11 22:17
标签:--help etc ati adc eth1 ror docker0 tin des 虚拟化常见的网络类型(虚拟桥接式网络) 可以直接访问宿主机ip,得到对应的结果 EXPOSE(docker端口发布): kubernetes(三)之Docker网络详解 标签:--help etc ati adc eth1 ror docker0 tin des 原文地址:https://blog.51cto.com/13812615/2500733虚拟网络类型

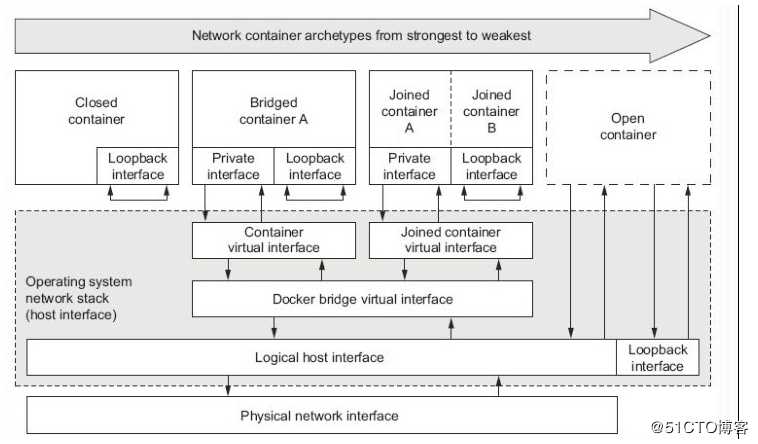
docker四类网络实践
[root@centos7-node1 ~]# docker run --name tinyweb2 -it --rm --network none wanghui122725501/myimg:v0.4 /bin/sh
/ # ifconfig -a
lo Link encap:Local Loopback
          inet addr:127.0.0.1 Mask:255.0.0.0
          UP LOOPBACK RUNNING MTU:65536 Metric:1
          RX packets:0 errors:0 dropped:0 overruns:0 frame:0
          TX packets:0 errors:0 dropped:0 overruns:0 carrier:0
          collisions:0 txqueuelen:1000
          RX bytes:0 (0.0 B) TX bytes:0 (0.0 B)
[root@centos7-node1 ~]# docker run --name tinyweb2  -d --network bridge wanghui122725501/myimg:v0.4
[root@centos7-node1 ~]# docker exec -it tinyweb2    /bin/sh
/ # ifconfig -a
eth0 Link encap:Ethernet HWaddr 02:42:AC:11:00:07
          inet addr:172.17.0.7 Bcast:172.17.255.255 Mask:255.255.0.0
          UP BROADCAST RUNNING MULTICAST MTU:1500 Metric:1
          RX packets:6 errors:0 dropped:0 overruns:0 frame:0
          TX packets:0 errors:0 dropped:0 overruns:0 carrier:0
          collisions:0 txqueuelen:0
          RX bytes:516 (516.0 B) TX bytes:0 (0.0 B)

lo Link encap:Local Loopback
          inet addr:127.0.0.1 Mask:255.0.0.0
          UP LOOPBACK RUNNING MTU:65536 Metric:1
          RX packets:0 errors:0 dropped:0 overruns:0 frame:0
          TX packets:0 errors:0 dropped:0 overruns:0 carrier:0
          collisions:0 txqueuelen:1000
          RX bytes:0 (0.0 B) TX bytes:0 (0.0 B)
[root@centos7-node1 ~]# docker run --name joinedc1 -it --rm --network container:tinyweb2 wanghui122725501/myimg:v0.4 /bin/sh
/ # ifconfig
eth0 Link encap:Ethernet HWaddr 02:42:AC:11:00:07
          inet addr:172.17.0.7 Bcast:172.17.255.255 Mask:255.255.0.0
          UP BROADCAST RUNNING MULTICAST MTU:1500 Metric:1
          RX packets:8 errors:0 dropped:0 overruns:0 frame:0
          TX packets:0 errors:0 dropped:0 overruns:0 carrier:0
          collisions:0 txqueuelen:0
          RX bytes:656 (656.0 B) TX bytes:0 (0.0 B)

lo Link encap:Local Loopback
          inet addr:127.0.0.1 Mask:255.0.0.0
          UP LOOPBACK RUNNING MTU:65536 Metric:1
          RX packets:0 errors:0 dropped:0 overruns:0 frame:0
          TX packets:0 errors:0 dropped:0 overruns:0 carrier:0
          collisions:0 txqueuelen:1000
          RX bytes:0 (0.0 B) TX bytes:0 (0.0 B)
[root@centos7-node1 ~]# docker run --name tintweb3 -it --rm --network host wanghui122725501/myimg:v0.4 /bin/sh
/ # ifconfig
/data/web # /bin/httpd -h /data/web/html/docker其他网络参数
-h或者--hostname
[root@centos7-node1 ~]# docker run --name bbox2 -it --rm --hostname mybbox2.cropy.cn busybox
/ # hostname
mybbox2.cropy.cn
--add-host可以使用多次)[root@centos7-node1 ~]# docker run --name bbox3 -it --rm --add-host bbox3.cropy.cn:172.17.0.10 --add-host gw.cropy.cn:172.17.0.1 busybox
/ # ifconfig
eth0 Link encap:Ethernet HWaddr 02:42:AC:11:00:06
inet addr:172.17.0.6 Bcast:172.17.255.255 Mask:255.255.0.0
UP BROADCAST RUNNING MULTICAST MTU:1500 Metric:1
RX packets:7 errors:0 dropped:0 overruns:0 frame:0
TX packets:0 errors:0 dropped:0 overruns:0 carrier:0
collisions:0 txqueuelen:0
RX bytes:586 (586.0 B) TX bytes:0 (0.0 B)
lo Link encap:Local Loopback
inet addr:127.0.0.1 Mask:255.0.0.0
UP LOOPBACK RUNNING MTU:65536 Metric:1
RX packets:0 errors:0 dropped:0 overruns:0 frame:0
TX packets:0 errors:0 dropped:0 overruns:0 carrier:0
collisions:0 txqueuelen:1000
RX bytes:0 (0.0 B) TX bytes:0 (0.0 B)
/ # cat /etc/hosts
127.0.0.1 localhost
::1 localhost ip6-localhost ip6-loopback
fe00::0 ip6-localnet
ff00::0 ip6-mcastprefix
ff02::1 ip6-allnodes
ff02::2 ip6-allrouters
172.17.0.10 bbox3.cropy.cn
--dns,--dns-search)[root@centos7-node1 ~]# docker run --name bbox3 -it --rm --add-host bbox3.cropy.cn:172.17.0.10 --add-host gw.cropy.cn:172.17.0.1 --dns 172.17.0.1 --dns 114.114.114.114 --dns-search cropy.cn busybox
/ # cat /etc/resolv.conf
search cropy.cn
nameserver 172.17.0.1
nameserver 114.114.114.114端口映射
iptables -t nat -A PREROUTING -d GW_IP -p tcp|udp --dport 10080 -j DNAT --to-destination BE_server_IP:port
-p选项-p选项的使用格式
-p <containerPort> : 将指定的容器端口映射至所在宿主机的任意端口-p <hostPort>:<containerPort>:将容器端口映射至所在宿主机的指定端口 -p <ip>::<containerPort>: 将指定容器的端口映射至所在主机指定IP的动态端口-p <ip>:<hostPort>:<containerPort>: 将指定容器的端口映射至所在主机指定IP的指定端口实例
[root@centos7-node1 ~]# docker run --name mytinyweb3 -d --network bridge -p 80 wanghui122725501/myimg:v0.4    #随机端口映射
[root@centos7-node1 ~]# docker port mytinyweb3    #查看映射详情(iptables -t nat -vnL   这个也可以)
80/tcp -> 0.0.0.0:32768
[root@centos7-node1 ~]# docker kill mytinyweb3 && docker rm mytinyweb3
[root@centos7-node1 ~]# docker run --name mytinyweb3 -d --rm --network bridge -p 80:80 wanghui122725501/myimg:v0.4   #指定端口映射
[root@centos7-node1 ~]# docker run --name mytinyweb3 -d  --network bridge -p 192.168.56.11::80 wanghui122725501/myimg:v0.4
[root@centos7-node1 ~]# docker kill mytinyweb3 && docker rm mytinyweb3
[root@centos7-node1 ~]# docker run --name mytinyweb3 -d  --network bridge -p 192.168.56.11:80:80 wanghui122725501/myimg:v0.4
[root@centos7-node1 ~]# docker kill mytinyweb3 && docker rm mytinyweb3
[root@centos7-node1 ~]# docker run --name mytinyweb3 -d --network bridge -p 80:80 -p 443:443 wanghui122725501/myimg:v0.4   #多端口映射
docker network操作
[root@centos7-node1 ~]# docker network --help
Usage:  docker network COMMAND
Manage networks
Commands:
  connect     Connect a container to a network
  create      Create a network
  disconnect  Disconnect a container from a network
  inspect     Display detailed information on one or more networks
  ls          List networks
  prune       Remove all unused networks
  rm          Remove one or more networks
[root@centos7-node1 ~]# docker info | grep Network    #可以支持创建的网络类型
  Network: bridge host ipvlan macvlan null overlay
[root@centos7-node1 ~]# docker network create --subnet 10.10.0.0/24 mybr0    #创建mybr0 网络
[root@centos7-node1 ~]# docker run --name mytinyweb3 -it --network mybr0 -p 80 -p 443 wanghui122725501/myimg:v0.4 /bin/sh    #创建容器并查看ip
/ # ifconfig
eth0      Link encap:Ethernet  HWaddr 02:42:0A:0A:00:02
          inet addr:10.10.0.2  Bcast:10.10.0.255  Mask:255.255.255.0
          UP BROADCAST RUNNING MULTICAST  MTU:1500  Metric:1
          RX packets:12 errors:0 dropped:0 overruns:0 frame:0
          TX packets:0 errors:0 dropped:0 overruns:0 carrier:0
          collisions:0 txqueuelen:0
          RX bytes:1032 (1.0 KiB)  TX bytes:0 (0.0 B)
[root@centos7-node1 ~]# docker network connect bridge mytinyweb3    #另开终端,将mytinyweb3连入bridge(docker0: 172.17.0.0)网络
/ # ifconfig    #查看网络,发现mytinyweb3 有了两块网卡
eth0      Link encap:Ethernet  HWaddr 02:42:0A:0A:00:02
          inet addr:10.10.0.2  Bcast:10.10.0.255  Mask:255.255.255.0
          UP BROADCAST RUNNING MULTICAST  MTU:1500  Metric:1
          RX packets:8 errors:0 dropped:0 overruns:0 frame:0
          TX packets:0 errors:0 dropped:0 overruns:0 carrier:0
          collisions:0 txqueuelen:0
          RX bytes:656 (656.0 B)  TX bytes:0 (0.0 B)

eth1      Link encap:Ethernet  HWaddr 02:42:AC:11:00:06
          inet addr:172.17.0.6  Bcast:172.17.255.255  Mask:255.255.0.0
          UP BROADCAST RUNNING MULTICAST  MTU:1500  Metric:1
          RX packets:8 errors:0 dropped:0 overruns:0 frame:0
          TX packets:0 errors:0 dropped:0 overruns:0 carrier:0
          collisions:0 txqueuelen:0
          RX bytes:656 (656.0 B)  TX bytes:0 (0.0 B)
[root@centos7-node1 ~]# docker network disconnect bridge mytinyweb3   #去掉mytinyweb3的bridge网卡
[root@centos7-node1 ~]# docker kill mytinyweb3 && docker rm mytinyweb3
[root@centos7-node1 ~]# docker network rm mybr0
[root@centos7-node1 ~]# vim /etc/docker/daemon.json
{
"bip": "172.31.0.1/16",
"registry-mirrors": ["https://0b8hhs68.mirror.aliyuncs.com"],
"storage-driver": "overlay2",
"graph":"/data/docker",
"storage-opts": [
"overlay2.override_kernel_check=true"
]
}
[root@centos7-node1 ~]# systemctl restart docker
[root@centos7-node1 ~]# ifconfig
docker0: flags=4099
上一篇:通过ajax上传文件
下一篇:本地项目上传到gitlab