selenium+python自动化102-登录页面滑动解锁(ActionChains)
2021-03-08 08:32
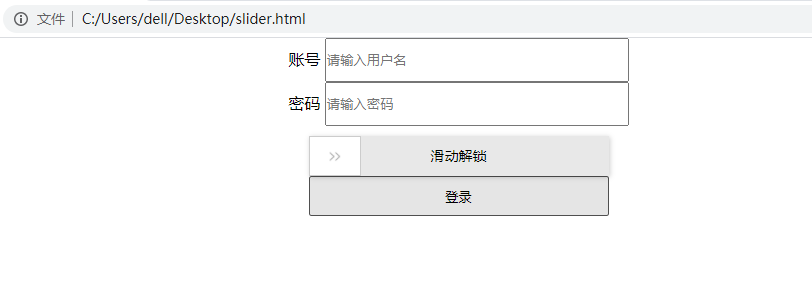
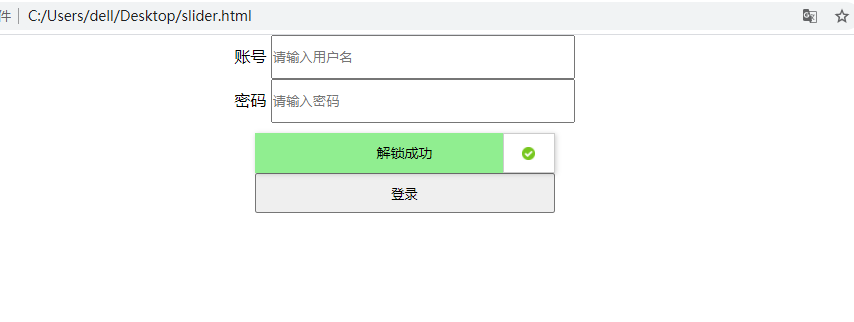
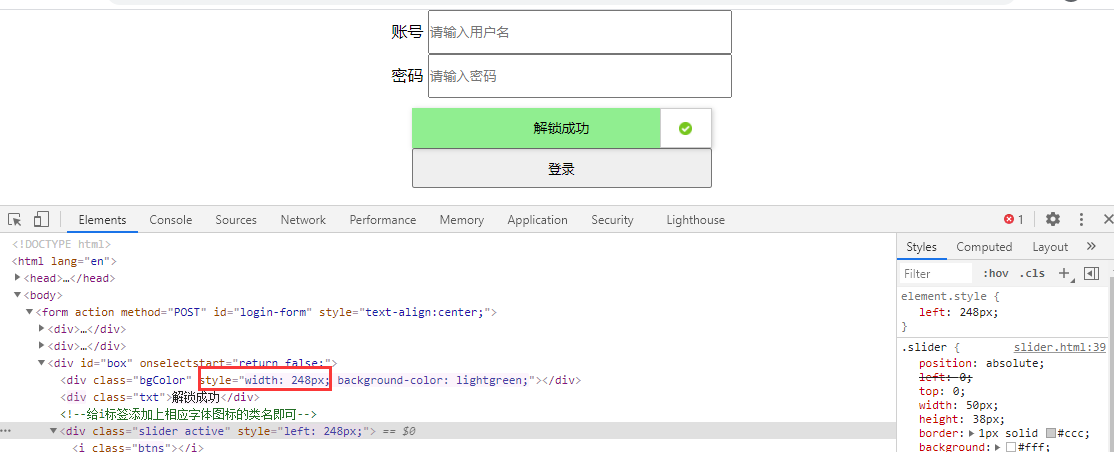
标签:rgs double 滑动 orm hid ase remote 就是 暂停 登录页面会遇到滑动解锁,滑动解锁的目的就是为了防止别人用代码登录(也就是为了防止你自动化登录),有些滑动解锁是需要去拼图这种会难一点。 看下图,是我本地写的一个 slider.html 网页 除了输入账号和密码,还需将滑块拖动到最右端才能解锁 最后才去点登陆按钮 查看 ActionChains 使用源码,相关介绍 使用上有2种实例,一种可用于链模式 另外一种方式操作可以一个接一个排队,然后执行 不管是哪种方式,动作都是按照调用的顺序执行的,一个接一个另一个。 selenium 里面滑动滑块需用到鼠标事件,回放下刚才操作的慢动作:按住 >> 按钮 -> 往右移动鼠标到最右端 -> 释放鼠标 -> 解锁成功 具体拖动多少像素,可以拖动鼠标后看偏移量,如下图 248px ActionChains 相关源码和使用说明 selenium+python自动化102-登录页面滑动解锁(ActionChains) 标签:rgs double 滑动 orm hid ase remote 就是 暂停 原文地址:https://www.cnblogs.com/yoyoketang/p/14204078.html前言
有些直接拖到最最右侧就可以了,本篇讲下使用 selenium web 自动化的时候如何滑动解锁。滑动解锁场景


ActionChains 滑动滑块
ActionChains是一种自动化低级交互的方法,比如鼠标移动、鼠标按钮操作、按键和上下文菜单交互。这对于执行更复杂的操作(如悬停和拖放)非常有用
在调用ActionChains对象上的操作方法时,这些操作存储在ActionChains对象的队列中。调用perform()时,事件将按其顺序激发排队等候。menu = driver.find_element_by_css_selector(".nav")
hidden_submenu = driver.find_element_by_css_selector(".nav #submenu1")
ActionChains(driver).move_to_element(menu).click(hidden_submenu).perform()
menu = driver.find_element_by_css_selector(".nav")
hidden_submenu = driver.find_element_by_css_selector(".nav #submenu1")
actions = ActionChains(driver)
actions.move_to_element(menu)
actions.click(hidden_submenu)
actions.perform()
实现代码
于是会用到click_and_hold move_by_offset release 这三个方法,最后用 perform() 执行from selenium import webdriver
from selenium.webdriver import ActionChains
driver = webdriver.Chrome()
driver.get("file:///C:/Users/dell/Desktop/slider.html")
driver.maximize_window()
driver.find_element_by_id(‘id_username‘).send_keys("yoyo")
driver.find_element_by_id(‘id_password‘).send_keys("123456")
slider = driver.find_element_by_class_name("slider")
# 滑块解锁
action = ActionChains(driver)
action.click_and_hold(slider) # 按住
action.move_by_offset(248, 0) # 往右偏移248个像素
action.release() # 释放鼠标
action.perform() # 执行
# 点登陆按钮
# driver.find_element_by_xpath(‘//*[@type="submit"]‘).click()

ActionChains 相关源码
class ActionChains(object):
"""
一种方式操作可以一个接一个排队,然后执行
menu = driver.find_element_by_css_selector(".nav")
hidden_submenu = driver.find_element_by_css_selector(".nav #submenu1")

ActionChains(driver).move_to_element(menu).click(hidden_submenu).perform()
另外一种方式操作可以一个接一个排队,然后执行
menu = driver.find_element_by_css_selector(".nav")
hidden_submenu = driver.find_element_by_css_selector(".nav #submenu1")

actions = ActionChains(driver)
actions.move_to_element(menu)
actions.click(hidden_submenu)
actions.perform()
不管是哪种方式,动作都是按照调用的顺序执行的,一个接一个另一个。
"""
def __init__(self, driver):
def perform(self):
"""
执行所有的动作,放到最后
"""
def reset_actions(self):
"""
Clears actions that are already stored locally and on the remote end
"""
def click(self, on_element=None):
"""
点击元素
:Args:
- on_element: The element to click.
If None, clicks on current mouse position.
"""
def click_and_hold(self, on_element=None):
"""
按住鼠标左键
:Args:
- on_element: The element to mouse down.
If None, clicks on current mouse position.
"""
def context_click(self, on_element=None):
"""
点击鼠标右键
:Args:
- on_element: The element to context-click.
If None, clicks on current mouse position.
"""
def double_click(self, on_element=None):
"""
双击鼠标
:Args:
- on_element: The element to double-click.
If None, clicks on current mouse position.
"""
def drag_and_drop(self, source, target):
"""
按住鼠标左键在元素source上,然后拖动元素target位置并释放鼠标
:Args:
- source: The element to mouse down.
- target: The element to mouse up.
"""
def drag_and_drop_by_offset(self, source, xoffset, yoffset):
"""
在source元素上按住鼠标左键,然后移动到目标偏移(相对source元素的偏移)并释放鼠标按钮
:Args:
- source: The element to mouse down.
- xoffset: X offset to move to.
- yoffset: Y offset to move to.
"""
def key_down(self, value, element=None):
"""
同时按住几个键不释放,只能与修改键(Control、Alt和Shift)一起使用
:Args:
- value: The modifier key to send. Values are defined in `Keys` class.
- element: The element to send keys.
If None, sends a key to current focused element.
Example, pressing ctrl+c::
ActionChains(driver).key_down(Keys.CONTROL).send_keys(‘c‘).key_up(Keys.CONTROL).perform()
"""
def key_up(self, value, element=None):
"""
释放按住的键,跟上面一个相对应
:Args:
- value: The modifier key to send. Values are defined in Keys class.
- element: The element to send keys.
If None, sends a key to current focused element.
Example, pressing ctrl+c::
ActionChains(driver).key_down(Keys.CONTROL).send_keys(‘c‘).key_up(Keys.CONTROL).perform()
"""
def move_by_offset(self, xoffset, yoffset):
"""
将鼠标移动到距当前鼠标位置的偏移位置。
:Args:
- xoffset: X offset to move to, as a positive or negative integer.
- yoffset: Y offset to move to, as a positive or negative integer.
"""
def move_to_element(self, to_element):
"""
将鼠标移到元素的中间
:Args:
- to_element: The WebElement to move to.
"""
def move_to_element_with_offset(self, to_element, xoffset, yoffset):
"""
按指定元素的偏移量移动鼠标。偏移相对于元素的左上角。
:Args:
- to_element: The WebElement to move to.
- xoffset: X offset to move to.
- yoffset: Y offset to move to.
"""
def pause(self, seconds):
""" 在指定的持续时间内暂停所有输入(以秒为单位)"""
def release(self, on_element=None):
"""
在元素上释放按住的鼠标按钮。
:Args:
- on_element: The element to mouse up.
If None, releases on current mouse position.
"""
def send_keys(self, *keys_to_send):
"""
将键发送到当前聚焦元素。
:Args:
- keys_to_send: The keys to send. Modifier keys constants can be found in the
‘Keys‘ class.
"""
def send_keys_to_element(self, element, *keys_to_send):
"""
向元素发送键。
:Args:
- element: The element to send keys.
- keys_to_send: The keys to send. Modifier keys constants can be found in the
‘Keys‘ class.
"""
文章标题:selenium+python自动化102-登录页面滑动解锁(ActionChains)
文章链接:http://soscw.com/essay/61736.html