ZooKeeper安装及配置(Windows系统下)
2021-04-02 15:24
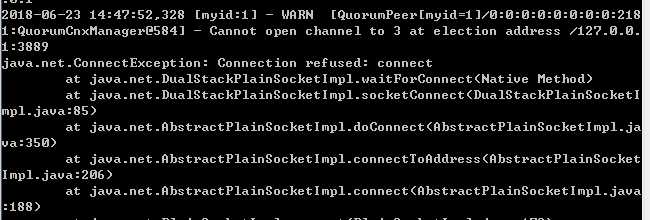
标签:print 初始 develop 一个 dex ibm direct tail 作用 ZooKeeper的定义用一句话就能说清:分布式服务框架 Zookeeper -- 管理分布式环境中的数据。下面从安装开始,对这个框架进行分析。 1. 官网下载压缩包并解压到D:\Program Files (x86)\zookeeper-3.4.12 2. 在D:\Program Files (x86)\zookeeper-3.4.12目录下新建data和log文件夹 3. 复制conf目录下zoo_sample.cfg文件到同目录下,重命名为zoo.cfg(Zookeeper 在启动时会找这个文件作为默认配置文件),修改其中的 dataDir 和 dataLogDir 上面新建目录的路径 4. 启动测试一下 服务端启动 启动之后,端口查看可以看到ZooKeeper通过2181端口启动了一个java服务 启动客户端连接一下,成功 目前配置文件zoo.cfg中的内容如下 单机模式下,主要配置项作用: ZooKeeper的安装模式分为三种,分别为:单机模式(stand-alone)、集群模式和集群伪分布模式。上面演示的即单机模式;通过多台机器共同提供服务即为集群模式;一台电脑的话其实还可以进行伪集群模式,即在一台物理机上运行多个 Zookeeper 实例。 集群模式是通过增加配置文件zoo.cfg中的配置项来设置,主要配置项如下: 除了修改 zoo.cfg 配置文件,集群模式下还要配置一个文件 myid,这个文件在 dataDir 目录下,这个文件里面就有一个数据就是 A 的值,Zookeeper 启动时会读取这个文件,拿到里面的数据与 zoo.cfg 里面的配置信息比较从而判断到底是哪个 server。 单机伪集群模式配置步骤如下: conf目录下复制三次zoo.cfg到同目录下,分别命名zoo1.cfg,zoo2.cfg,zoo3.cfg,对三个文件进行如下修改 zoo1.cfg zoo2.cfg zoo3.cfg 相对应的,需要在各自dataDir下创建myid文件(无后缀名),内容分别为1,2,3,表示其为第几号服务器。 bin目录下复制三次zkServer.cmd到同目录下,分别命名zkServer1.cmd,zkServer2.cmd,zkServer3.cmd,对三个文件进行如下修改 zkServer1.cmd zkServer2.cmd zkServer3.cmd cmd下启动三个zkServer,在这里我是打开三个cmd窗口启动的,顺序1-2-3,三个zkServer没全启动的时候会报如下错误,这是zookeeper的Leader选举算法的异常信息,当节点没有启动完毕的时候,Leader无法正常进行工作,这种错误信息是可以忽略的,等其他节点启动之后就正常了。 三个端口全部启动 创建ZooKeeper实例时,如果有多个连接,则使用逗号隔开。 参考:https://blog.csdn.net/qiunian144084/article/details/79192819 https://www.ibm.com/developerworks/cn/opensource/os-cn-zookeeper/ ZooKeeper安装及配置(Windows系统下) 标签:print 初始 develop 一个 dex ibm direct tail 作用 原文地址:https://www.cnblogs.com/zjfjava/p/9215374.html1.安装


2. ZooKeeper配置文件
# The number of milliseconds of each tick
tickTime=2000
# The number of ticks that the initial
# synchronization phase can take
initLimit=10
# The number of ticks that can pass between
# sending a request and getting an acknowledgement
syncLimit=5
# the directory where the snapshot is stored.
# do not use /tmp for storage, /tmp here is just
# example sakes.
dataDir=D:\\Program Files (x86)\\zookeeper-3.4.12\\data
dataLogDir=D:\\Program Files (x86)\\zookeeper-3.4.12\\log
# the port at which the clients will connect
clientPort=2181
# the maximum number of client connections.
# increase this if you need to handle more clients
#maxClientCnxns=60
#
# Be sure to read the maintenance section of the
# administrator guide before turning on autopurge.
#
# http://zookeeper.apache.org/doc/current/zookeeperAdmin.html#sc_maintenance
#
# The number of snapshots to retain in dataDir
#autopurge.snapRetainCount=3
# Purge task interval in hours
# Set to "0" to disable auto purge feature
#autopurge.purgeInterval=1
3. 集群模式
initLimit=10
syncLimit=5
server.1=192.168.211.1:2888:3888
server.2=192.168.211.2:2888:3888
3.1 配置文件修改


3.2 修改服务端启动配置


3.3 启动服务


4. java连接测试
import org.apache.zookeeper.WatchedEvent;
import org.apache.zookeeper.Watcher;

public class WatcherTest implements Watcher{
    public void process(WatchedEvent arg0){
        System.out.println("========================");
        System.out.println("path:"+arg0.getPath());
        System.out.println("type:"+arg0.getType());
        System.out.println("state:"+arg0.getState());
    }
}
import java.io.IOException;

import org.apache.zookeeper.CreateMode;
import org.apache.zookeeper.KeeperException;
import org.apache.zookeeper.ZooDefs;
import org.apache.zookeeper.ZooKeeper;
import org.apache.zookeeper.data.Stat;

import com.zang.WatcherTest;

public class App
{

    public static void main( String[] args ) throws IOException, KeeperException, InterruptedException {
        //创建一个Zookeeper实例,第一个参数为目标服务器地址和端口,第二个参数为Session超时时间,第三个为节点变化时的回调方法
       ZooKeeper zk = new ZooKeeper("127.0.0.1:2181,127.0.0.1:2182,127.0.0.1:2183", 30000, new WatcherTest());

       String node = "/node2";
       Stat stat = zk.exists(node, false);
       if(null == stat){
           //创建一个节点,数据为test,不进行ACL权限控制,节点为永久性的
           String createResult = zk.create(node, "test".getBytes(), ZooDefs.Ids.OPEN_ACL_UNSAFE, CreateMode.PERSISTENT);
           System.out.println(createResult);
       }

       //取得/node2/test节点下的数据,返回byte[]
       byte[] b = zk.getData(node, false, stat);
       System.out.println(new String(b));
       zk.close();
    }
}