python基础-面向对象进阶
2021-04-08 10:25
标签:知识 none 析构函数 设置 适用于 经典 讲解 icm 出版社 在这里我们和大家说一下,推荐几本python的好书。 我们先看一下下面的三个例子,来体验一下super的应用。 我们通过上面的三个例子以及结合我们学习的理论知识,我们可以得出如下的结果,熟记于心: 1.输出的结果的过程刚好为寻找函数的反向(逆向)过程。 2.super和父类其实并没有什么关系,这个是我们一直会弄错的一个问题。 3.super是按照mro()函数的顺序来寻找当前类的下一个类的。 4.在python3中是不需要传入参数,自动就带我们寻找当前类的mro顺序的下一类中的同名方法。 5.在python2中的新式类中需要主动传入参数super(子类的名字,子类的对象).函数名()。在python2的经典类并不支持使用super()来找下一个类。 6.这样才能帮我们调用到子类的mro顺序的下一个类的同名方法。 7.在D类中找super的func,那么可以这样写super().func()。也可以这样写super(D,self).func()(注意:并且在python2的新式类中必须这样写) 8.在单继承的程序中,super就是找父类,寻找当前类的父类的同名方法。 我们直接在这里提出来property装饰器的用法------把一个方法伪装成一个属性,在调用这个方法的时候不需要加括号(),就可以直接得到返回值。装饰器的作用是把这个方法伪装成一个属性使用,直接和普通属性一样操作即可。 我们先体验一下property装饰器的应用: 例子1: 例子2: 例子3:和私有的属性合作的,可以查,但是不能改。 下面我们来讲一下property的进阶。 先看一下下面这个例子: 这个例子的分析结果如下所示: | 我们再看一个例子: | 在讲解@classmethod装饰器之前,我们先直接给出@classmethod这个装饰器的作用------通过@classmethod装饰器被装饰的方法会成为类方法。 我们来看一下下面这个例子: 在这里我们总结一下@classmethod装饰器的用法。 1.什么时候我们会用到@classmethod的方法呢? 1)定义了一个方法,默认传入的是self,但是这个self没有被使用到。 2)并且你在这个方法里面用到了当前的类名,或者你准备使用这个类的内存空间中的名字的时候。 2.@classmethod 把一个对象绑定的方法,修改为一个类方法。 1)在这个类方法中,我们仍然可以引用类中的静态变量。 2)可以不用实例化对象,就直接用类名在外部调用这个方法即可。 3.类方法可以通过类名调用,类方法也可以通过对象名调用。 我们用@classmethod装饰来做一个例子: @staticmethod 被装饰的方法会成为一个静态方法。 我们使用一下@staticmethod装饰器来做一个例子, 总结:能定义到类中的内容 python面向对象中的反射:通过字符串的形式操作对象相关的属性。python中的一切事物都是对象(都可以使用反射)。 用字符串数据类型的名字,来操作这个名字对应的函数\实例变量\绑定方法\各种方法\ 四个可以实现自省的函数 下列方法适用于类和对象(一切皆对象,类本身也是一个对象) 2.反射:模块中的所有变量。被导入的模块,当前执行的python文件--脚本 导入其他模块,利用反射查找该模块是否存在某个方法 对象后面加括号,出发执行。 注:构造方法的执行是由创建对象触发的,即:对象=类名();而对于 什么时候执行 为什么要有,用来做什么的? 创建一个对象需要的空间的 单例模式(用 在这里我们总结一下:在实例化的时候总是先调用 单例模式: 改变对象的字符串显示 自定制格式化字符串 注:此方法一般无须定义,因为Python是一门高级语言,程序员在使用时无需关心内存的分配和释放,因为此工作都是交给Python解释器来执行,所以,析构函数的调用是由解释器在进行垃圾回收时自动触发执行的。 python基础-面向对象进阶 标签:知识 none 析构函数 设置 适用于 经典 讲解 icm 出版社 原文地址:https://www.cnblogs.com/stu-zhouqian/p/13377250.htmlpython基础--面向对象
(1)super的应用
# 这里的A类是默认继承的是object类
class A(object):
def func(self):
super().func()
print(‘A‘)
class B(A):
def func(self):
super().func()
print(‘B‘)
class C(B):
def func(self):
super().func()
print(‘C‘)
print(C.mro())
# 输出的结果为:[class A(object):
def func(self):
print(‘A‘)
class B(A):
def func(self):
# A.func(self)
super().func()
print(‘B‘)
class C(B):
def func(self):
# B.func(self)
super().func()
print(‘C‘)
C().func()
‘‘‘
在这个例子中:super().func()和类.函数名(self)是一样的作用,上面两种方法输出的结果是一样的,在实际的工作中,两个方法都可以用。
输出的结果为
A
B
C
‘‘‘
class A:
    def func(self):
        print(‘a‘)

class B(A):
    def func(self):
        super().func()
        print(‘b‘)
class C(A):
    def func(self):
        super().func()
        print(‘c‘)
class D(B,C):
    def func(self):
        # super()的参数是不用写的,默认会传入当前类和当前类的对象这两个参数
        # super(D,self) 第一个参数是当前类,第二个参数是self。在python2中不传参数会报错,python3中不会报错。
        # 在python2经典类中没有super,因为没有mro顺序。
        super().func()
        print(‘d‘)
D().func()
‘‘‘
输出的结果为:
a
c
b
d
‘‘‘
(2)@property装饰器
# property
from math import pi


class Circle:
    def __init__(self, r):
        self.r = r

    @property  # 把一个方法伪装成一个属性,在调用这个方法的时候不需要加括号(),就可以直接得到返回值
    # @property装饰器的作用是把这个方法伪装成一个属性使用,直接和普通属性一样操作即可。
    def area(self):
        return pi * self.r ** 2


c1 = Circle(5)
print(c1.r)

# print(c1.area())
# 如果写了@property属性的时候那么c1.area()后面你的括号就不用加了,直接写成c1.area就好了
# 下面就是不用加上括号了。如果加了括号会报错。
# 报错信息为:TypeError: ‘float‘ object is not callable
print(c1.area)


# 变量的属性和方法
# 属性:圆形的半径\圆形的面积  (半径和面积一听就是一个名词)----属性
# 方法:登录 注册 (登录和注册一听就是一个有动作的词,动词)----方法
import time


class Person:
    def __init__(self, name, birthday):
        self.name = name
        self.birthday = birthday

    @property  # 把一个方法伪装成一个属性,在调用这个方法的时候不需要加括号(),就可以直接得到返回值
    # 装饰的这个方法不能有参数,有参数这个方法就会报错。
    # 这里是当做属性。对属性的操作我们有带参数吗?
    def age(self):
        return time.localtime().tm_year - self.birthday


people1 = Person(‘zhouqian‘, 1998)
print(people1.age)
# property第二个应用场景:和私有的属性合作的,可以查,但是不能改
class User:
    def __init__(self, usr, pwd):
        self.user = usr
        self.__pwd = pwd

    @property
    def pwd(self):
        return self.__pwd

alex = User(‘alex‘,‘dasdas‘)
# print(alex.pwd())
print(alex.pwd)  # dasdas
# 这里是不能改的
alex.pwd = 13454 # AttributeError: can‘t set attribute

‘‘‘
# print(alex.pwd)   dasdas
# print(alex.__pwd)   ‘User‘ object has no attribute ‘__pwd‘
# print(alex._User__pwd)   dasdas
# alex.pwd = 1234   AttributeError: can‘t set attribute
# print(alex.__dict__)   {‘user‘: ‘alex‘, ‘_User__pwd‘: ‘dasdas‘}
‘‘‘
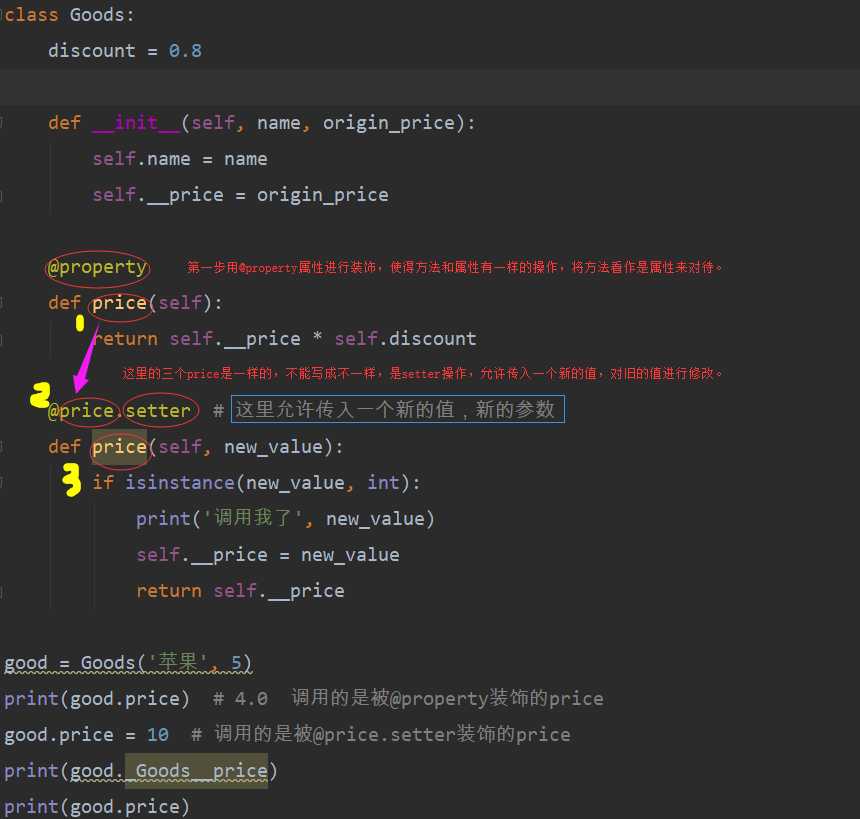
class Goods:
    discount = 0.8

    def __init__(self, name, origin_price):
        self.name = name
        self.__price = origin_price

    @property
    def price(self):
        return self.__price * self.discount

    @price.setter  # 这里允许传入一个新的值,新的参数
    def price(self, new_value):
        if isinstance(new_value, int):
            print(‘调用我了‘, new_value)
            self.__price = new_value
            return self.__price

good = Goods(‘苹果‘, 5)
print(good.price)  # 4.0  调用的是被@property装饰的price
good.price = 10  # 调用的是被@price.setter装饰的price
print(good._Goods__price)
print(good.price)
‘‘‘
输出的结果为:
4.0
调用我了 10
10
8.0
‘‘‘
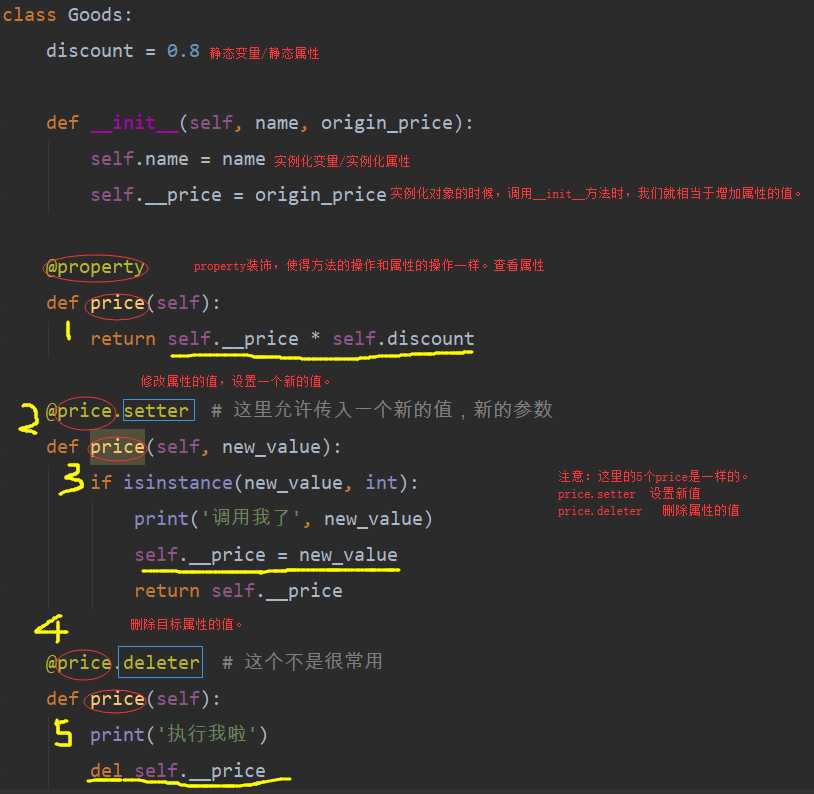
 |
|# class Goods:
# discount = 0.8
#
# def __init__(self, name, origin_price):
# self.name = name
# self.__price = origin_price
#
# @property
# def price(self):
# return self.__price * self.discount
#
# @price.setter # 这里允许传入一个新的值,新的参数
# def price(self, new_value):
# if isinstance(new_value, int):
# print(‘调用我了‘, new_value)
# self.__price = new_value
# return self.__price
#
# @price.deleter # 这个不是很常用
# def price(self):
# print(‘执行我啦‘)
# del self.__price
#
#
# apple = Goods(‘apple‘, 5)
# # del apple.name
# # del apple.price # AttributeError: can‘t delete attribute
#
# del apple.price # 并不能真的删除什么,只是调用对应的被@price.deleter装饰的方法而已。只有用到方法中的del self.__price,才可以做到真正的删除
# print(apple.__dict__)
# print(apple.price) # AttributeError: ‘Goods‘ object has no attribute ‘_Goods__price‘
 |
|(3)@classmethod装饰器
class Goods:
__discont = 0.8
def __init__(self):
self.__price = 5
self.price = self.__price * self.__discont
@classmethod # 把一个对象绑定的方法,修改为一个 类方法
def change_discount(cls, new_discount):
print(cls, Goods) # import time
class Date:
def __init__(self, year, month, day):
self.year = year
self.month = month
self.day = day
@classmethod
def today(cls):
tm = time.localtime()
# self.year = tm.tm_year
# self.month = tm.tm_mon
# self.day = tm.tm_mday
# return默认返回的就是一个元组的类型
# return self.year, self.month, self.day
# 实例化的工作不在某一个方法里做,而是调用某个方法的时候在做。这里出现了使用类名的情况。所以我们
# 加上 @classmethod作为方法的装饰器
data = cls(tm.tm_year, tm.tm_mon, tm.tm_mday)
return data
# data = Date(2012, 2, 2)
# print(data.today()) # (2020, 7, 11)以元组的形式返回。
# print(getattr(data, ‘year‘), getattr(data, ‘month‘), getattr(data, ‘day‘))
# 下面获取到的是date的对象
date = Date.today()
print(date.year, date.month, date.day) # 2020 7 11
import time


class Date:
    def __init__(self, year, month, day):
        self.year = year
        self.month = month
        self.day = day

    def today(self):
        tm = time.localtime()
        # self.year = tm.tm_year
        # self.month = tm.tm_mon
        # self.day = tm.tm_mday
        # return默认返回的就是一个元组的类型
        # return self.year, self.month, self.day
        data = Date(tm.tm_year, tm.tm_mon, tm.tm_mday)
        return data
#
#
# # data = Date(2012, 2, 2)
# # print(data.today())  # (2020, 7, 11)以元组的形式返回。
# # print(getattr(data, ‘year‘), getattr(data, ‘month‘), getattr(data, ‘day‘))
#
# # 下面获取到的是date的对象
date = Date.today(111)
print(date.year, date.month, date.day)  # 2020 7 11
(4)@staticmethod装饰器
# def login():
#     print(‘login logical‘)
# class User:
#     pass
#
#     @staticmethod
#     def login():  # 本身是一个普通的函数,被移动到类的内部执行,那么直接给这个函数添加@staticmethod装饰器就可以了
#         print(‘login logical‘)
#
# User.login()
class User:
    pass

    @staticmethod
    def login(a, b):  # 本身是一个普通的函数,被移动到类的内部执行,那么直接给这个函数添加@staticmethod装饰器就可以了
        print(‘login logical ‘, a, b)
        # 在函数内部既不会用到self变量,也不会用到cls类。xxx类名
        # 帮助我们把一个普通函数移动到类中类直接使用的,被移动到类的内部直接执行的,制造静态方法。

# 既可以用类名调用也可以用对象进行调用
User.login(1, 2)  # login logical  1 2
user = User()
user.login(3, 4)  # login logical  3 4
class A:
    country = ‘China‘

    def func(self):
        print(self.__dict__)

    @classmethod
    def class_func(cls):
        print(cls.country)

    @staticmethod
    def static_func():
        print(‘普通函数‘)

    @property
    def name(self):
        return ‘zhouqian‘
(5)总结一下
(6)isinstance和issubclass
class Foo(object):
    pass
obj = Foo()
isinstance(obj,Foo)
print(isinstance(obj,Foo)) # true
class Foo(object):
    pass

class Bar(Foo):
    pass

issubclass(Bar,Foo)
print(issubclass(Bar, Foo)) # true
(7)反射
def hasattr(*args, **kwargs): # real signature unknown
    """
    Return whether the object has an attribute with the given name.

    This is done by calling getattr(obj, name) and catching AttributeError.
    """
    pass
def getattr(object, name, default=None): # known special case of getattr
    """
    getattr(object, name[, default]) -> value

    Get a named attribute from an object; getattr(x, ‘y‘) is equivalent to x.y.
    When a default argument is given, it is returned when the attribute doesn‘t
    exist; without it, an exception is raised in that case.
    """
    pass
def setattr(x, y, v): # real signature unknown; restored from __doc__
    """
    Sets the named attribute on the given object to the specified value.

    setattr(x, ‘y‘, v) is equivalent to ``x.y = v‘‘
    """
    pass
def delattr(x, y): # real signature unknown; restored from __doc__
    """
    Deletes the named attribute from the given object.

    delattr(x, ‘y‘) is equivalent to ``del x.y‘‘
    """
    pass
class Foo:
    f = ‘类的静态变量‘
    def __init__(self,name,age):
        self.name=name
        self.age=age

    def say_hi(self):
        print(‘hi,%s‘%self.name)

obj=Foo(‘egon‘,73)

#检测是否含有某属性、方法
print(hasattr(obj,‘name‘))
print(hasattr(obj,‘say_hi‘))

#获取属性、方法
n=getattr(obj,‘name‘)
print(n)
func=getattr(obj,‘say_hi‘)
func()

print(getattr(obj,‘aaaaaaaa‘,‘不存在啊‘)) #报错

#设置属性
setattr(obj,‘sb‘,True)
setattr(obj,‘show_name‘,lambda self:self.name+‘sb‘)
print(obj.__dict__)
print(obj.show_name(obj))

#删除属性
delattr(obj,‘age‘)
delattr(obj,‘show_name‘)
delattr(obj,‘show_name111‘)#不存在,则报错

print(obj.__dict__)
class Foo(object):

    staticField = "old boy"

    def __init__(self):
        self.name = ‘wupeiqi‘

    def func(self):
        return ‘func‘

    @staticmethod
    def bar():
        return ‘bar‘

print(getattr(Foo, ‘staticField‘))
print(getattr(Foo, ‘func‘))
print(getattr(Foo, ‘bar‘))
#!/usr/bin/env python
# -*- coding:utf-8 -*-

import sys


def s1():
    print ‘s1‘


def s2():
    print ‘s2‘


this_module = sys.modules[__name__]

hasattr(this_module, ‘s1‘)
getattr(this_module, ‘s2‘)
#!/usr/bin/env python
# -*- coding:utf-8 -*-

def test():
    print(‘from the test‘)
#!/usr/bin/env python
# -*- coding:utf-8 -*-

"""
程序目录:
    module_test.py
    index.py

当前文件:
    index.py
"""

import module_test as obj

#obj.test()

print(hasattr(obj,‘test‘))

getattr(obj,‘test‘)()
(8)
__call__和__len__的使用__call__-----callable:能不能在这个对象加上括号能不能运行,对象()能不能运行就是callable判断的事儿。__call__方法的执行是由对象后加括号触发的。即对象()或者类()()class A:
pass
obj = A()
print(callable(obj)) # False
class A:
def __call__(self, *args, **kwargs):
print(‘_____‘)
obj = A()
print(callable(obj)) # True
obj() # _____ 实例化对象+(),执行的是类里面的__call__方法(函数)下面的逻辑
class Foo:
def __init__(self):
pass
def __call__(self, *args, **kwargs):
print(‘__call__‘)
obj = Foo() # 执行 __init__
obj() # 执行 __call__
__len__ : len(对象) 需要实现这个类中的__len__方法class A:
def __init__(self):
self.a = 1
self.b = 2
def __len__(self):
return len(self.__dict__)
a = A()
print(len(a))
class Cls:
def __init__(self, name):
self.name = name
self.studets = []
py22 = Cls(‘py22‘)
py22.studets.append(‘zhouqian‘)
py22.studets.append(‘zhouQian‘)
py22.studets.append(‘ZhouQian‘)
print(len(py22.studets)) # 3
class Cls:
def __init__(self, name):
self.name = name
self.studets = []
def __len__(self):
return len(self.studets)
py22 = Cls(‘py22‘)
py22.studets.append(‘zhouqian‘)
py22.studets.append(‘zhouQian‘)
py22.studets.append(‘ZhouQian‘)
print(Cls.__len__(py22), len(py22))
# 如果类中有__len__函数的时候,我们统计长度的时候只要len(对象),这是一个内置的函数
(9)
__new__、__init__、__str__和__repr__使用__new__:__new__实现单例模式)class A:
def __new__(cls, *args, **kwargs):
super().__new__(cls)
print(‘执行new‘)
def __init__(self):
print(‘执行init‘)
A()
‘‘‘
输出的结果为:
执行new
‘‘‘
# class A:
#     def __new__(cls, *args, **kwargs):   # 构造方法
#         print(‘执行new‘)
#         return super().__new__(cls)
#
#
#     def __init__(self):
#         print(‘执行init‘)
#
# A()
‘‘‘
输出的结果为:
执行new
执行init
‘‘‘
__new__和__init__之间的关系:
实例化的时候,我们都是先创建一块内存空间,有一个指向能够指向类的指针(类指针)------这个过程有__new__来实现的。调用__init__方法,将self与属性绑定在一起,也就是将对象和属性绑定在一起。__new__方法--》》然后在调用__init__方法。class A:
# 这里的确是创建了一个对象的一块内存空间出来
def __new__(cls, *args, **kwargs): # 构造方法
o = super().__new__(cls)
# o = object.__new__(cls) 这两个是一样的写法
print(‘执行new‘, o)
return o
# 将返回的内存空间的结果给了self。所以__new__和__init__所指向的是同一个,内存空间也是同一个。
def __init__(self):
print(‘执行init‘, self)
A()
‘‘‘
输出的结果为:
执行new <__main__.a object at>
执行init <__main__.a object at>
‘‘‘
class Singleton:
    def __new__(cls, *args, **kw):
        if not hasattr(cls, ‘_instance‘):
            cls._instance = object.__new__(cls)
        return cls._instance

one = Singleton()
two = Singleton()

two.a = 3
print(one.a)
# 3
# one和two完全相同,可以用id(), ==, is检测
print(id(one))
# 29097904
print(id(two))
# 29097904
print(one == two)
# True
print(one is two)
__str__和__repr____str__,__repr____format__#_*_coding:utf-8_*_
format_dict={
‘nat‘:‘{obj.name}-{obj.addr}-{obj.type}‘,#学校名-学校地址-学校类型
‘tna‘:‘{obj.type}:{obj.name}:{obj.addr}‘,#学校类型:学校名:学校地址
‘tan‘:‘{obj.type}/{obj.addr}/{obj.name}‘,#学校类型/学校地址/学校名
}
class School:
def __init__(self,name,addr,type):
self.name=name
self.addr=addr
self.type=type
def __repr__(self):
return ‘School(%s,%s)‘ %(self.name,self.addr)
def __str__(self):
return ‘(%s,%s)‘ %(self.name,self.addr)
def __format__(self, format_spec):
# if format_spec
if not format_spec or format_spec not in format_dict:
format_spec=‘nat‘
fmt=format_dict[format_spec]
return fmt.format(obj=self)
s1=School(‘oldboy1‘,‘北京‘,‘私立‘)
print(‘from repr: ‘,repr(s1))
print(‘from str: ‘,str(s1))
print(s1)
‘‘‘
str函数或者print函数--->obj.__str__()
repr或者交互式解释器--->obj.__repr__()
如果__str__没有被定义,那么就会使用__repr__来代替输出
注意:这俩方法的返回值必须是字符串,否则抛出异常
‘‘‘
print(format(s1,‘nat‘))
print(format(s1,‘tna‘))
print(format(s1,‘tan‘))
print(format(s1,‘asfdasdffd‘))
class B:

     def __str__(self):
         return ‘str : class B‘

     def __repr__(self):
         return ‘repr : class B‘


b=B()
print(‘%s‘%b)
print(‘%r‘%b)
# 以下两个方法都是帮助我们在打印字符串的时候看到更加直观的效果,而不是一串内存地址
# __str__:在打印一个对象的时候,调用__str__方法,在%s拼接的时候,调用__str__方法,str(对象)的时候,也是调用的是这个对象的__str__方法
# 如果找不到__str__,就调用__repr__方法(备胎)
# __repr__:__repr__不仅是__str__的替代品,还有自己的功能
# 当用到%r进行拼接的时候,或者用repr(对象)的时候,总是调用这个对象的__repr__方法
# 帮助我们在打印\展示对象的时候更能直观的显示对象内容 %s str() print()
# __repr__:repr是str的备胎,同时还和%r和repr有合作关系
(10)
__eq__、__hash__和__del__使用__eq__class A:
def __init__(self):
self.a = 1
self.b = 2
def __eq__(self,obj):
if self.a == obj.a and self.b == obj.b:
return True
a = A()
b = A()
print(a == b)
__hash__class A:
def __init__(self):
self.a = 1
self.b = 2
def __hash__(self):
return hash(str(self.a)+str(self.b))
a = A()
print(hash(a))
__del__
析构方法,当对象在内存中被释放时,自动触发执行。class Foo:
def __del__(self):
print(‘执行我啦‘)
f1=Foo()
del f1
print(‘------->‘)
#输出结果
执行我啦
------->
(11)
with、__enter__和__exit__使用class A:
def __enter__(self):
print(‘before‘)
def __exit__(self, exc_type, exc_val, exc_tb):
print(‘after‘)
with A() as a:
print(‘123‘)
class A:
    def __init__(self):
        print(‘init‘)

    def __enter__(self):
        print(‘before‘)

    def __exit__(self, exc_type, exc_val, exc_tb):
        print(‘after‘)


with A() as a:
    print(‘123‘)
class Myfile:
    def __init__(self,path,mode=‘r‘,encoding = ‘utf-8‘):
        self.path = path
        self.mode = mode
        self.encoding = encoding

    def __enter__(self):
        self.f = open(self.path, mode=self.mode, encoding=self.encoding)
        return self.f

    def __exit__(self, exc_type, exc_val, exc_tb):
        self.f.close()


with Myfile(‘file‘,mode=‘w‘) as f:
    f.write(‘wahaha‘)
import  pickle
class MyPickledump:
    def __init__(self,path):
        self.path = path

    def __enter__(self):
        self.f = open(self.path, mode=‘ab‘)
        return self

    def dump(self,content):
        pickle.dump(content,self.f)

    def __exit__(self, exc_type, exc_val, exc_tb):
        self.f.close()

class Mypickleload:
    def __init__(self,path):
        self.path = path

    def __enter__(self):
        self.f = open(self.path, mode=‘rb‘)
        return self


    def __exit__(self, exc_type, exc_val, exc_tb):
        self.f.close()

    def load(self):
         return pickle.load(self.f)


    def loaditer(self):
        while True:
            try:
                yield  self.load()
            except EOFError:
                break


# with MyPickledump(‘file‘) as f:
#      f.dump({1,2,3,4})

with Mypickleload(‘file‘) as f:
    for item in f.loaditer():
        print(item)
import  pickle
class MyPickledump:
    def __init__(self,path):
        self.path = path

    def __enter__(self):
        self.f = open(self.path, mode=‘ab‘)
        return self

    def dump(self,content):
        pickle.dump(content,self.f)

    def __exit__(self, exc_type, exc_val, exc_tb):
        self.f.close()

class Mypickleload:
    def __init__(self,path):
        self.path = path

    def __enter__(self):
        self.f = open(self.path, mode=‘rb‘)
        return self


    def __exit__(self, exc_type, exc_val, exc_tb):
        self.f.close()

    def __iter__(self):
        while True:
            try:
                yield  pickle.load(self.f)
            except EOFError:
                break


# with MyPickledump(‘file‘) as f:
#      f.dump({1,2,3,4})

with Mypickleload(‘file‘) as f:
    for item in f:
        print(item)