ASP.NET MVC:窗体身份验证及角色权限管理示例
2021-04-20 02:29
前言
本来使用Forms Authentication进行用户验证的方式是最常见的,但系统地阐明其方法的文章并不多见,网上更多的文章都是介绍其中某一部分的使用方法或实现原理,而更多的朋友则发文询问如何从头到尾完整第实现用户的注册、登录。因此,Anders Liu在这一系列文章中计划通过一个实际的例子,介绍如何基于Forms Authentication实现:
l 用户注册(包括密码的加密存储)
l 用户登录(包括密码的验证、设置安全Cookie)
l 用户实体替换(使用自己的类型作为HttpContext.User的类型)
有关Forms Authentication的原理等内容不属于本文的讨论范畴,大家可以通过在Google等搜索引擎中输入“Forms Authentication”、“Forms身份验证”、“窗体身份验证”等关键词来查看更多资源。本文仅从实用的角度介绍如何使用这一技术。
不使用Membership
本文介绍的实现方式不依赖ASP.NET 2.0提供的Membership功能。这主要是因为,如果使用Membership,就必须用aspnet_regsql.exe实用工具配置数据库,否则就得自己写自定义的MembershipProvider。
如果用aspnet_regsql.exe配置数据库,就会导致数据库中出现很多我们实际并不需要的表或字段。此外更重要的是,默认的SqlMembershipProvider给很多数据表添加了ApplicationID列,其初衷可能是希望可以将多个应用程序的用户全部放在一个库里,但又能彼此隔离。但实际情况是,每个应用程序都在其自身的数据库中保存用户数据。因此,引入这个ApplicationID无端地在每次查找用户时增加了额外的条件。
另一方面,如果考虑自己实现一个MembershipProvider,因为工作量巨大,有点得不偿失。
但是,如果不使用Membership,也就无法享受ASP.NET 2.0中新增的Login等控件的便利了。
与Forms Authentication相关的配置
在web.config文件中,
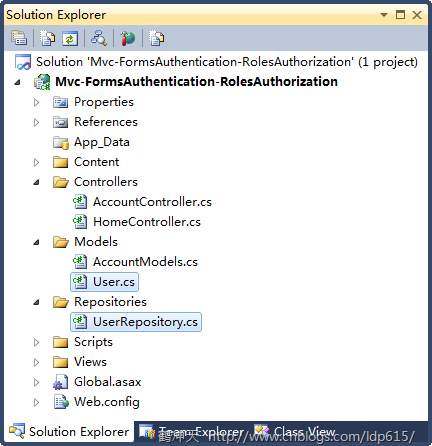
name=".ASPXAUTH" loginUrl="login.aspx" defaultUrl="default.aspx" protection="All" timeout="30" path="/" requireSSL="false" slidingExpiration="false" enableCrossAppRedirects="false" cookieless="UseDeviceProfile" domain="" /> 以上代码使用的均是默认设置,换言之,如果你的哪项配置属性与上述代码一致,则可以省略该属性例如 l name——Cookie的名字。Forms Authentication可能会在验证后将用户凭证放在Cookie中,name属性决定了该Cookie的名字。通过FormsAuthentication.FormsCookieName属性可以得到该配置值(稍后介绍FromsAuthentication类)。 l loginUrl——登录页的URL。通过FormsAuthentication.LoginUrl属性可以得到该配置值。当调用FormsAuthentication.RedirectToLoginPage()方法时,客户端请求将被重定向到该属性所指定的页面。loginUrl的默认值为“login.aspx”,这表明即便不提供该属性值,ASP.NET也会尝试到站点根目录下寻找名为login.aspx的页面。 l defaultUrl——默认页的URL。通过FormsAuthentication.DefaultUrl属性得到该配置值。 l protection——Cookie的保护模式,可取值包括All(同时进行加密和数据验证)、Encryption(仅加密)、Validation(仅进行数据验证)和None。为了安全,该属性通常从不设置为None。 l timeout——Cookie的过期时间。 l path——Cookie的路径。可以通过FormsAuthentication.FormsCookiePath属性得到该配置值。 l requireSSL——在进行Forms Authentication时,与服务器交互是否要求使用SSL。可以通过FormsAuthentication.RequireSSL属性得到该配置值。 l slidingExpiration——是否启用“弹性过期时间”,如果该属性设置为false,从首次验证之后过timeout时间后Cookie即过期;如果该属性为true,则从上次请求该开始过timeout时间才过期,这意味着,在首次验证后,如果保证每timeout时间内至少发送一个请求,则Cookie将永远不会过期。通过FormsAuthentication.SlidingExpiration属性可以得到该配置值。 l enableCrossAppRedirects——是否可以将以进行了身份验证的用户重定向到其他应用程序中。通过FormsAuthentication.EnableCrossAppRedirects属性可以得到该配置值。为了安全考虑,通常总是将该属性设置为false。 l cookieless——定义是否使用Cookie以及Cookie的行为。Forms Authentication可以采用两种方式在会话中保存用户凭据信息,一种是使用Cookie,即将用户凭据记录到Cookie中,每次发送请求时浏览器都会将该Cookie提供给服务器。另一种方式是使用URI,即将用户凭据当作URL中额外的查询字符串传递给服务器。该属性有四种取值——UseCookies(无论何时都使用Cookie)、UseUri(从不使用Cookie,仅使用URI)、AutoDetect(检测设备和浏览器,只有当设备支持Cookie并且在浏览器中启用了Cookie时才使用Cookie)和UseDeviceProfile(只检测设备,只要设备支持Cookie不管浏览器是否支持,都是用Cookie)。通过FormsAuthentication.CookieMode属性可以得到该配置值。通过FormsAuthentication.CookiesSupported属性可以得到对于当前请求是否使用Cookie传递用户凭证。 l domain——Cookie的域。通过FormsAuthentication.CookieDomain属性可以得到该配置值。 以上针对 FormsAuthentication类 FormsAuthentication类用于辅助我们完成窗体验证,并进一步完成用户登录等功能。该类位于system.web.dll程序集的System.Web.Security命名空间中。通常在Web站点项目中可以直接使用这个类,如果是在类库项目中使用这个类,请确保引用了system.web.dll。 前一节已经介绍了FormsAuthentication类的所有属性。这一节将介绍该类少数几个常用的方法。 RedirectToLoginPage方法用于从任何页面重定向到登录页,该方法有两种重载方式: public static void RedirectToLoginPage () public static void RedirectToLoginPage (string extraQueryString) 两种方式均会使浏览器重定向到登录页(登录页的URL由 RedirectToLoginPage通常在任何非登录页的页面中调用。该方法除了进行重定向之外,还会向URL中附加一个ReturnUrl参数,该参数即为调用该方法时所在的页面的URL地址。这是为了方便登录后能够自动回到登录前所在的页面。 RedirectFromLoginPage方法用于从登录页跳转回登录前页面。这个“登录前”页面即由访问登录页时提供的ReturnUrl参数指定。如果没有提供ReturnUrl参数(例如,不是使用RedirectToLoginPage方法而是用其他手段重定向到或直接访问登录页时),则该方法会自动跳转到由 此外,如果 RedirectFromLoginPage方法有两种重载形式: public static void RedirectFromLoginPage (string userName, bool createPersistentCookie) public static void RedirectFromLoginPage (string userName, bool createPersistentCookie, string strCookiePath) userName参数表示用户的标识(如用户名、用户ID等);createPersistentCookie参数表示是否“记住我”;strCookiePath参数表示Cookie路径。 RedirectFromLoginPage方法除了完成重定向之外,还会将经过加密(是否加密取决于 此外,FormsAuthentication还有一个SignOut方法,用于完成用户注销。其原理是从Cookie或Uri中移除用户凭据。 好了,至此所需要掌握的基础知识就齐备了,接下来我们将实现用户注册、登录等功能: ASP.NET MVC 建立 ASP.NET 基础之上,很多 ASP.NET 的特性(如窗体身份验证、成员资格)在 MVC 中可以直接使用。本文旨在提供可参考的代码,不会涉及这方面太多理论的知识。 本文仅使用 ASP.NET 的窗体身份验证,不会使用它的 成员资格(Membership) 和 角色管理 (RoleManager),原因有二:一是不灵活,二是和 MVC 关系不太。 User.cs 是模型文件,其中包含了 User 类: UserRepository 为数据存取类,为了演示方便,并没有连接数据库,而是使用一个数组来作为数据源: public bool ValidateUser(string userName, string password) public string[] GetRoles(string userName) public User GetByNameAndPassword(string name, string password) 二、用户登录及身份验证 方式一 修改 AccountController:原有 AccountController 为了实现控制反转,对窗体身份验证进行了抽象。为了演示方便,我去除了这部分(以及注册及修改密码部分): [HttpPost] public ActionResult LogOff() 修改 Global.asax: void MvcApplication_AuthorizeRequest(object sender, EventArgs e) 给 MvcApplication 增加构造函数,在其中增加 AuthorizeRequest 事件的处理函数。 代码下载:Mvc-FormsAuthentication-RolesAuthorization-1.rar (243KB) 方式二 此方式将用户的角色保存至用户 Cookie,使用到了 FormsAuthenticationTicket。 修改 AccountController: [HttpPost] if (!String.IsNullOrEmpty(returnUrl)) return Redirect(returnUrl); public ActionResult LogOff() 修改 Global.asax: void MvcApplication_AuthorizeRequest(object sender, EventArgs e) 代码下载:Mvc-FormsAuthentication-RolesAuthorization-2.rar (244KB) 三、角色权限 使用任一种方式后,我们就可以在 Controller 中使用 AuthorizeAttribute 实现基于角色的权限管理了: 四、简要说明 MVC 使用 HttpContext.User 属性进行来进行实现身份验证及角色管理,同样 AuthorizeAttribute 也根据 HttpContext.User 进行角色权限验证。 因些不要在用户登录后,将相关用户信息保存在 Session 中(网上经常看到这种做法),将用户保存在 Session 中是一种非常不好的做法。 也不要在 Action 中进行角色权限判断,应该使用 AuthorizeAttribute 或它的子类,以下的方式都是错误的: 若本文中有错误或不妥之处,敬请指正,谢谢! 已下为项目中用到的代码: 身份验证 后台:DateTime expiredTime = DateTime.Now.AddMonths(1); string ssoData = userName + "," + saveLogin.ToString(); FormsAuthenticationTicket ticket = new FormsAuthenticationTicket(1, userName, DateTime.Now, expiredTime, saveLogin, ssoData, FormsAuthentication.FormsCookiePath); string authTicket = FormsAuthentication.Encrypt(ticket); HttpCookie lcookie = new HttpCookie(FormsAuthentication.FormsCookieName, authTicket); lcookie.Expires = DateTime.Now.AddMonths(1);//勾选自动登录时 Response.Cookies.Add(lcookie); 前台if (!User.Identity.IsAuthenticated) 退出登录: public ActionResult LogOff() { FormsAuthentication.SignOut(); return Redirect(FormsAuthentication.LoginUrl); // }一、示例项目

public class User
{
public int ID { get; set; }
public string Name { get; set; }
public string Password { get; set; }
public string[] Roles { get; set; }
}
public class UserRepository
{
private static User[] usersForTest = new[]{
new User{ ID = 1, Name = "bob", Password = "bob", Roles = new []{"employee"}},
new User{ ID = 2, Name = "tom", Password = "tom", Roles = new []{"manager"}},
new User{ ID = 3, Name = "admin", Password = "admin", Roles = new[]{"admin"}},
};
{
return usersForTest
.Any(u => u.Name == userName && u.Password == password);
}
{
return usersForTest
.Where(u => u.Name == userName)
.Select(u => u.Roles)
.FirstOrDefault();
}
{
return usersForTest
.FirstOrDefault(u => u.Name == name && u.Password == password);
}
}
public class AccountController : Controller
{
private UserRepository repository = new UserRepository();
public ActionResult LogOn()
{
return View();
}
public ActionResult LogOn(LogOnModel model, string returnUrl)
{
if (ModelState.IsValid)
{
if (repository.ValidateUser(model.UserName, model.Password))
{
FormsAuthentication.SetAuthCookie(model.UserName, model.RememberMe);
if (!String.IsNullOrEmpty(returnUrl)) return Redirect(returnUrl);
else return RedirectToAction("Index", "Home");
}
else
ModelState.AddModelError("", "用户名或密码不正确!");
}
return View(model);
}
{
FormsAuthentication.SignOut();
return RedirectToAction("Index", "Home");
}
}
public class MvcApplication : System.Web.HttpApplication
{
public MvcApplication()
{
AuthorizeRequest += new EventHandler(MvcApplication_AuthorizeRequest);
}
{
IIdentity id = Context.User.Identity;
if (id.IsAuthenticated)
{
var roles = new UserRepository().GetRoles(id.Name);
Context.User = new GenericPrincipal(id, roles);
}
}
//...
}
public class AccountController : Controller
{
private UserRepository repository = new UserRepository();
public ActionResult LogOn()
{
return View();
}
public ActionResult LogOn(LogOnModel model, string returnUrl)
{
if (ModelState.IsValid)
{
User user = repository.GetByNameAndPassword(model.UserName, model.Password);
if (user != null)
{
FormsAuthenticationTicket ticket = new FormsAuthenticationTicket(
1,
user.Name,
DateTime.Now,
DateTime.Now.Add(FormsAuthentication.Timeout),
model.RememberMe,
user.Roles.Aggregate((i,j)=>i+","+j)
);
HttpCookie cookie = new HttpCookie(
FormsAuthentication.FormsCookieName,
FormsAuthentication.Encrypt(ticket));
Response.Cookies.Add(cookie);
else return RedirectToAction("Index", "Home");
}
else
ModelState.AddModelError("", "用户名或密码不正确!");
}
return View(model);
}
{
FormsAuthentication.SignOut();
return RedirectToAction("Index", "Home");
}
}
public class MvcApplication : System.Web.HttpApplication
{
public MvcApplication()
{
AuthorizeRequest += new EventHandler(MvcApplication_AuthorizeRequest);
}
{
var id = Context.User.Identity as FormsIdentity;
if (id != null && id.IsAuthenticated)
{
var roles = id.Ticket.UserData.Split(‘,‘);
Context.User = new GenericPrincipal(id, roles);
}
}
//...
}
[Authorize(Roles = "employee,manager")]
public ActionResult Index1()
{
return View();
}
[Authorize(Roles = "manager")]
public ActionResult Index2()
{
return View();
}
[Authorize(Users="admin", Roles = "admin")]
public ActionResult Index3()
{
return View();
}
public ActionResult Action1()
{
if (Session["User"] == null) { /**/}
/**/
}
public ActionResult Action2()
{
if (User.Identity == null) { /**/}
if (User.Identity.IsAuthenticated == false) { /**/}
if (User.IsInRole("admin") == false) { /**/}
/**/
}