小demo原生js同步翻译,可以玩玩儿
2021-04-26 08:27
YPE html>
1. 背景:
平时不知道用js写什么练手,这里就写了一个类似百度翻译的小demo。大家可以平时没事儿了看看书,写写像这种类型的小demo,调用以下公开的api即可。对于学生党,能进入学校实验室做项目更好。进不去的,平时写写小demo练练也不差。(我为什么没在实验室)
2. demo前准备工作:
页面布局
了解百度翻译API,所需配置参数
准备 MD5.js 加密算法函数(百度自己搜)
写js代码
3. 步骤:
1. 页面布局:
布局就不说了,直接贴图上代码:
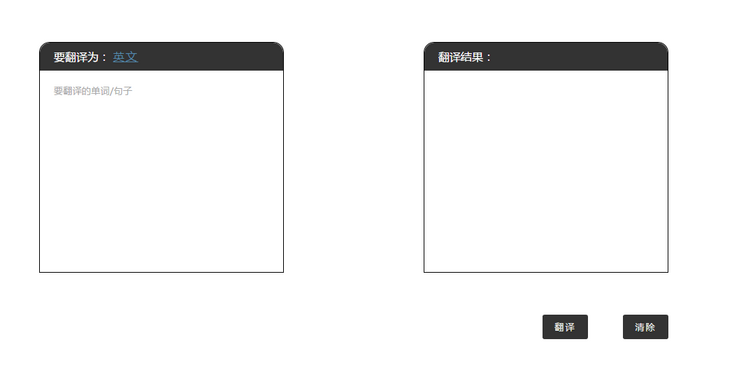
可进行语言切换
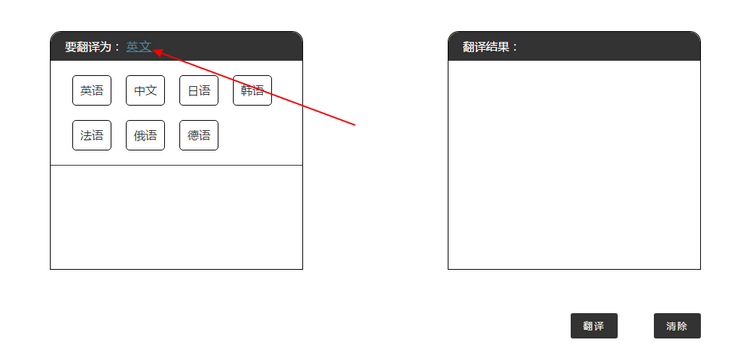
html代码:
- 英语
- 中文
- 日语
- 韩语
- 法语
- 俄语
- 德语
翻译结果:
css代码:
*{
  margin: 0;
  padding: 0;
  font-family: "微软雅黑";
}
html,body {
  height: 100%;
}
li {
  list-style: none;
}
body {
  overflow: hidden;
}
#main {
  width: 1000px;
  height: 80%;
  margin: 5% auto;
}
#main .left {
  float: left;
  width: 350px;
  height:330px;
  margin: 50px 0 0 50px;
  background-color: #fff;
  border: 1px solid #000;
  box-sizing: border-box;
  color: #fff;
  border-top-left-radius: 15px;
  border-top-right-radius: 15px;
}
#main .right {
  float: right;
  width: 350px;
  height: 330px;
  margin: 50px 50px 0 0;
  background-color: #fff;
  box-sizing: border-box;
  border: 1px solid #000;
  border-top-left-radius: 15px;
  border-top-right-radius: 15px;
}
#main .title {
  width: 100%;
  height: 40px;
  background-color: #333;
  line-height: 40px;
  text-indent: 20px;
  position: relative;
  color: #fff;
  border-top-left-radius: 15px;
  border-top-right-radius: 15px;
}
#main .lang {
  height: 40px;
  line-height: 40px;
  text-indent: 20px;
  letter-spacing: 2px;
  text-decoration: underline;
  color: #58a;
  cursor: pointer;
}
#main .lang:hover {
  text-decoration: none;
  color: #eee;
}
#main .text {
  width: 100%;
  height: 288px;
  padding: 20px;
  box-sizing: border-box;
  resize: none;
  outline: none;
  border: none;
}
#main .right .cont {
  width: 100%;
  height: 295px;
  padding: 20px;
  box-sizing: border-box;
}
#main .bottom {
  float: left;
  width: 100%;
  height: 40px;
  margin-top: 60px;
}
#main .bottom button {
  float: right;
  width: 65px;
  height: 35px;
  line-height: 35px;
  letter-spacing: 2px;
  border: none;
  margin-right: 50px;
  border-radius: 3px;
  outline: none;
  cursor: pointer;
  color: #eee;
  background-color: #333;
}
#main ul {
  width: 100%;
  padding: 20px 15px 0 20px;
  box-sizing: border-box;
  position: absolute;
  background: blue;
  background-color: #fff;
  border-bottom: 1px solid #333;
  display: none;
}
#main ul li {
  float:left;
  text-indent: 0;
  text-align: center;
  padding: 0 10px;
  margin: 0 10px;
  margin-bottom: 20px;
  border: 1px solid #000;
  border-radius: 5px;
  box-sizing: border-box;
  color: #333;
  cursor: pointer;
}
#main ul li:hover {
  background-color: #333;
  color: #fff;
}
2,了解百度翻译API
这只只对所配置的参数做一介绍,官方API也有做解释:
进入百度翻译,左下角如图:
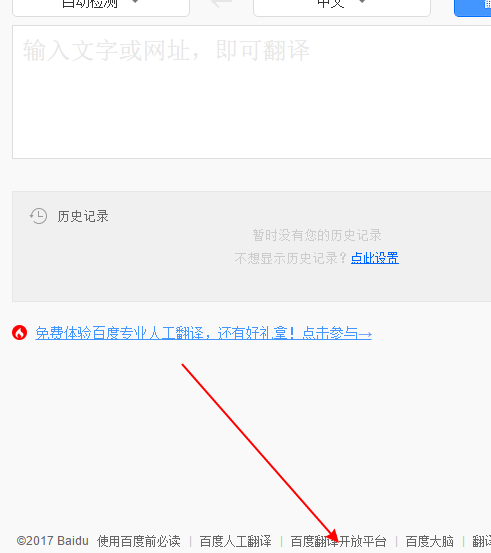
点击百度翻译开放平台:
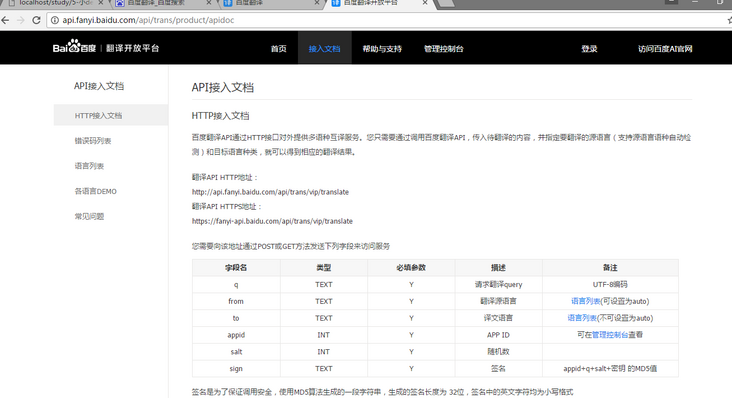
q是你要翻译的字符串
from是你在输入时的语言
to是你要翻译成什么语言
appid是你申请的百度翻译测试账号(注册后秒发)
salt是一个随机数,这里用事件表示
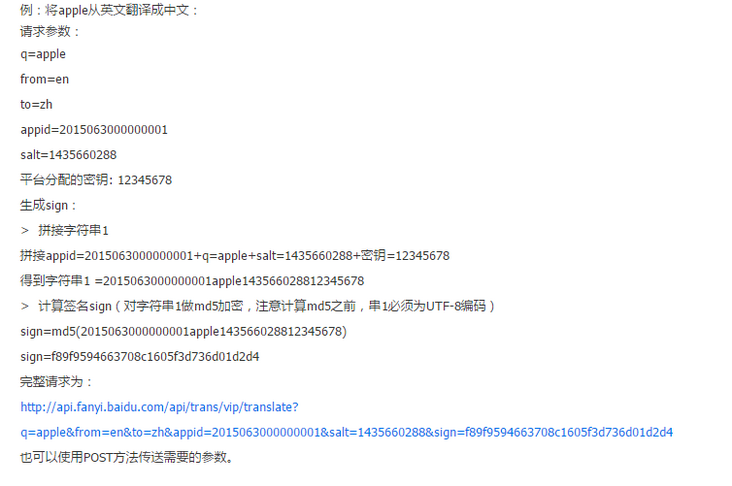
sign是对拼接的字符串的MD5加密,至于拼接的字符串其实就是: 待加密字符串 =
appid+q+salt+秘钥(申请账号时密码也会给你) 最后把 待价密 的字符串传入MD5函数,返回sign.
完整流程如图:
3.准备MD5加密函数(可以百度自己搜,这里直接附代码)
MD5加密字符串:
var MD5 = function (string) {

    function RotateLeft(lValue, iShiftBits) {
        return (lValue>>(32-iShiftBits));
    }

    function AddUnsigned(lX,lY) {
        var lX4,lY4,lX8,lY8,lResult;
        lX8 = (lX & 0x80000000);
        lY8 = (lY & 0x80000000);
        lX4 = (lX & 0x40000000);
        lY4 = (lY & 0x40000000);
        lResult = (lX & 0x3FFFFFFF)+(lY & 0x3FFFFFFF);
        if (lX4 & lY4) {
            return (lResult ^ 0x80000000 ^ lX8 ^ lY8);
        }
        if (lX4 | lY4) {
            if (lResult & 0x40000000) {
                return (lResult ^ 0xC0000000 ^ lX8 ^ lY8);
            } else {
                return (lResult ^ 0x40000000 ^ lX8 ^ lY8);
            }
        } else {
            return (lResult ^ lX8 ^ lY8);
        }
    }

    function F(x,y,z) { return (x & y) | ((~x) & z); }
    function G(x,y,z) { return (x & z) | (y & (~z)); }
    function H(x,y,z) { return (x ^ y ^ z); }
    function I(x,y,z) { return (y ^ (x | (~z))); }

    function FF(a,b,c,d,x,s,ac) {
        a = AddUnsigned(a, AddUnsigned(AddUnsigned(F(b, c, d), x), ac));
        return AddUnsigned(RotateLeft(a, s), b);
    };

    function GG(a,b,c,d,x,s,ac) {
        a = AddUnsigned(a, AddUnsigned(AddUnsigned(G(b, c, d), x), ac));
        return AddUnsigned(RotateLeft(a, s), b);
    };

    function HH(a,b,c,d,x,s,ac) {
        a = AddUnsigned(a, AddUnsigned(AddUnsigned(H(b, c, d), x), ac));
        return AddUnsigned(RotateLeft(a, s), b);
    };

    function II(a,b,c,d,x,s,ac) {
        a = AddUnsigned(a, AddUnsigned(AddUnsigned(I(b, c, d), x), ac));
        return AddUnsigned(RotateLeft(a, s), b);
    };

    function ConvertToWordArray(string) {
        var lWordCount;
        var lMessageLength = string.length;
        var lNumberOfWords_temp1=lMessageLength + 8;
        var lNumberOfWords_temp2=(lNumberOfWords_temp1-(lNumberOfWords_temp1 % 64))/64;
        var lNumberOfWords = (lNumberOfWords_temp2+1)*16;
        var lWordArray=Array(lNumberOfWords-1);
        var lBytePosition = 0;
        var lByteCount = 0;
        while ( lByteCount >>29;
        return lWordArray;
    };

    function WordToHex(lValue) {
        var WordToHexValue="",WordToHexValue_temp="",lByte,lCount;
        for (lCount = 0;lCount>>(lCount*8)) & 255;
            WordToHexValue_temp = "0" + lByte.toString(16);
            WordToHexValue = WordToHexValue + WordToHexValue_temp.substr(WordToHexValue_temp.length-2,2);
        }
        return WordToHexValue;
    };

    function Utf8Encode(string) {
        string = string.replace(/\r\n/g,"\n");
        var utftext = "";

        for (var n = 0; n  127) && (c > 6) | 192);
                utftext += String.fromCharCode((c & 63) | 128);
            }
            else {
                utftext += String.fromCharCode((c >> 12) | 224);
                utftext += String.fromCharCode(((c >> 6) & 63) | 128);
                utftext += String.fromCharCode((c & 63) | 128);
            }

        }

        return utftext;
    };

    var x=Array();
    var k,AA,BB,CC,DD,a,b,c,d;
    var S11=7, S12=12, S13=17, S14=22;
    var S21=5, S22=9 , S23=14, S24=20;
    var S31=4, S32=11, S33=16, S34=23;
    var S41=6, S42=10, S43=15, S44=21;

    string = Utf8Encode(string);

    x = ConvertToWordArray(string);

    a = 0x67452301; b = 0xEFCDAB89; c = 0x98BADCFE; d = 0x10325476;

    for (k=0;k
加密:

发送请求时别忘了在参数最后面加上一个callback参数用来接收返回值

callback函数:
function fn(str) {
  var result = document.querySelector(".right .cont");
  result.innerHTML = str.trans_result[0].dst;
}
4.写js
这里简单的逻辑就不说了,说说这里的接口请求的实现和实现实时翻译的逻辑(每输入一两个字就会主动给你翻译)。首先这个列子的核心就是jsonp的跨域请求原理很简单,就是每次请求都给他创建一个标签插入body, 每次给标签的src传入不同的参数,待服务器给你返回数据,最终拿到数据渲染到页面。这里要提醒的是要给请求的参数最后面加上一个回调函数,返回过来的数据客户端可以从回调函数中拿取。其次就是实时翻译,原理就是在敲键盘时每次按键抬起时隔一定的时间去请求,那就是键盘事件加上setInterval();每隔500ms去请求。
整个过程的代码如下:
(function() {
  var title = document.querySelector(".left .title .lang"),
      ul = document.querySelector(".ul1"),
      lis = document.querySelectorAll(".ul1 li"),
      text = document.querySelector(".left .text"),
      result = document.querySelector(".right .cont"),
      reset = document.querySelector(".bottom .reset"),
      trans = document.querySelector(".bottom .trans"),
      key = true,
      length = lis.length,
      lang = "en",
      timer = null;

  function langShow() {
    if (key == true) {
      ul.style.display = "block";
      key = false;
    } else {
      ul.style.display = "none";
      key = true;
    }
  }

  function changeLang() {
    lang = this.getAttribute(‘data-lang‘);
    title.innerHTML = this.innerHTML;
    this.parentNode.style.display = "none";
    key = true;
  }

  function createScript(src) {
    var script = document.createElement(‘script‘);
    script.id = "script1"
    script.src = src;
    document.body.appendChild(script);
  }

  function translate() {
    var value = ‘http://api.fanyi.baidu.com/api/trans/vip/translate?‘;
    var date = Date.now();
    var str = ‘20170605000052254‘+text.value+date+‘63r1c42X7_buc4OrXm1g‘;
    var md5 = MD5(str);
    var data = ‘q=‘ + text.value + ‘&from=auto&to=‘ + lang + ‘&appid=20170605000052254‘ + ‘&salt=‘ + date + ‘&sign=‘ + md5 + "&callback=fn";
    var src = value + data;
    createScript(src);
  }

  function init() {

    title.onclick = langShow;

    for (var i = 0; i
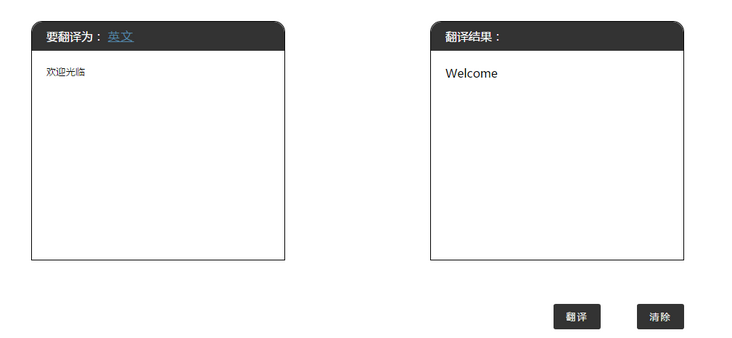
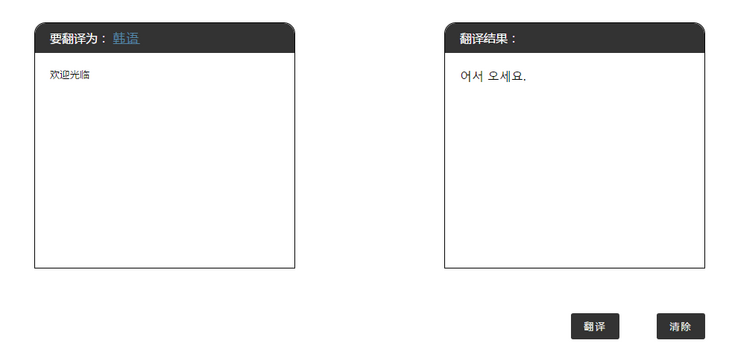
以上就是实现翻译的过程,效果图:
中 - 英
中 - 韩
这样一个小小的翻译小Demo就完成了,主要还是练习原生js,理解跨域请求的原理,其实跨域请求的方法很多,比如src,等等。这些方法大家都得去一一了解。
本文分享到此结束,笔者技术有限,理解有误的地方还请大家多提,大家可以共同学习。
上一篇:BUGKU 程序员本地网站
下一篇:基础Html重点——防健忘