从头编写 asp.net core 2.0 web api 基础框架 (4) EF配置
2021-05-06 09:27
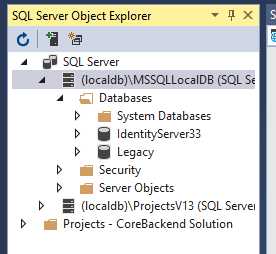
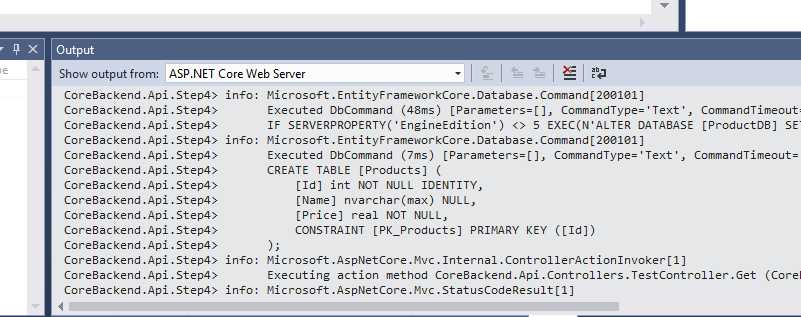
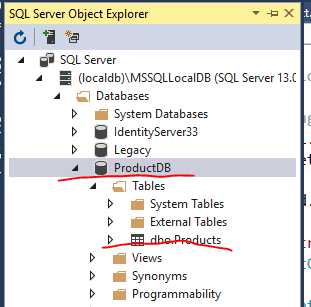
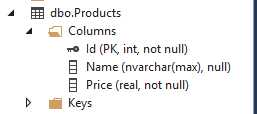
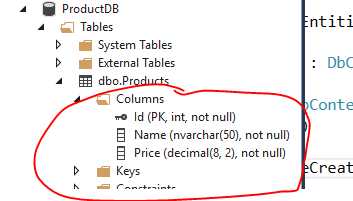
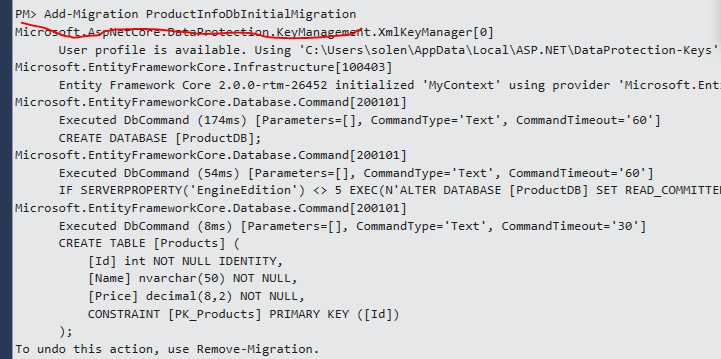
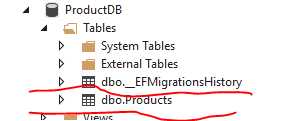
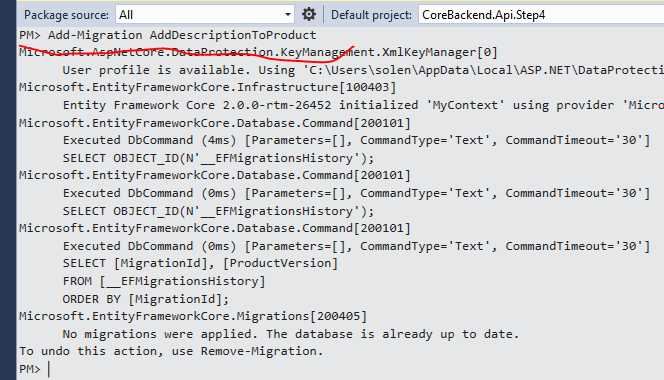
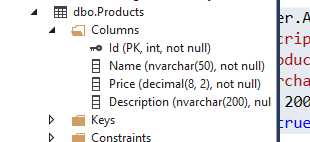
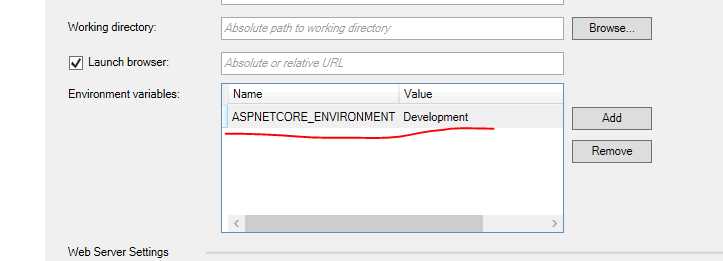
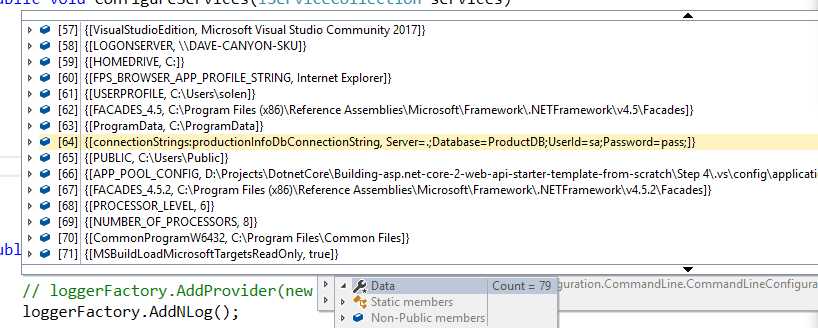
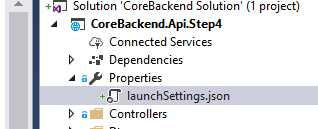
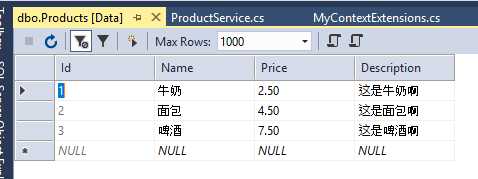
标签:cat 模式 maxlength hang private ack github http nconf 第1部分: http://www.cnblogs.com/cgzl/p/7637250.html 第2部分:http://www.cnblogs.com/cgzl/p/7640077.html 第3部分:http://www.cnblogs.com/cgzl/p/7652413.html Github源码地址:https://github.com/solenovex/Building-asp.net-core-2-web-api-starter-template-from-scratch 前三部分弄完,我们已经可以对内存数据进行CRUD的基本操作,并且可以在asp.net core 2中集成Nlog了。 下面继续: Entity Framework 是ORM(Object-Relational-Mapping)。ORM是一种让你可以使用面向对象的范式对数据库进行查询和操作。 简单的情况下,ORM可以把数据库中的表和Model对象一一映射起来;也有比较复杂的情况,ORM允许使用OO(面向对象)功能来做映射,例如:Person作为基类,Employee作为Person的派生类,他们俩可以在数据库中映射成一个表;或者在没有继承的情况下,数据库中的一个表可能和多个类有映射关系。 EF Core 不是 EF6的升级版,这个大家应该知道,EF Core是轻量级、具有很好的扩展性的,并且是跨平台的EF版本。 EF Core 目前有很多Providers,所以支持很多种数据库,包括:MSSQL,SQLite,SQL Compact,Postgres,MySql,DB2等等。而且还有一个内存的Provider,用于测试和开发。开发UWP应用的时候也可以使用EF Core(用SQLite Provider)。 EF Core支持两种模式: Code First:简单理解为 先写C#(Model),然后生成数据库。 Database First:现在数据库中建立表,然后生成C#的Model。 由于用asp.net core 2.0开发的项目基本都是新项目,所以建议使用Code First。 Entity就是普通的C#类,就像Dto一样。Dto是与外界打交道的Model,entity则不一样,有一些Dto的计算属性我们并不像保存在数据库中,所以entity中没有这些属性;而数据从entity传递到Dto后某些属性也会和数据库里面的形式不一样。 首先把我们原来的Product和Material这两个Dto的名字重构一下,改成ProductDto和MaterialDto。 建立一个Entities文件夹,在里面建立Product.cs: DbContext EFCore使用一个DbContext和数据库打交道,它代表着和数据库之间的一个Session,可以用来查询和保存我们的entities。 DbContext需要一个Provider,以便能访问数据库(这里我们就用LocalDB吧)。 我们就建立一个DbContext吧(大一点的项目会使用多个DbContext)。建立MyContext并集成DbContext: 这里我们为Product建立了一个类型为DbSet 因为我们需要使用这个MyContext,所以就需要先在Container中注册它,然后就可以在依赖注入中使用了。 打开Startup.cs,修改ConfigureServices,添加这一句话: 使用AddDbContext这个Extension method为MyContext在Container中进行注册,它默认的生命周期使Scoped。 但是它如何连接数据库?这就需要连接字符串,我们需要为DbContext提供连接字符串,这里有两种方式。 第一种是在MyContext中override OnConfiguring这个方法: 其中的参数optionsBuilder提供了一个UseSqlServer()这个方法,它告诉Dbcontext将会被用来连接Sql Server数据库,在这里就可以提供连接字符串,这就是第一种方法。 第二种方法: 先大概看一下DbContext的源码的定义: 有一个Constructor带有一个DbContextOptions参数,那我们就在MyContext种建立一个Constructor,并overload这个带有参数的Constructor。 这种方法相对第一种的优点是:它可以在我们注册MyContext的时候就提供options,显然这样做比第一种override OnConfiguring更合理。 然后返回Startup: 使用AddDbContext的另一个overload的方法,它可以带一个参数,在里面调用UseSqlServer。 关于连接字符串,我是用的是LocalDb,实例名是MSSQLLocalDB。可以在命令行查询本机LocalDb的实例,使用sqllocaldb info: 也可以通过VS的Sql Server Object Explorer查看: 连接字符串中的ProductDb是数据库名;连接字符串的最后一部分表示这是一个受信任的连接,也就是说使用了集成验证,在windows系统就是指windows凭证。 因为我们使用的是Code First,所以如果还没有数据库的话,它应该会自动建立一个数据库。 打开MyContext: 这个Constructor在被依赖注入的时候会被调用,在里面写Database.EnsureCreated()。其中Database是DbContext的一个属性对象。 EnsureCreated()的作用是,如果有数据库存在,那么什么也不会发生。但是如果没有,那么就会创建一个数据库。 但是现在就运行的话,并不会创建数据库,因为没有创建MyContext的实例,也就不会调用Constructor里面的内容。 那我们就建立一个临时的Controller,然后注入MyContext,此时就调用了MyContext的Constructor: 使用Postman访问Get这个Action后,我们可以从Debug窗口看见一些创建数据库和表的Sql语句: 然后我们查看一下Sql Server Object Explorer: 我们可以看到数据库建立好了,里面还有dbo.Products这个表。 Database.EnsureCreated()确实可以保证创建数据库,但是随着代码不断被编写,我们的Model不断再改变,数据库应该也随之改变,而EnsureCreated()就不够了,这就需要迁移(Migration)。 不过迁移之前,我们先看看Product这个表的具体字段属性: Product的Id作为了主键,而Name这个字符串的长度是max,而Price没有精度限制,这样不行。我们需要对Model生成的表的字段进行限制! 解释一下:Product这个entity中的Id,根据约定(Id或者ProductId)会被视为映射表的主键,并且该主键是自增的。 如果不使用Id或者ProductId这两个名字作为主键的话,我们可以通过两种方式把该属性设置成为主键:Data Annotation注解和Fluet Api。我只在早期使用Data Annotation,后来一直使用Fluent Api,所以我这里只介绍Fluent Api吧。 针对Product这个entity,我们要把它映射成一个数据库的表,所以针对每个属性,可能需要设定一些限制,例如最大长度,是否必填等等。 针对Product,我们可以在MyContext里面override OnModelCreating这个方法,然后这样写: 第一行表示设置Id为主键(其实我们并不需要这么做)。然后Name属性是必填的,而且最大长度是50。最后Price的精度是8,2,数据库里的类型为decimal。 fluent api有很多方法,具体请查看文档:https://docs.microsoft.com/en-us/ef/core/modeling/ 然后,我们就会发现一个严重的问题。如果项目里面有很多entity,那么所有的fluent api配置都需要写在OnModelCreating这个方法里,那太多了。 所以我们改进一下,使用IEntityTypeConfiguration 把刚才在MyContext里写的配置都移动到这里,然后修改一些MyContext的OnModelCreating方法: 就是把ProductConfiguration里面写的配置加载进来,和之前的效果是一样的。 但是项目中如果有很多entities的话也需要写很多行代码,更好的做法是写一个方法,可以加载所有实现了IEntityTypeConfiguration 然后把数据库删掉,重新生成一下数据库: 很好! 随着代码的更改,数据库也会跟着变,所有EnsureCreated()不满足要求。migration就允许我们把数据库从一个版本升级到另一个版本。那我们就研究一下,首先把数据库删了,然后创建第一个迁移版本。 打开Package Manager Console,做个迁移 Add-Migration xxx: Add-Migration 然后接着是一个你起的名字。 然后看一下VS的Solution Explorer 会发现生成了一个Migrations目录: 里面有两个文件,一个是Snapshot,它是目前entity的状态: 这就是当前Product这个Model的状态细节,包括我们通过Fluent Api为其添加的映射限制等。 另一个文件是xxxx_ProductInfoDbInitialMigration,下划线后边的部分就是刚才Add-Migration命令后边跟着的名字参数。 这里面包含着migration builder需要的代码,用来迁移这个版本的数据库。里面有Up方法,就是从当前版本升级到下一个版本;还有Down方法,就是从下一个版本再退回到当前版本。 我们也可以不使用 Add-Migration命令,手写上面这些代码也行,我感觉还是算了吧。 另外还有一件事,那就是要保证迁移migration都有效的应用于数据库了,那就是另一个命令 Update-Database。 先等一下,我们也可以使用代码来达到同样的目的,打开MyContext: 把之前的EnsureCreated改成Database.Migrate(); 如果数据库还没删除,那就最后删除一次。 运行,并除法TestController: 然后会看见Product表,除此之外还有一个__EFMigrationHistory表,看看有啥: 这个表里面保存了哪些迁移已经被应用于这个数据库了。这也保证了Database.Migrate()或者Update-database命令不会执行重复的迁移migration。 我们再弄个迁移,为Product添加一个属性: 执行Add-Migration后,会在Migrations目录生成了一个新的文件: 然后这次执行Update-Database命令: 加上verbose参数就是显示执行过程的明细而已。 不用运行,看看数据库: Description被添加上了,然后看看迁移表: 目前差不太多了,但还有一个安全隐患。它是: 保存连接字符串,你可能会想到appSettings.json,但这不是一个好的想法。在本地开发的时候还没有什么问题(使用的是集成验证),但是你要部署到服务器的时候,数据库连接字符串可能包括用户名和密码(Sql Server的另一种验证方式)。加入你不小心把appSettings.json或写到C#里面的连接字符串代码提交到了Git或TFS,那么这个用户名和密码包括服务器的名称可能就被暴露了,这样做很不安全。 我们可以这样做,首先针对开发环境(development environment)把C#代码中的连接字符串拿掉,把它放到appSettings.json里面。然后针对正式生产环境(production environment),我们使用环境变量来保存这些敏感数据。 开发环境: appSettings.json: Startup.cs: 然后你可以设断点看看connectionString的值。目前项目的环境变量是Production,先改成Development: 然后断点调试: 可以看到这两个JsonConfigurationProvider就是appSettings的两个文件的配置。 这个就是appSettings.json,里面包含着我们刚才添加的连接字符串。 由于当前是Development环境,所以如果你查看另外一个JsonConfigurationProvider的话,会发现它里面的值是空的(Data数是0). 所以没有问题。 生产环境: 在项目的属性--Debug里面,我们看到了环境变量: 而这个环境变量,我们可以在程序中读取出来,所以可以在这里添加连接字符串: 注意它的key,要和appSettings.json里面的整体结构一致;Value呢应该是给一个服务器的数据库的字符串,这里就随便弄个假的吧。别忘了把Development改成Production。 然后调试一下: 没错。如果你仔细调试一下看看的话:就会从EnvironmentVariablesConfigurationProvider的第64个找到我们刚才写到连接字符串: 但是还没完。 打开项目的launchSettings.json: 你会发现: 连接字符串在这里。这个文件一般都会源码控制给忽略,也不会在发布的时候发布到服务器。那么服务器怎么读取到这个连接字符串呢??? 看上面调试EnvironmentVariablesConfigurationProvider的值,会发现里面有几十个变量,这些基本都不是来自launchSettings.json,它们是从系统层面上定义的!! 这回我们这样操作: 把launchSettings里面的连接字符串去掉: 然后这里自然也就没有了: 现在任何json文件都没有敏感信息了。 现在我们要把连接字符串添加到系统变量中。 在win10搜索框输入 envi: 然后点击上面的结果: 点击环境变量: 这里面上边是用户的变量,下面是系统的变量,这就是刚才EnvironmentVariableConfigurationProvider里面调试出来的那一堆环境变量。 而这个地方就是在你应该服务器上添加连接字符串的地方。再看一下调试: Environment的Provider在第4个位置,appSettings.production.json的在第3个位置。也就是说如果appSettings.Product.json和系统环境变量都有一样Key的连接字符串,那么程序会选择系统环境变量的值,因为它是后边的配置会覆盖前边的配置。 在系统环境变量中添加: 然后调试运行(需要重启VS,以便新添加的系统环境变量生效): 嗯,没问题! 目前EF Core还没有内置的方法来做种子数据。那么自己写: 建立一个MyContextExtensions.cs: 这是个Extension method,如果数据库没有数据,那就弄点种子数据,AddRange可以添加批量数据到Context(被Context追踪),但是到这还没有插入到数据库。使用SaveChanges会把数据保存到数据库。 然后再Startup的Configure方法中调用这个method: 首先注入MyContext,然后调用这个extension method。 然后把系统环境变量中的连接字符串删了把,并且把项目属性Debug中改成Development,这时候需要重启VS,因为一般环境变量是在软件启动的时候附加到其内存的,软件没关的情况下如果把系统环境变量给删了,在软件的内存中应该还是能找到该环境变量,所以软件得重启才能获取最新的环境变量们。重启VS,并运行: 种子数据进去了! 先写到这吧!!!! 从头编写 asp.net core 2.0 web api 基础框架 (4) EF配置 标签:cat 模式 maxlength hang private ack github http nconf 原文地址:http://www.cnblogs.com/cgzl/p/7661805.htmlEntity Framework Core 2.0
创建 Entity
namespace CoreBackend.Api.Entities
{
    public class Product
    {
        public int Id { get; set; }
        public string Name { get; set; }
        public float Price { get; set; }
    }
}
namespace CoreBackend.Api.Entities
{
public class MyContext : DbContext
{
public DbSet
services.AddDbContext
namespace CoreBackend.Api.Entities
{
public class MyContext : DbContext
{
public DbSet
namespace Microsoft.EntityFrameworkCore
{
public class DbContext : IDisposable, IInfrastructure
namespace CoreBackend.Api.Entities
{
public class MyContext : DbContext
{
public MyContext(DbContextOptions
public void ConfigureServices(IServiceCollection services)
{
services.AddMvc();
#if DEBUG
services.AddTransient

生成数据库
public MyContext(DbContextOptions
namespace CoreBackend.Api.Controllers
{
    [Route("api/[controller]")]
    public class TestController: Controller
    {
        private MyContext _context;

        public TestController(MyContext context)
        {
            _context = context;
        }

        [HttpGet]
        public IActionResult Get()
        {
            return Ok();
        }
    }
}
Fluet Api
protected override void OnModelCreating(ModelBuilder modelBuilder)
{
modelBuilder.Entity
public class ProductConfiguration : IEntityTypeConfiguration
        protected override void OnModelCreating(ModelBuilder modelBuilder)
        {
            modelBuilder.ApplyConfiguration(new ProductConfiguration());
        }
迁移 Migration

namespace CoreBackend.Api.Migrations
{
    [DbContext(typeof(MyContext))]
    partial class MyContextModelSnapshot : ModelSnapshot
    {
        protected override void BuildModel(ModelBuilder modelBuilder)
        {
#pragma warning disable 612, 618
            modelBuilder
                .HasAnnotation("ProductVersion", "2.0.0-rtm-26452")
                .HasAnnotation("SqlServer:ValueGenerationStrategy", SqlServerValueGenerationStrategy.IdentityColumn);

            modelBuilder.Entity("CoreBackend.Api.Entities.Product", b =>
                {
                    b.Propertyint>("Id")
                        .ValueGeneratedOnAdd();

                    b.Propertystring>("Name")
                        .IsRequired()
                        .HasMaxLength(50);

                    b.Propertyfloat>("Price")
                        .HasColumnType("decimal(8,2)");

                    b.HasKey("Id");

                    b.ToTable("Products");
                });
#pragma warning restore 612, 618
        }
    }
}
namespace CoreBackend.Api.Migrations
{
    public partial class ProductInfoDbInitialMigration : Migration
    {
        protected override void Up(MigrationBuilder migrationBuilder)
        {
            migrationBuilder.CreateTable(
                name: "Products",
                columns: table => new
                {
                    Id = table.Columnint>(type: "int", nullable: false)
                        .Annotation("SqlServer:ValueGenerationStrategy", SqlServerValueGenerationStrategy.IdentityColumn),
                    Name = table.Columnstring>(type: "nvarchar(50)", maxLength: 50, nullable: false),
                    Price = table.Columnfloat>(type: "decimal(8,2)", nullable: false)
                },
                constraints: table =>
                {
                    table.PrimaryKey("PK_Products", x => x.Id);
                });
        }

        protected override void Down(MigrationBuilder migrationBuilder)
        {
            migrationBuilder.DropTable(
                name: "Products");
        }
    }
}
public MyContext(DbContextOptions

namespace CoreBackend.Api.Entities
{
public class Product
{
public int Id { get; set; }
public string Name { get; set; }
public float Price { get; set; }
public string Description { get; set; }
}
public class ProductConfiguration : IEntityTypeConfiguration
namespace CoreBackend.Api.Migrations
{
    public partial class AddDescriptionToProduct : Migration
    {
        protected override void Up(MigrationBuilder migrationBuilder)
        {
            migrationBuilder.AddColumnstring>(
                name: "Description",
                table: "Products",
                type: "nvarchar(200)",
                maxLength: 200,
                nullable: true);
        }

        protected override void Down(MigrationBuilder migrationBuilder)
        {
            migrationBuilder.DropColumn(
                name: "Description",
                table: "Products");
        }
    }
}


如何安全的保存敏感的配置数据,例如:连接字符串
{
  "mailSettings": {
    "mailToAddress": "admin__json@qq.com",
    "mailFromAddress": "noreply__json@qq.com"
  },
  "connectionStrings": {
    "productionInfoDbConnectionString": "Server=(localdb)\\MSSQLLocalDB;Database=ProductDB;Trusted_Connection=True"
  }
}
public void ConfigureServices(IServiceCollection services)
{
services.AddMvc();
#if DEBUG
services.AddTransient




{
  "iisSettings": {
    "windowsAuthentication": false,
    "anonymousAuthentication": true,
    "iisExpress": {
      "applicationUrl": "http://localhost:60835/",
      "sslPort": 0
    }
  },
  "profiles": {
    "IIS Express": {
      "commandName": "IISExpress",
      "launchBrowser": true,
      "environmentVariables": {
        "connectionStrings:productionInfoDbConnectionString": "Server=.;Database=ProductDB;UserId=sa;Password=pass;",
        "ASPNETCORE_ENVIRONMENT": "Production"
      }
    },
    "CoreBackend.Api": {
      "commandName": "Project",
      "launchBrowser": true,
      "environmentVariables": {
        "ASPNETCORE_ENVIRONMENT": "Development"
      },
      "applicationUrl": "http://localhost:60836/"
    }
  }
}
{
  "iisSettings": {
    "windowsAuthentication": false,
    "anonymousAuthentication": true,
    "iisExpress": {
      "applicationUrl": "http://localhost:60835/",
      "sslPort": 0
    }
  },
  "profiles": {
    "IIS Express": {
      "commandName": "IISExpress",
      "launchBrowser": true,
      "environmentVariables": {"ASPNETCORE_ENVIRONMENT": "Production"
      }
    },
    "CoreBackend.Api": {
      "commandName": "Project",
      "launchBrowser": true,
      "environmentVariables": {
        "ASPNETCORE_ENVIRONMENT": "Development"
      },
      "applicationUrl": "http://localhost:60836/"
    }
  }
}

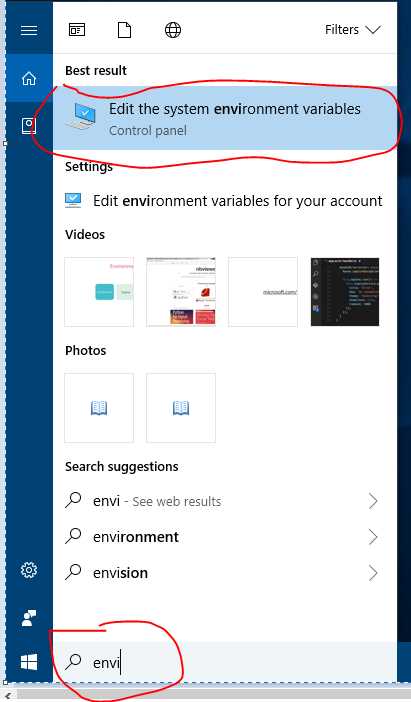
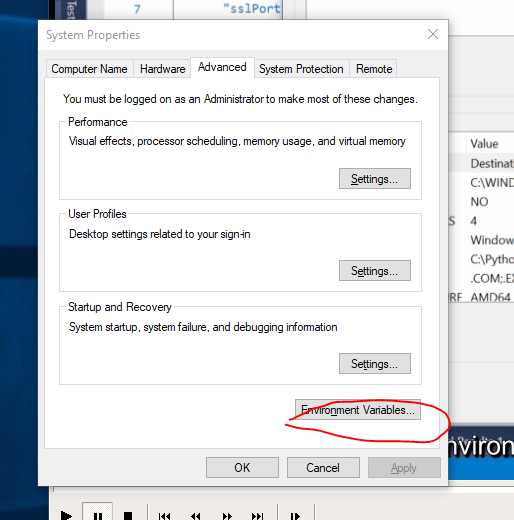
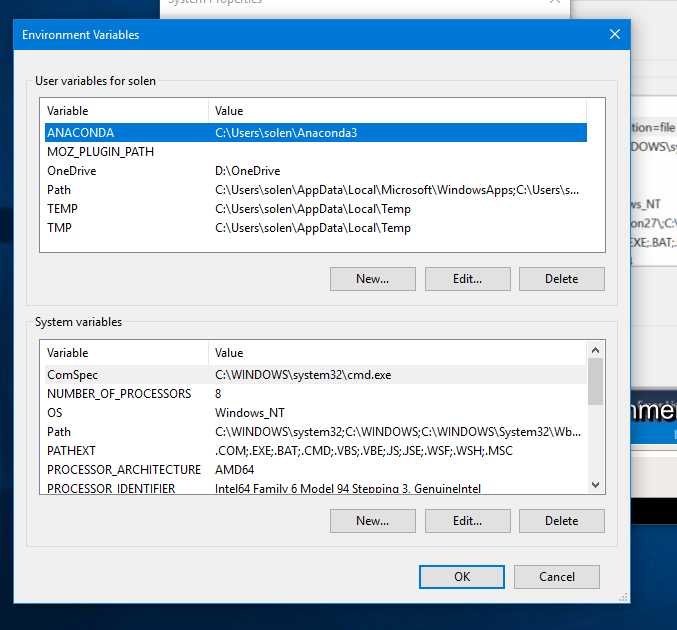


种子数据 Seed Data
namespace CoreBackend.Api.Entities
{
public static class MyContextExtensions
{
public static void EnsureSeedDataForContext(this MyContext context)
{
if (context.Products.Any())
{
return;
}
var products = new List
public void Configure(IApplicationBuilder app, IHostingEnvironment env, ILoggerFactory loggerFactory,
            MyContext myContext)
        {
            // loggerFactory.AddProvider(new NLogLoggerProvider());
            loggerFactory.AddNLog();

            if (env.IsDevelopment())
            {
                app.UseDeveloperExceptionPage();
            }
            else
            {
                app.UseExceptionHandler();
            }

            myContext.EnsureSeedDataForContext();

            app.UseStatusCodePages();

            app.UseMvc();
        }
文章标题:从头编写 asp.net core 2.0 web api 基础框架 (4) EF配置
文章链接:http://soscw.com/essay/83147.html