使用ASP.NET Web API和Web API Client Gen使Angular 2应用程序的开发更加高效
2021-05-29 18:04
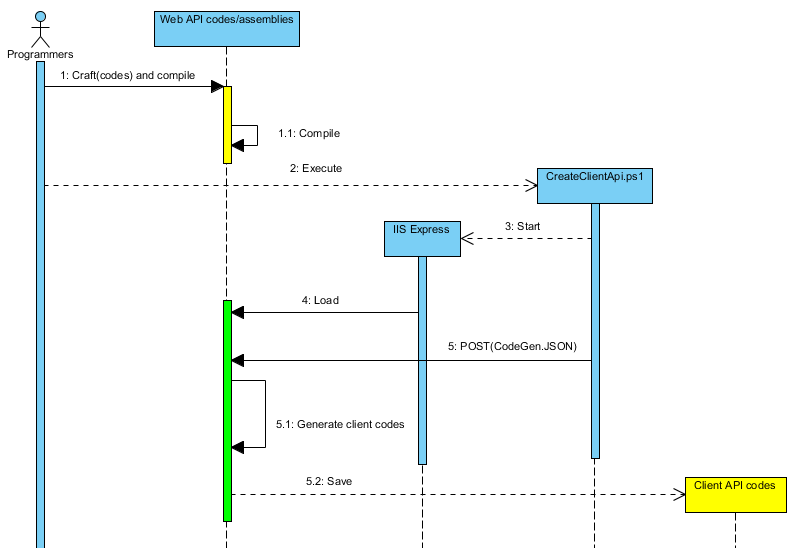
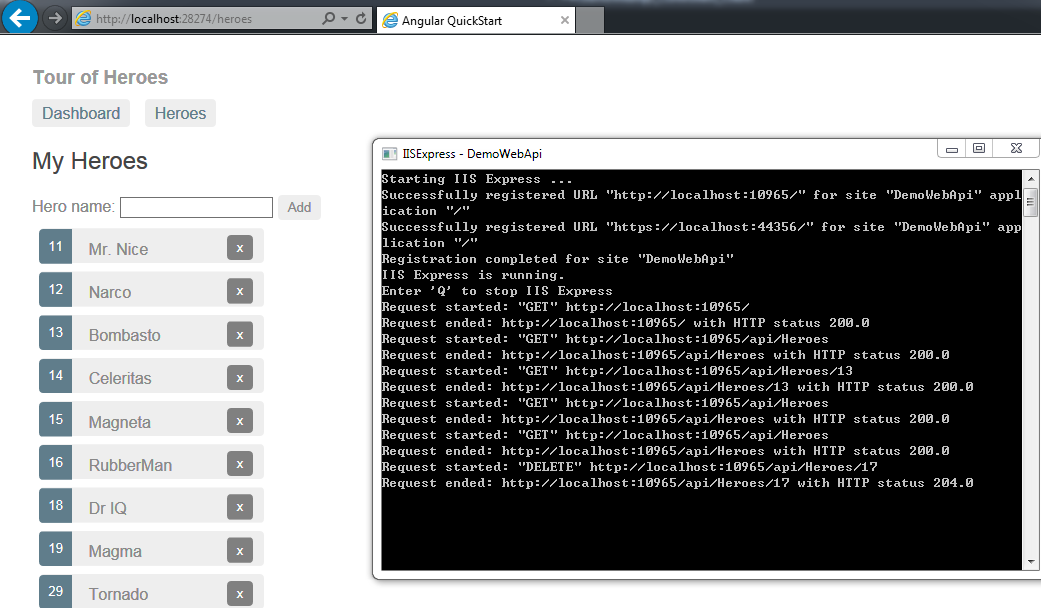
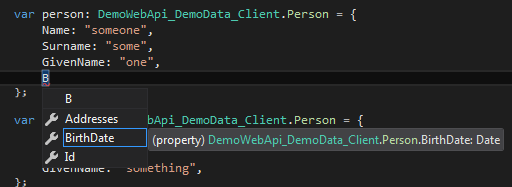
标签:orm mob rate 处理 post 提高 col jsonp current 本文介绍“ 为ASP.NET Web API生成TypeScript客户端API ”,重点介绍Angular 2+代码示例和各自的SDLC。如果您正在开发.NET Core Web API后端,则可能需要阅读为ASP.NET Core Web API生成C#Client API。 自 在2016年9月底发布Angular 2的第一个产品发布几周后,我碰巧启动了一个使用Angular2的主要Web应用程序项目,因此我 并且可选地,如果您或您的团队支持基于Trunk的开发,那么更好,因为使用的设计 为了跟进这种开发客户端程序的新方法,最好有一个ASP.NET Web API项目。您可以使用现有项目,也可以创建演示项目。 本文重点介绍Angular 2+的代码示例。假设您有一个ASP.NET Web API项目和一个Angular2项目作为VS解决方案中的兄弟项目。如果你将它们分开,那么为了使开发步骤无缝地编写脚本应该不难。 我认为您已阅读“ 为ASP.NET Web API生成TypeScript客户端API ”。为jQuery生成客户端API的步骤几乎与为Angular 2生成客户端API的步骤相同。演示TypeScript代码基于TUTORIAL:TOUR OF HEROES,许多人从中学习了Angular2。因此,您将能够看到如何 这是Web API代码: 安装还将安装依赖的NuGet包 此外,用于触发CodeGen的CodeGenController.cs被添加到Web API项目的Controllers文件夹中。 将 如果您正在使用@ angular / http中定义的Angular2的Http服务,那么您应该使用 下面的JSON配置数据是 Angular 6正在使用RxJS v6,它引入了一些重大变化,特别是对于导入 您应确保“ 建议到JSON配置数据保存到与文件类似的这一个位于Web API项目文件夹。 如果您在Web API项目中定义了所有POCO类,则应将Web API项目的程序集名称放在“ “ 在 默认选项是 在IIS Express上的IDE中运行Web项目。 然后使用Curl或Poster或任何您喜欢的客户端工具POST到http:// localhost:10965 / api / CodeGen,with 基本上,每当Web API更新时,您只需要步骤2来生成客户端API,因为您不需要每次都安装NuGet包或创建新的JSON配置数据。 编写一些批处理脚本来启动Web API和POST JSON配置数据应该不难。为了您的方便,我实际起草了一个:Powershell脚本文件CreateClientApi.ps1,它在IIS Express上启动Web(API)项目,然后发布JSON配置文件以触发代码生成。 基本上,您可以制作Web API代码,包括API控制器和数据模型,然后执行CreateClientApi.ps1。而已! 现在您在TypeScript中生成了客户端API,类似于以下示例: 如果您希望生成的TypeScript代码符合JavaScript和JSON的camel大小写,则可以在 然后属性名称和函数名称将在camel大小写中,前提是C#中的相应名称都在Pascal大小写中。有关详细信息,请查看camelCasing或PascalCasing。 在像Visual Studio这样的正常文本编辑器中编写客户端代码时,您可能会获得很好的智能感知。 通过IDE进行设计时类型检查,并在生成的代码之上进行编译时类型检查,可以更轻松地提高客户端编程的效率和产品质量。 不要做计算机可以做的事情,让计算机为我们努力工作。我们的工作是为客户提供自动化解决方案,因此最好先自行完成自己的工作。 在典型的角2个教程,包括官方的一个 这已经存档,作者经常督促应用程序开发者制作一个服务类,如“ 典型的教程还建议使用模拟服务进行单元测试。 在典型的SDLC中,在初始设置之后,以下是开发Web API和NG2应用程序的典型步骤: 对于第5步,有其他选择。例如,您可以使用VS IDE同时以调试模式启动Web API和NG2应用程序。一些开发人员可能更喜欢使用“ 本文最初是为Angular 2编写的,具有Http服务。Angular 4.3中引入了 顺便说一句,如果你没有完成向Angular 5的迁移,那么这篇文章可能有所帮助: 升级到Angular 5和HttpClient。如果您使用的是Angular 6,则应使用 使用ASP.NET Web API和Web API Client Gen使Angular 2应用程序的开发更加高效 标签:orm mob rate 处理 post 提高 col jsonp current 原文地址:https://www.cnblogs.com/langda/p/11079802.html背景
WebApiClientGenAngular 2仍然在RC2时,自2016年6月v1.9.0-beta 以来,对Angular2的支持已经可用。并且在WebApiClientGenv2.0中提供了对Angular 2产品发布的支持。希望NG2的发展不会如此频繁地破坏我的CodeGen和我的Web前端应用程序。:)WebApiClientGen对NG2应用程序开发的使用方法几乎相同。推定
WebApiClientGen和工作流程WebApiClientGen假设基于Trunk的开发,这比其他分支策略(如Feature Branching和GitFlow等)更有效。对于熟练掌握TDD的团队。使用代码
WebApiClientGen适应并改进Angular2应用程序的典型开发周期。using System;
using System.Collections.Generic;
using System.Linq;
using System.Web.Http;
using System.Runtime.Serialization;
using System.Collections.Concurrent;
namespace DemoWebApi.Controllers
{
[RoutePrefix("api/Heroes")]
public class HeroesController : ApiController
{
public Hero[] Get()
{
return HeroesData.Instance.Dic.Values.ToArray();
}
public Hero Get(long id)
{
Hero r;
HeroesData.Instance.Dic.TryGetValue(id, out r);
return r;
}
public void Delete(long id)
{
Hero r;
HeroesData.Instance.Dic.TryRemove(id, out r);
}
public Hero Post(string name)
{
var max = HeroesData.Instance.Dic.Keys.Max();
var hero = new Hero { Id = max + 1, Name = name };
HeroesData.Instance.Dic.TryAdd(max + 1, hero);
return hero;
}
public Hero Put(Hero hero)
{
HeroesData.Instance.Dic[hero.Id] = hero;
return hero;
}
[HttpGet]
public Hero[] Search(string name)
{
return HeroesData.Instance.Dic.Values.Where(d => d.Name.Contains(name)).ToArray();
}
}
[DataContract(Namespace = DemoWebApi.DemoData.Constants.DataNamespace)]
public class Hero
{
[DataMember]
public long Id { get; set; }
[DataMember]
public string Name { get; set; }
}
public sealed class HeroesData
{
private static readonly Lazy
步骤0:将NuGet包WebApiClientGen安装到Web API项目
Fonlow.TypeScriptCodeDOM和Fonlow.Poco2Ts项目引用。CodeGenController只在调试版本开发过程中应该是可用的,因为客户端API应该用于Web API的每个版本生成一次。提示
WebApiClientGenv2.2.5。如果您使用的HttpClient是@ angular / common / http中定义的Angular 4.3中可用的服务,并且在Angular 5中已弃用,那么您应该使用WebApiClientGenv2.3.0。第1步:准备JSON配置数据
POSTCodeGen Web API:{
"ApiSelections": {
"ExcludedControllerNames": [
"DemoWebApi.Controllers.Account"
],
"DataModelAssemblyNames": [
"DemoWebApi.DemoData",
"DemoWebApi"
],
"CherryPickingMethods": 1
},
"ClientApiOutputs": {
"ClientLibraryProjectFolderName": "DemoWebApi.ClientApi",
"GenerateBothAsyncAndSync": true,
"CamelCase": true,
"TypeScriptNG2Folder": "..\\DemoAngular2\\clientapi",
"NGVersion" : 5
}
}
提示
Observable。默认情况下,WebApiClientGen2.4和更高版本默认将导入声明为import { Observable } from ‘rxjs‘; 。如果您仍在使用Angular 5.x,则需要"NGVersion" : 5在JSON配置中声明,因此生成的代码中的导入将是更多详细信息,import { Observable } from ‘rxjs/Observable‘; . 请参阅RxJS v5.x至v6更新指南和RxJS:版本6的TSLint规则。备注
TypeScriptNG2Folder”存在的文件夹存在,因为WebApiClientGen不会为您创建此文件夹,这是设计使然。DataModelAssemblyNames” 数组中。如果您有一些专用的数据模型程序集可以很好地分离关注点,那么您应该将相应的程序集名称放入数组中。您可以选择为jQuery或NG2或C#客户端API代码生成TypeScript客户端API代码,或者全部三种。TypeScriptNG2Folder”是Angular2项目的绝对路径或相对路径。例如,“ .. \\ DemoAngular2 \\ ClientApi ”表示DemoAngular2作为Web API项目的兄弟项目创建的Angular 2项目“ ”。CodeGen根据“从POCO类生成强类型打字稿接口CherryPickingMethods,其在下面的文档注释描述”:///
DataContract选择加入。您可以使用任何方法或组合方法。第2步:运行Web API项目的DEBUG构建
步骤3:POST JSON配置数据以触发客户端API代码的生成
content-type=application/json。提示

WebApiClientGen和CreateClientApi.ps1将为您完成剩下的工作。发布客户端API库
import { Injectable, Inject } from ‘@angular/core‘;
import { Http, Headers, Response } from ‘@angular/http‘;
import { Observable } from ‘rxjs/Observable‘;
export namespace DemoWebApi_DemoData_Client {
export enum AddressType {Postal, Residential}
export enum Days {Sat=1, Sun=2, Mon=3, Tue=4, Wed=5, Thu=6, Fri=7}
export interface PhoneNumber {
fullNumber?: string;
phoneType?: DemoWebApi_DemoData_Client.PhoneType;
}
export enum PhoneType {Tel, Mobile, Skype, Fax}
export interface Address {
id?: string;
street1?: string;
street2?: string;
city?: string;
state?: string;
postalCode?: string;
country?: string;
type?: DemoWebApi_DemoData_Client.AddressType;
location?: DemoWebApi_DemoData_Another_Client.MyPoint;
}
export interface Entity {
id?: string;
name: string;
addresses?: Array
提示
WebApiConfigWeb API的脚手架代码类中添加以下行:config.Formatters.JsonFormatter.SerializerSettings.ContractResolver =
new Newtonsoft.Json.Serialization.CamelCasePropertyNamesContractResolver();
客户端应用编程
import { Component, OnInit } from ‘@angular/core‘;
import { Router } from ‘@angular/router‘;
import * as namespaces from ‘../clientapi/WebApiNG2ClientAuto‘;
import DemoWebApi_Controllers_Client = namespaces.DemoWebApi_Controllers_Client;

@Component({
    moduleId: module.id,
    selector: ‘my-heroes‘,
    templateUrl: ‘heroes.component.html‘,
    styleUrls: [‘heroes.component.css‘]
})


兴趣点
HeroService”,而黄金法则是:永远委托给配套服务类的数据访问。WebApiClientGen为您生成此服务类DemoWebApi_Controllers_Client.Heroes,它将使用真正的Web API而不是内存中的Web API。在开发过程中WebApiClientGen,我创建了一个演示项目DemoAngular2和各自用于测试的Web API控制器。WebApiClientGen使用真正的Web API服务要便宜得多,因此您可能不需要创建模拟服务。您应该在开发期间平衡使用模拟或实际服务的成本/收益,具体取决于您的上下文。通常,如果您的团队已经能够在每台开发机器中使用持续集成环境,那么使用真实服务运行测试可能非常无缝且快速。
提示
npm start”。WebApiClientGen2.3.0支持HttpClient。并且生成的API在接口级别保持不变。这使得从过时的Http服务迁移到HttpClient服务相当容易或无缝,与Angular应用程序编程相比,不使用生成的API而是直接使用Http服务。WebApiClientGen2.4.0+。
文章标题:使用ASP.NET Web API和Web API Client Gen使Angular 2应用程序的开发更加高效
文章链接:http://soscw.com/essay/89226.html