java8+junit5实现并发测试(多线程)
2021-06-04 06:03
标签:The http figure res ted access ble isp class 1.配置线程 2. 编写并发测试的代码 java8+junit5实现并发测试(多线程) 标签:The http figure res ted access ble isp class 原文地址:https://www.cnblogs.com/cythia2018/p/14660025.html
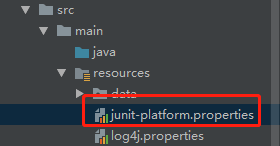
#是否允许并行执行true/false
junit.jupiter.execution.parallel.enabled = true
#是否支持方法级别多线程same_thread/concurrent
junit.jupiter.execution.parallel.mode.default = concurrent
#是否支持类级别多线程same_thread/concurrent
junit.jupiter.execution.parallel.mode.classes.default = concurrent
# the maximum pool size can be configured using a ParallelExecutionConfigurationStrategy
junit.jupiter.execution.parallel.config.strategy=fixed
junit.jupiter.execution.parallel.config.fixed.parallelism=10
import com.wechat.apiobject.DepartMentObject;
import com.wechat.apiobject.TokenHelper;
import io.restassured.response.Response;
import org.junit.jupiter.api.*;
import org.junit.jupiter.api.parallel.Execution;
import org.slf4j.Logger;
import org.slf4j.LoggerFactory;

import static org.junit.jupiter.api.Assertions.assertEquals;
import static org.junit.jupiter.api.parallel.ExecutionMode.CONCURRENT;

/**
 * 对创建部门进行并发测试
 */
@TestMethodOrder(MethodOrderer.OrderAnnotation.class)
public class Demo_06_1_thread_creatdepartment {
    private static final Logger logger = LoggerFactory.getLogger(Demo_06_1_thread_creatdepartment.class);
    static String accessToken;

    @BeforeAll
    public static void getAccessToken() throws Exception {
        accessToken = TokenHelper.getAccessToken();
        logger.info(accessToken);

    }

    @DisplayName("创建部门")
    @RepeatedTest(100)
    @Execution(CONCURRENT)
    void createDepartment() {
        String creatName= "name1234567";
        String creatEnName="en_name1234567";

        Response creatResponse = DepartMentObject.creatDepartMent(creatName,creatEnName,accessToken);
        assertEquals("0",creatResponse.path("errcode").toString());
    }
}
上一篇:Spring体系之核心容器篇
下一篇:SpringMvc组件初始化