JavaWeb - SpringBoot 入门
2021-06-09 06:05
阅读:597
标签:就是 toc aliyun ext ica 传统 charset 实例 lease
JavaWeb - SpringBoot 入门
目录
- JavaWeb - SpringBoot 入门
- 1 SpringBoot 基本应用
- 1.1 约定优于配置
- 1.2 Spring 缺点及SpringBoot 如何解决 Spring问题
- 2 SpringBoot 快速入门
- 2.1 Spring Initializr方式构建Spring Boot项目
- 2.2 单元测试
- 2.3 热部署
- 2.4 全局文件配置
- 2.5 配置文件属性注入方式
- 2.6 自定义配置
- 3 SpringBoot 原理及源码解析
- 3.1 依赖管理
- 3.2 自动配置
- 4 SpringBoot 整合框架
- 4.1 Springboot 整合 Mybatis
- 4.2 SpringBoot 整合 SSM
- 1 SpringBoot 基本应用
1 SpringBoot 基本应用
1.1 约定优于配置
// 约定优于配置(Convention over Configuration),又称按约定编程,是一种软件设计范式

//本质上是说,系统、类库或框架应该假定合理的默认值,而非要求提供不必要的配置。比如说模型中有一个名为User的类,那么数据库中对应的表就会默认命名为user。只有在偏离这一个约定的时候,例如想要将该表命名为person,才需要写有关这个名字的配置
1.2 Spring 缺点及SpringBoot 如何解决 Spring问题
// Spring 缺点
	配置重量级,项目库之间依赖版本不兼容问题

// SpringBoot 如何解决 Spring 问题
	核心思想为基于约定优于配置思想减少不必要的配置

	// 起步依赖
	// 本质上是一个Maven项目对象模型(Project Object Model,POM),定义了对其他库的传递依赖,这些东西加在一起即支持某项功能,即将具备某种功能的坐标打包到一起,并提供一些默认的功能

	// 自动配置
	// 自动将一些配置类的bean注入ioc容器并通过@autowired等注解来使用
	// 自动表现在只需引入想用功能的包不用关心配置
2 SpringBoot 快速入门
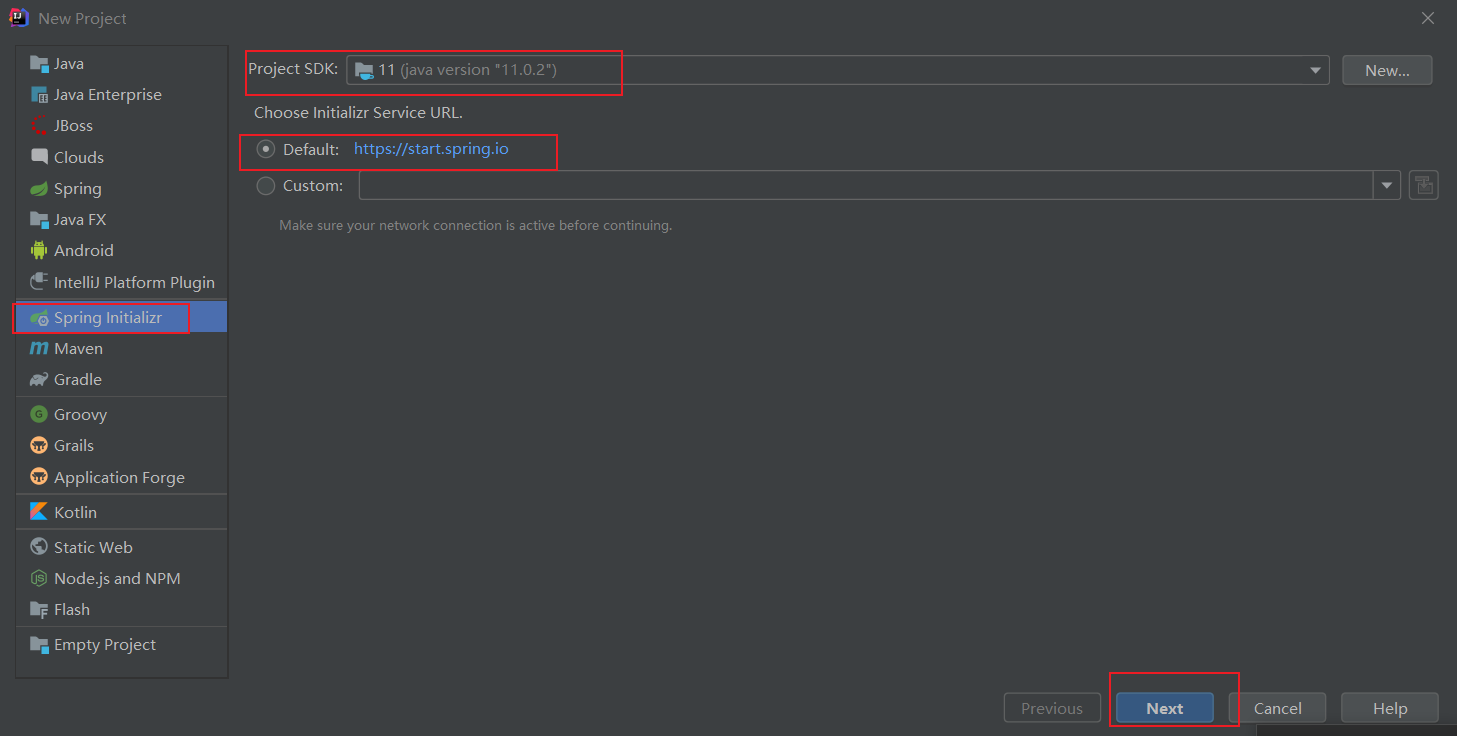
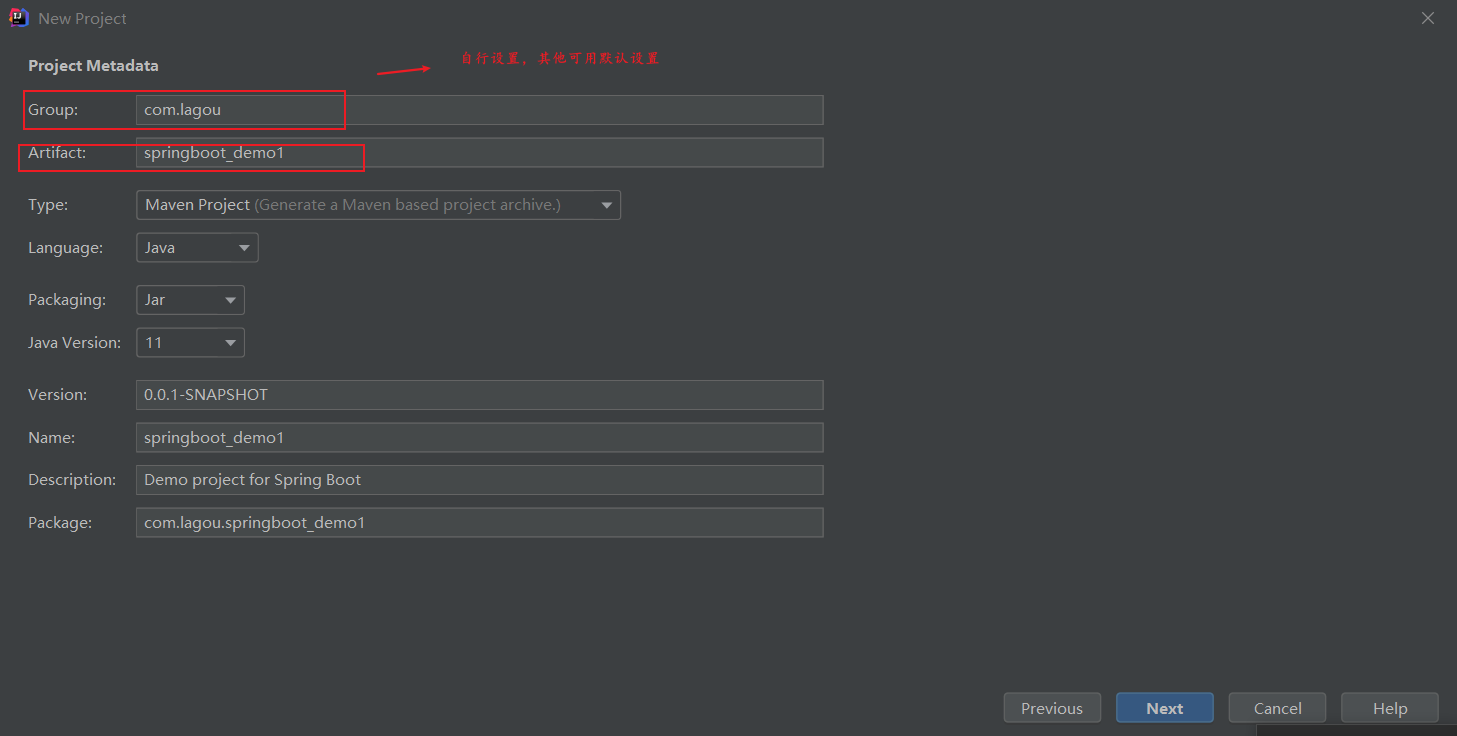
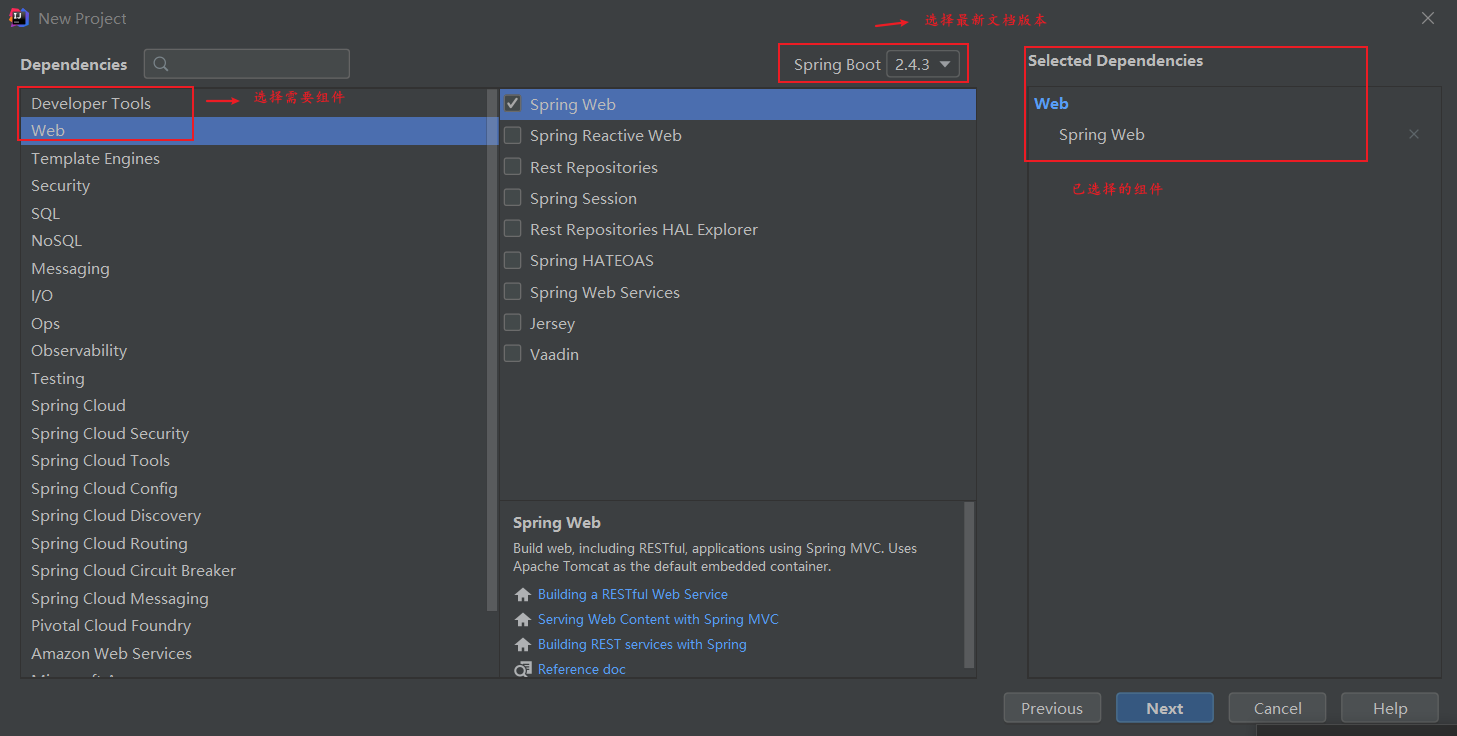
2.1 Spring Initializr方式构建Spring Boot项目
// 1 设置JDK 版本并在联网情况下选择默认初始服务地址

// 2 设置项目名称

// 3 选择组件和版本

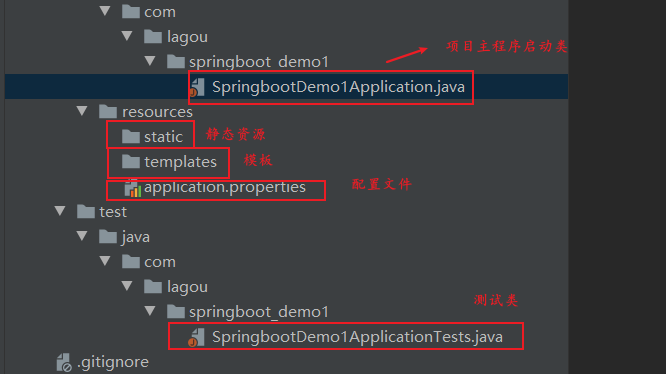
// 4 SpringBoot 项目结构图
生成项目启动类、存放前端静态资源和页面的文件夹、编写项目配置的配置文件以及进行项目单元测试的测试类
// 主程序启动类需要放到外部包(包括其他注解类)下
// pom 加载慢可导入aliyun仓库
aliyun-repos http://maven.aliyun.com/nexus/content/groups/public/ false aliyun-plugin http://maven.aliyun.com/nexus/content/groups/public/ false 
// 解决 @RestController 直接返回内容时中文乱码
	// 1 @RequestMapping(produces = "application/json; charset=utf-8")
	// 2 全局配置文件中配置
	#设置响应为utf-8
·	spring.http.encoding.force-response=true
2.2 单元测试
// 1 添加spring-boot-starter-test测试依赖启动器 通过Spring Initializr已导包
org.springframework.boot
spring-boot-starter-test
test 2.3 热部署
// 1 添加spring-boot-devtools热部署依赖启动器
org.springframework.boot
spring-boot-devtools
2.4 全局文件配置
// 对默认配置值修改,一般路径resource目录下,application.properties或者application.yaml
// 1 application.properties
// Spring Initializr 自动在Resource下生成该空文件
// 该文件中配置系统属性,环境变量,命令参数等,自定义配置文件名称位置
// 通过全局配置文件为自定义类赋值 @Component和@ConfigurationProperties(prefix = "xxx")注解
@ConfigurationProperties(prefix = "xxx")注解的作用是将配置文件中以xxx开头的属性值通过setXX()方法注入到实体类对应属性中
@Component注解的作用是将当前注入属性值的自定义类对象作为Bean组件放到Spring容器中
// xxx.name = tom String类型不加""
// List 和 数组类型 直接,隔开赋值,如 =tom,jack
// Map 类型 xxx.map.k1 = v1 (k1为key类型值,v1为value类型值)
// 对象 xxx.POJO.属性名 = 值
// 开启全局配置文件提示需要导包并Build Project (ctrl+F9)
org.springframework.boot
spring-boot-configuration-processor
true 2.5 配置文件属性注入方式
// 1 @ConfigurationProperties注入属性 与 @Component
@Component
@ConfigurationProperties(prefix = "person")
public class Person {
    private int id;
    // 属性的setXX()方法
    public void setId(int id) {
    this.id = id;
    }
}
// 2 @Value 注入 EL表达式
@Component
public class Person {
    @Value("${person.id}")
    private int id;
    ...
}
2.6 自定义配置
// 创建自定义配置文件并加载至全局配置
// 1 @PropertySource加载配置文件,然后可通过配置文件属性注入方式注入
@Component // 自定义配置类
@PropertySource("classpath:test.properties") // 指定自定义配置文件位置和名称
@ConfigurationProperties(prefix = "test") // 指定配置文件注入属性前缀
public class MyProperties {
    private int id;
    private String name;
    ...getXX()和setXX()
    ...toString()
}

// 2 @Configuration编写自定义配置类 @Configuration指定一个类为配置类,@Bean方法将返回值对象添加到Spring容器(id 默认为方法名)
@Configuration // 定义该类是一个配置类````
public class MyConfig {
    @Bean // 将返回值对象作为组件添加到Spring容器中,该组件id默认为方法名
    public MyService myService(){
    return new MyService();
    }
}
3 SpringBoot 原理及源码解析
3.1 依赖管理
// 1 为什么导入dependency时不需要指定版本?
	// 1.1 spring-boot-starter-parent依赖
		//作为Spring Boot项目的统一父项目依赖管理,并将项目版本号统一为2.2.2.RELEASE
		//spring-boot-starter-parent 父依赖spring-boot-dependencies
		// spring-boot-dependencies 设置  及进行统一版本号管理

// 2 spring-boot-starter-parent父依赖启动器的主要作用是进行版本统一管理,那么Web项目运行依赖的JAR包是从何而来的?
	// 2.1 spring-boot-starter-web依赖
		//spring-boot-starter-web依赖启动器的主要作用是提供Web开发场景所需的底层所有依赖
		//版本号由spring-boot-starter-parent父依赖进行的统一管理

// SpringBoot 没给 Mybatis, druid等框架提供依赖启动器,但这些框架自己实现mybatis-spring-boot-starter、druid-spring-boot-starter等
3.2 自动配置
// Spring Boot到底是如何进行自动配置的,都把哪些组件进行了自动配置?

	// 1 @SpringBootApplication注解标注类main方法为程序入口,该注解能扫描Spring组件并自动配置SpringBoot

	// 2 @SpringBootApplication为组合注解,主要是@SpringBootConfiguration,@EnableAutoConfiguration、@ComponentScan三个核心注解

		// 2.1 @SpringBootConfiguration表示SpringBoot配置类,其内部核心注解为@Configuration,表示该类为Spring配置类

		// 2.2 @EnableAutoConfiguration注解表示开启自动配置功能实现自动化配置,借助@Import收集并注册特定场景相关的bean加载到IoC容器

			// 2.2.1 @AutoConfigurationPackage 由也是@Import实现,给容器导入组件类(Registar),该类有registerBeanDefinitions()方法将主程序类所在包及所有子包下的组件到扫描到spring容器中

			// 2.2.2 @Import({AutoConfigurationImportSelector.class}),该类帮助springboot应用将所有符合条件的@Configuration配置都加载到当前SpringBoot创建并使用的IoC容器(ApplicationContext)中
				// 2.2.2.1 AutoConfigurationImportSelector通过selectImports方法确定导入组件,该方法使用内部工具类SpringFactoriesLoader,查找classpath上所有jar包中的META-INF/spring.factories进行加载,实现将配置类信息交给SpringFactory加载器进行一系列的容器创建过程

		// 2.3  @ComponentScan 注解具体扫描的包的根路径由SpringBoot项目主程序启动类所在包位置决定


// @EnableAutoConfiguration 案例分析
@EnableAutoConfiguration就是从classpath中搜寻META-INF/spring.factories配置文件,并将其中
org.springframework.boot.autoconfigure.EnableutoConfiguration对应的配置项通过反射(Java
Refletion)实例化为对应的标注了@Configuration的JavaConfig形式的配置类,并加载到IOC容器中

在项目中加入了Web环境依赖启动器,对应的WebMvcAutoConfiguration自动配置类就会生效,打开该自动配置类会发现,在该配置类中通过全注解配置类的方式对Spring MVC运行所需环境进行了默认配置,包括默认前缀、默认后缀、视图解析器、MVC校验器等。而这些自动配置类的本质是传统Spring MVC框架中对应的XML配置文件,只不过在Spring Boot中以自动配置类的形式进行了预先配置
4 SpringBoot 整合框架
4.1 Springboot 整合 Mybatis
// 引入对应的依赖启动器,并进行数据库相关参数设置
	// SQL - Mybatis Framework&MySQL Driver

	// application.properties配置数据库连接信息
	spring.datasource.url=jdbc:mysql://localhost:3306/springbootdata?serverTimezone=UTC&characterEncoding=UTF-8
	spring.datasource.username=root
	spring.datasource.password=root

// 注解整合
	// 创建Mapper 接口并定义方法
public interface CommentMapper {
    @Select("SELECT * FROM xx WHERE id =#{id}")
    public POJO findById(Integer id);
}
	// 启动类上添加Mapper扫描注解
@SpringBootApplication
@MapperScan("com.lagou.dao")
public class xxxxx {}

	// 当然字段名 a_id 和表对应实体类 aId不同时可在properties文件中开启驼峰命名匹配映射
mybatis.configuration.map-underscore-to-camel-case=true

// 配置文件整合
    // 创建Mapper 接口并添加@Mapper

    //Resources 目录下mapper文件夹编写mapper接口对应 xml文件 遵循代理开发但不必同包结构


	// properties文件配置 XML映射路径和别名
#配置MyBatis的xml配置文件路径
mybatis.mapper-locations=classpath:mapper/*.xml
#配置XML映射文件中指定的实体类别名路径
mybatis.type-aliases-package=com.lagou.pojo
4.2 SpringBoot 整合 SSM
// 1 Mybatis Framework & MySQL Driver & Spring Web 并导入 druid
com.alibaba
druid
1.1.3 JavaWeb - SpringBoot 入门
标签:就是 toc aliyun ext ica 传统 charset 实例 lease
原文地址:https://www.cnblogs.com/pengc931482/p/14497590.html
下一篇:Java基础篇——多线程
评论
亲,登录后才可以留言!