Centos7下搭建Django+uWSGI+nginx基于python3
2021-06-16 06:03
标签:需要 configure als 命名 通信 日志 another down list Centos7 + python3.6 + virtualenv 由于centos自带的是python2.7版本,所以要自己安装新的版本,这里就不对此描述了,直接开工 因为我们没有事先安装Django,直接用pycharm创建新的Django项目,指定我们刚才的虚拟环境pycharm会在这个环境下自动安装较新版本的Django,如果需要指定版本可以先用pip安装到虚拟环境,创建时项目,指定虚拟环境。 使用manager.py Task 工具测试一下项目,runserver,浏览器访问一下我们的admin 没有毛病继续下一步操作 然后浏览 http://127.0.0.1:8000,有”Hello World”输出即安装成功。 说明uWSGI没有毛病,接下一步 uwsgi支持ini、xml等多种配置方式,本文ini为例, 在项目下新建wifiproject_uwsgi.ini,添加如下配置: 进入到 /usr/local/nginx 安装目录下 把这三个文件分别复制拷贝到项目的conf文件夹,也可以重命名 然后对nginx.conf配置文件进行设置 这样 就不会在终端打印日志了 settings.py 中设置debug = False ,Django将不会代管静态文件,我们是交给nginx管理,所以要把django的相关静态文件收集到一个目录下,并在nginx的配置文件里指向该目录 settings.py 添加 STATIC_ROOT = os.path.join(BASE_DIR,‘static‘) 调用manage命令 collectstatic 就会自动把相关静态文件收集到上面的路径里 使用虚拟环境进入项目 然后运行 如果没有报错就开启了uwsgi Centos7下搭建Django+uWSGI+nginx基于python3 标签:需要 configure als 命名 通信 日志 another down list 原文地址:https://www.cnblogs.com/Thomas-blog/p/8998670.html1.电脑环境
2.具体流程
使用python虚拟环境
1.在自己想要创建虚拟环境的文件夹下创建虚拟环境,我们的uWSGI也是安装在虚拟环境中
1 virtualenv Env
2 cd Env
3 cd bin
4 启动虚拟环境  source activate  (关闭的命令 deactivate)
2.启动之后会看到命令行左边有括号括起的环境名称
1 pip3 install uwsgi 安装uwsgi库
3.安装pycharm
1 直接用浏览器下载tar.gz包
2 解压 tar xzvf xxx.tar.gz -C 指定解压到的目录
3 进入该目录
4 cd bin/
5 sh pycharm.sh
就开启了pycharm
4.创建django项目
5.测试uWSGI,在项目下创建一个test.py文件
1 def application(env, start_response):
2     start_response(‘200 OK‘, [(‘Content-Type‘,‘text/html‘)])
3     return "Hello World"
运行 sudo uwsgi --http 0.0.0.0:8000 --wsgi-file test.py
6.下载nginx并安装
1 wget http://nginx.org/download/nginx-1.13.10.tar.gz
2 进入下载目录,解压 tar xzvf nginx-1.13.10.tar.gz
3 进入解压目录  cd nginx-1.13.10
4 ./configure --prefix=/usr/local/nginx  #把所有资源文件放在/usr/local/nginx的路径中,不会杂乱。
5  make
6   make install
7. 配置uwsgi
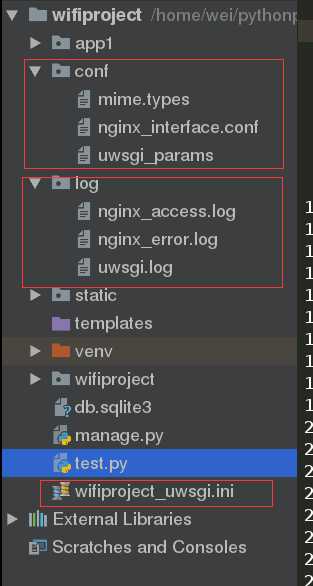
#wifiproject_uwsgi.ini file
[uwsgi]

#与nginx通信
socket = 127.0.0.1:8080

#让uwsgi作为单独的web-server,这里注释掉
#http = 127.0.0.1:8080

#django项目根目录
chdir = /home/wei/pythonproject/wifiproject

#wsgi.py在项目中的位置
module  = wifiproject.wsgi

enable-threads = true
#进程数
processes = 4
#线成
threads = 2
#退出时清空环境变量
vacuum = true

#配uWSGI搜索静态文件目录,(及django项目下存放的static文件目录,用uwsgi作为单独服务器时才需要设置,此时我们用nginx处理静态文件
#check-static = /home/wei/pythonproject/wifiproject

#日志存储路径
daemonize = /home/wei/pythonproject/wifiproject/log/uwsgi.log
8. 配置nginx
  1 user  root; #使用root否则静态文件可能加载失败
  2 worker_processes  1; #运行nginx工作进程,一般几个cpu核心就写ji
  3
  4 #error_log  logs/error.log;
  5 #error_log  logs/error.log  notice;
  6 #error_log  logs/error.log  info;
  7
  8 #pid        logs/nginx.pid;
  9
 10
 11 events {
 12     worker_connections  1024; #一个进程能同时处理1024个请求
 13 }
 14
 15
 16 http {
 17     include       mime.types;
 18     default_type  application/octet-stream;
 19
 20     #log_format  main  ‘$remote_addr - $remote_user [$time_local] "$request" ‘
 21     #                  ‘$status $body_bytes_sent "$http_referer" ‘
 22     #                  ‘"$http_user_agent" "$http_x_forwarded_for"‘;
 23
 24     #access_log  logs/access.log  main;
 25
 26     sendfile        on;
 27     #tcp_nopush     on;
 28
 29     #keepalive_timeout  0;
 30     keepalive_timeout  65;
 31
 32     #gzip  on;
 33 #开始配置一个域名,一个server配置一般对应一个域名
 34     server {
 35         listen       8002; #暴露给外部的端口,等于浏览器访问的端口
 36         server_name  localhost; #域名
 37         charset utf-8;
 38         error_log   /home/wei/pythonproject/wifiproject/log/nginx_error.log;
 39         access_log  /home/wei/pythonproject/wifiproject/log/nginx_access.log;
 40 #可以有多个location
 41         location / {
 42             #root   html; #站点根目录
 43             #index  index.html index.htm; #索引文件
 44     include  /home/wei/pythonproject/wifiproject/conf/uwsgi_params; #设置将所有请求转发给uwsgi服务器处理
 45     uwsgi_pass  127.0.0.1:8080; #指定uwsgi的url,与uwsgi通信
 46
 47          }
 48 location /static/ {
 49 #设置将/static的静态请求交给nginx,并指定静态文件的目录
 50
 51 alias  /home/wei/pythonproject/wifiproject/static/;
 52 }
 53
 54
 55         #error_page  404              /404.html;
 56
 57         # redirect server error pages to the static page /50x.html
 58         error_page   500 502 503 504  /50x.html;
 59         #定义页面错误,如果出现这些错误,把站点根目录下的50x.html返回给用户
 60 location = /50x.html {
 61             root   html;
 62         }
 63
 64         # proxy the PHP scripts to Apache listening on 127.0.0.1:80
 65         #
 66         #location ~ \.php$ {
 67         #    proxy_pass   http://127.0.0.1;
 68         #}
 69
 70         # pass the PHP scripts to FastCGI server listening on 127.0.0.1:9000
 71         #
 72         #location ~ \.php$ {
 73         #    root           html;
 74         #    fastcgi_pass   127.0.0.1:9000;
 75         #    fastcgi_index  index.php;
 76         #    fastcgi_param  SCRIPT_FILENAME  /scripts$fastcgi_script_name;
 77         #    include        fastcgi_params;
 78         #}
 79
 80         # deny access to .htaccess files, if Apache‘s document root
 81         # concurs with nginx‘s one
 82         #
 83         #location ~ /\.ht {
 84         #    deny  all;
 85         #}
 86     }
 87
 88
 89     # another virtual host using mix of IP-, name-, and port-based configuration
 90     #
 91     #server {
 92     #    listen       8000;
 93     #    listen       somename:8080;
 94     #    server_name  somename  alias  another.alias;
 95
 96     #    location / {
 97     #        root   html;
 98     #        index  index.html index.htm;
 99     #    }
100     #}
101
102
103     # HTTPS server
104     #
105     #server {
106     #    listen       443 ssl;
107     #    server_name  localhost;
108
109     #    ssl_certificate      cert.pem;
110     #    ssl_certificate_key  cert.key;
111
112     #    ssl_session_cache    shared:SSL:1m;
113     #    ssl_session_timeout  5m;
114
115     #    ssl_ciphers  HIGH:!aNULL:!MD5;
116     #    ssl_prefer_server_ciphers  on;
117
118     #    location / {
119     #        root   html;
120     #        index  index.html index.htm;
121     #    }
122     #}
123
124 }
9 创建相关日志文件

10 生产模式下diango设置
11. 使用配置文件开启 uwsgi

12 在nginx启动目录下使用配置文件开启 nginx

13 使用浏览器访问
文章标题:Centos7下搭建Django+uWSGI+nginx基于python3
文章链接:http://soscw.com/essay/94456.html