Spring Security简单的登陆验证授权
2021-06-17 13:02
阅读:571
(1)其中 getAuthorities 方法是获取用户角色信息的方法,用于授权。不同的角色可以拥有不同的权限。
(2)账户未过期、账户未锁定和密码未过期我们这里没有用到,直接返回 True,你也可以根据自己的应用场景写自己的业务逻辑。
(3)为了区分是否是同一个用户,重写 equals 和 hashCode 方法。
因为实现接口之后可以获得数据库中的真是存在的信息;
使用这个框架之间我们要引入它,首先要在web.xml文件中引入它
springSecurityFilterChain class>org.springframework.web.filter.DelegatingFilterProxy class>springSecurityFilterChain /*
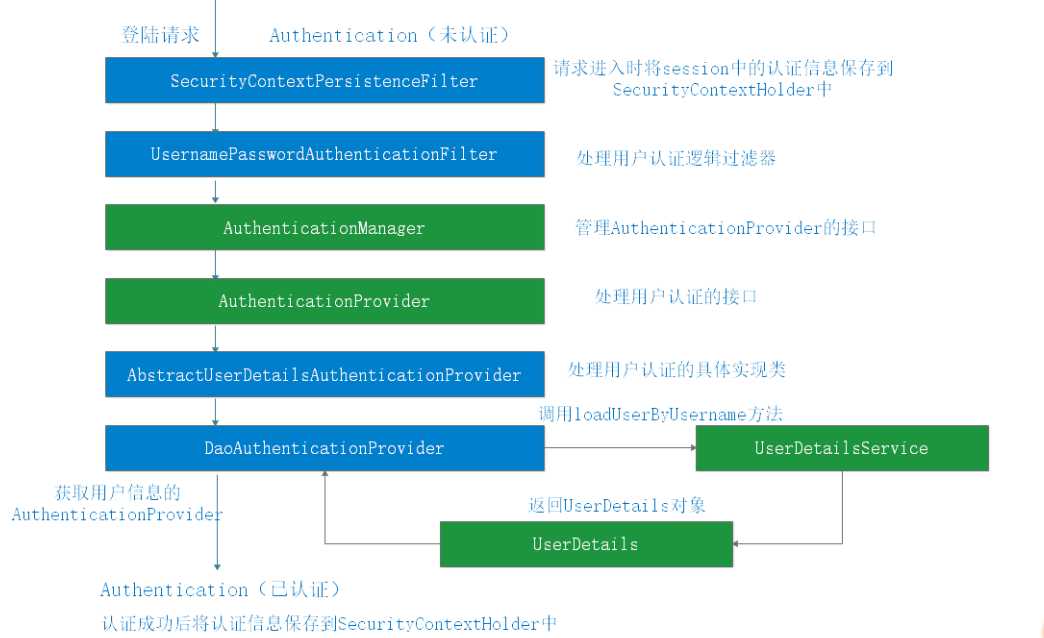
然后UsernamePasswordAuthenticationFilter这个过滤器会接受到此方法,在源码里面已经帮我们实现获得密码以及用户名的操作,并且规定post请求方法
具体代码如下:
public Authentication attemptAuthentication(HttpServletRequest request, HttpServletResponse response) throws AuthenticationException {
    if (this.postOnly && !request.getMethod().equals("POST")) {
        throw new AuthenticationServiceException("Authentication method not supported: " + request.getMethod());
    } else {
        String username = this.obtainUsername(request);
        String password = this.obtainPassword(request);
        if (username == null) {
            username = "";
        }

        if (password == null) {
            password = "";
        }

        username = username.trim();
        UsernamePasswordAuthenticationToken authRequest = new UsernamePasswordAuthenticationToken(username, password);
        this.setDetails(request, authRequest);
        return this.getAuthenticationManager().authenticate(authRequest);
    }
}
在现实生活中,开发中可以增加的逻辑很多,所以一般都会重写这个方法;我们要建一个自己的类去继承这个类:
public class AccountAuthenticationFilter extends UsernamePasswordAuthenticationFilter {
    private String codeParameter = "code";

    @Override
    public Authentication attemptAuthentication(HttpServletRequest request, HttpServletResponse response) throws AuthenticationException {
        String username = this.obtainUsername(request);
        String password = this.obtainPassword(request);
        String code = this.obtainCode(request);
        String caChecode = (String)request.getSession().getAttribute("VERCODE_KEY");
        boolean flag = CodeValidate.validateCode(code,caChecode);
        if(!flag){
            throw new UsernameNotFoundException("验证码错误");
        }
        if(username == null) {
            username = "";
        }
        if(password == null) {
            password = "";
        }
        username = username.trim();
        //通过构造方法实例化一个 UsernamePasswordAuthenticationToken 对象,此时调用的是 UsernamePasswordAuthenticationToken 的两个参数的构造函数
        //其中 super(null) 调用的是父类的构造方法,传入的是权限集合,因为目前还没有认证通过,所以不知道有什么权限信息,这里设置为 null,然后将用户名和密码分别赋值给
        // principal 和 credentials,同样因为此时还未进行身份认证,所以 setAuthenticated(false)。
        UsernamePasswordAuthenticationToken authRequest = new UsernamePasswordAuthenticationToken(username, password);
        //setDetails(request, authRequest) 是将当前的请求信息设置到 UsernamePasswordAuthenticationToken 中。
        this.setDetails(request, authRequest);
        //通过调用 getAuthenticationManager() 来获取 AuthenticationManager,通过调用它的 authenticate 方法来查找支持该
        // token(UsernamePasswordAuthenticationToken) 认证方式的 provider,然后调用该 provider 的 authenticate 方法进行认证)。
        return this.getAuthenticationManager().authenticate(authRequest);
    }

    protected String obtainCode(HttpServletRequest request) {
        return request.getParameter(this.codeParameter);
    }
}
里面我们完成了一个验证码的验证工作,并且把仅为post请求给屏蔽,获取到用户名和用户密码后,我们把它放在了UsernamePasswordAuthenticationToken类里,进去之后看到了
public UsernamePasswordAuthenticationToken(Object principal, Object credentials) {
    super((Collection)null);
    this.principal = principal;
    this.credentials = credentials;
    this.setAuthenticated(false);
}
代码中给予了注释,然后setDetails将其存入UsernamePasswordAuthenticationToken之中,然后我们通过getAuthenticationManager()
获取AuthenticationManager这个接口,在调用接口里的方法,我们继续查找会发现AuthenticationManager这个类实现了这个接口的方法,
在方法中它又调用了AuthenticationProvide这个接口,那AuthenticationProvide这个接口的实现类是AbstractUserDetailsAuthenticationProvider
并且实现了authenticate方法,在这个方法里面引用了两个重要的方法additionalAuthenticationChecks(user,(UsernamePasswordAuthenticationToken) authentication);
和user = retrieveUser(username,(UsernamePasswordAuthenticationToken) authentication);
那这两个方法在子类DaoAuthenticationProvider中实现,两个方法上面都有代码,但是我们再看一下其中重点的方法
protected final UserDetails retrieveUser(String username, UsernamePasswordAuthenticationToken authentication) throws AuthenticationException {
    UserDetails loadedUser;
    try {
    //很关键
        loadedUser = this.getUserDetailsService().loadUserByUsername(username);
    } catch (UsernameNotFoundException var6) {
        if (authentication.getCredentials() != null) {
            String presentedPassword = authentication.getCredentials().toString();
            this.passwordEncoder.isPasswordValid(this.userNotFoundEncodedPassword, presentedPassword, (Object)null);
        }

        throw var6;
    } catch (Exception var7) {
        throw new InternalAuthenticationServiceException(var7.getMessage(), var7);
    }

    if (loadedUser == null) {
        throw new InternalAuthenticationServiceException("UserDetailsService returned null, which is an interface contract violation");
    } else {
        return loadedUser;
    }
}
那个注释的地方是要获得一个UserDetails,上面有说到UserDetailsService常见的实现类有JdbcDaoImpl,InMemoryUserDetailsManager,为了简化我们自己写一个实现类,
因为结合我们pojo对象实现了UserDetails的接口,所以我们创建如下类:
public class AccountDetailsService implements UserDetailsService{ @Autowired private UserService userService; @Autowired private RoleService roleService; @Override public UserDetails loadUserByUsername(String username) throws UsernameNotFoundException { User user = userService.findByEmail(username); if(user == null){ throw new UsernameNotFoundException("用户名或密码错误"); } Listroles = roleService.findByUid(user.getId()); user.setRoles(roles); return user; } }
实现了loadByUsername的方法。到此为止我们我们在逆向的回到了UsernamePasswordAuthenticationFilter上,且返回了一个Authentication对象。
我们在第一个关键词SecurityContextHolder中将其取出,做一些自己的业务逻辑。
工作到此还没有结束,我们还要去授权,对认证通过的人去授权,这里我们可以xml去配置这些信息:我们前面留了一个问题就是salt加密密码验证,我们前面还不知道salt
对象是什么,所以需要配置一下
其实salt可以自己代码去配置,通过这个xml去配置也行,最紧要的还是要和你原来数据库密码的加密方式有关系,我这里是用了pojo对象里的用户名作为salt对象,
所以我的密码加密方式就是username+password再用MD5加密了。那还有一个重要的工作就是授权配置
这些都是基础的一些授权操作,还有配置在我们的AccountAuthenticationFilter类中是不是通过了验证
class="***.***.**.**.AccountAuthenticationFilter">
    class="org.springframework.security.web.authentication.SavedRequestAwareAuthenticationSuccessHandler">
            class="org.springframework.security.web.authentication.SimpleUrlAuthenticationFailureHandler">
其中defaultTargetUrl和defaultFailureUrl是通过和不通过的一些采取措施,通常是一些页面跳转。
其余的配置文件信息,我还没有琢磨透,以后有时间在发表一篇。
最后:用一张图大致的总结下它的具体流程(本图来自王林永老师的gitchat):

上一篇:C# WCF初始
下一篇:Python07,字典
评论
亲,登录后才可以留言!