【Win10】实现控件倒影效果
2021-06-22 10:04
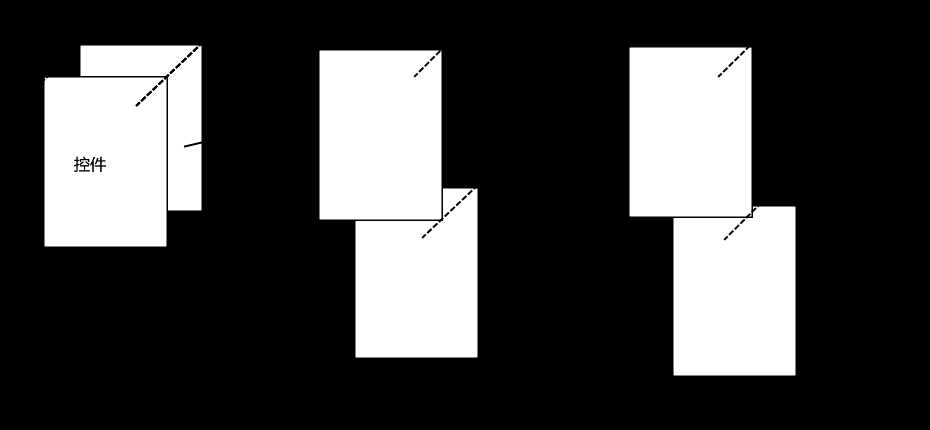
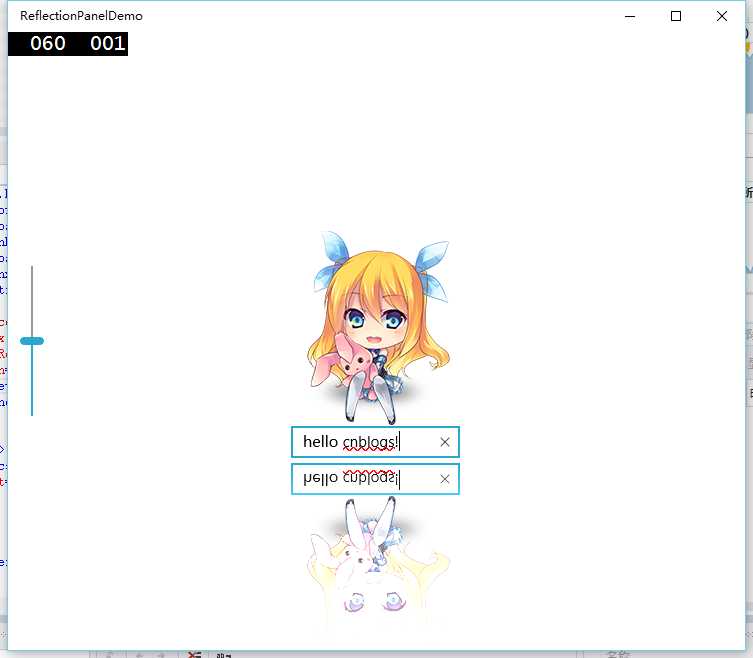
标签:ble cccccc res http winrt 部分 xaml inf 反转 先引入个小广告: 最近买了台小米盒子折腾下,发觉 UI 还是挺漂亮的,特别是主页那个倒影效果。 (图随便找的,就是上面图片底部的那个倒影效果。) 好了,广告结束,回归正题,这个倒影效果我个人觉得是挺不错的,那么有没有办法在 Win10 中实现呢? 稍微分析了一下,大概层次是这样的: 简单点来说,就是倒影显示跟控件显示一样,然后往下翻转,再平移一下就好了。最后再对倒影加个渐变透明就 perfect 了。 翻转、平移都很容易,使用 RenderTransform 就可以了。麻烦就麻烦在如何让倒影的显示跟控件的显示相同。 在 WinRT 里,是没有 VisualBrush 这种东西的,因此我们得另寻他径。俗语说:上帝关闭一扇门的同时也为你打开一扇窗。微软虽然去掉 VisualBrush,但是给了我们 RenderTargetBitmap 这种获取绝大部分控件当前样貌的神器。(MediaElement 获取不了,WebView 则需另外使用 WebViewBrush 来获取,这里我们忽略掉这两个不是常见需求的家伙。) 那么我们就可以将倒影设置为 Image 控件,然后赋值上 RenderTargetBitmap 就可以了。但问题又来了,我们应该什么时候去抓一次控件的外貌?查阅 MSDN 得知,LayoutUpdated 事件可以帮到我们。 还等什么,立马开始编写我们的代码。 创建我们的项目,新建一个名字叫做 ReflectionPanel 的模板化控件。 然后定义我们的控件模板如下: 这样对应上之前的分析了。 接下来编写 cs 代码。 这里是最关键的代码。详细可以看文章末尾提供的 demo。 接下来尝试一下吧。 感觉还不错的说。 最后,我们来做渐变的半透明效果。 在 WinRT 里,由于没了 OpacityMask 属性,因此我们还是从图片入手吧。 RenderTargetBitmap 有一个叫 GetPixelsAsync 的方法,可以获取到图片的数据,格式是以 BGRA8 的格式,这里联动一下老周的 blog 好了(http://www.cnblogs.com/tcjiaan/p/4231886.html)。 简单点说,就是每 4 个 byte 代表一个像素。我们再简单分析下需求,那么可以得出,图片最顶部是最透明的,最底部是最不透明的。 经过简单的数学计算,我们可以写出以下代码: 最后我们将修改后的 data 弄到 Image 控件上去就 ok 了。这里我们使用 WriteableBitmap。 大功告成,看一下 Demo 的效果。 最后附带完整 Demo 下载:ReflectionPanelDemo.zip 【Win10】实现控件倒影效果 标签:ble cccccc res http winrt 部分 xaml inf 反转 原文地址:https://www.cnblogs.com/lonelyxmas/p/10218111.html

ResourceDictionary xmlns="http://schemas.microsoft.com/winfx/2006/xaml/presentation"
                    xmlns:x="http://schemas.microsoft.com/winfx/2006/xaml"
                    xmlns:local="using:ReflectionPanelDemo"
                    xmlns:controls="using:ReflectionPanelDemo.Controls">
    Style TargetType="controls:ReflectionPanel">
        Setter Property="HorizontalAlignment"
                Value="Center" />
        Setter Property="VerticalAlignment"
                Value="Center" />
        Setter Property="Template">
            Setter.Value>
                ControlTemplate TargetType="controls:ReflectionPanel">
                    Grid x:Name="RootLayout"
                          Background="{TemplateBinding Background}">


                        Image x:Name="ReflectionImage"
                               Stretch="None"
                               RenderTransformOrigin="0.5,1">
                            Image.RenderTransform>
                                TransformGroup>

                                    ScaleTransform ScaleY="-1" />

                                    TranslateTransform x:Name="SpacingTransform"
                                                        Y="0" />
                                TransformGroup>
                            Image.RenderTransform>
                        Image>


                        ContentControl x:Name="ContentBorder"
                                        Content="{TemplateBinding Content}" />

                    Grid>
                ControlTemplate>
            Setter.Value>
        Setter>
    Style>
ResourceDictionary>
protected override void OnApplyTemplate()
{
    FrameworkElement rootLayout = (FrameworkElement)this.GetTemplateChild("RootLayout");

    // 实际内容容器。
    this._contentBorder = (ContentControl)this.GetTemplateChild("ContentBorder");

    // 倒影图片。
    this._reflectionImage = (Image)this.GetTemplateChild("ReflectionImage");

    // 倒影位移。
    this._spacingTransform = (TranslateTransform)this.GetTemplateChild("SpacingTransform");
    this._spacingTransform.Y = this.ReflectionSpacing;

    if (DesignMode.DesignModeEnabled == false)
    {
        rootLayout.LayoutUpdated += this.RootLayoutChanged;
    }
}

private async void RootLayoutChanged(object sender, object e)
{
    try
    {
        // 呈现控件到图像源。
        RenderTargetBitmap contentRender = new RenderTargetBitmap();
        await contentRender.RenderAsync(this._contentBorder);

        // 设置倒影图片。
        this._reflectionImage.Source = contentRender;
    }
    catch
    {
    }
}

// 获取图像数据。
byte[] bgra8 = (await contentRender.GetPixelsAsync()).ToArray();

// 获取图像高度和宽度。
int width = contentRender.PixelWidth;
int height = contentRender.PixelHeight;

for (int i = 0; i 4)
{
    // 获取该像素原来的 A 通道。
    byte a = bgra8[i + 3];

    // 计算该像素的 Y 轴坐标。
    int y = (i / 4) / width;

    // 计算新的 A 通道值。
    bgra8[i + 3] = (byte)(a * y / height);
}
WriteableBitmap outputBitmap = new WriteableBitmap(width, height);
bgra8.CopyTo(outputBitmap.PixelBuffer);

// 设置倒影图片。
this._reflectionImage.Source = outputBitmap;
