基于php实现的验证码小程序
2018-09-07 19:12
验证码功能(个人理解):
减轻服务器的压力(如12306的验证码功能); 防止暴力注册
个人思路:在a-z,A-Z,1-9生成n位随机的数来构成新的验证码。
关于生成验证码的几个小函数
range() //指定范围输出一个数组
a) 如: range(1,9)
array_merge()//合并数组
a) array_merge(数组1,数组2….)
array_rand(数组,数量)
a) 随机从数组中取出几个下标返回一个数组
shuffle(数组)//将再一次打乱数组中元素 mt_rand(指定一个范围) //生成一个更好的随机数 如: mt_rand(1,5) //生成一个在1-5之间的任意数
生成验证码代码
<?php $arr1=range(a, z);//指定范围输出一个数组 $arr2=range(A, Z); $arr3=range(1,9); $arr=array_merge($arr1,$arr2,$arr3); //合并数组 $index = array_rand($arr,5); //在$arr中随机取5个数,返回值是$arr的下标 Shuffle($index); $code = ;//定义一个空的字符串来存储生成的验证码用点来进行拼接 foreach ($index as $key => $value) {//遍历数组 $code.= $arr[$value];//根据下标取数组中的值 } var_dump($code); ?>
运行结果截图

完善:要把验证码添加到图像中这样的验证码才逼真
在完善之前先介绍有关图像创建的大致步骤
创建图像
方法一: 创建一个真彩色图像 (空画布)
imagecreatetruecolor(width, height) //创建一个真彩色图像
说明:
width : 画布的宽度(像素) height: 画布的高度(像素) 返回值为图像资源

注意:

为真彩色图像: 填充颜色
imagefill(image, x, y, color) //为图像资源填充颜色
说明:
image //图像资源 x,y,填充的坐标点(注意:填充的与此点最接近的颜色) color; //用什么颜色来填充
为真彩色图像: 分配颜色
imagecolorallocate(image, red, green, blue)
说明:
image //图像资源 red: //红颜色(0-255) 或 0x(00-ff) //即十六进制来表示 (0xff就是255) green//绿颜色(0-255) blue //蓝颜色(0-255)
imagefill和imagecolorallocate的代码演示
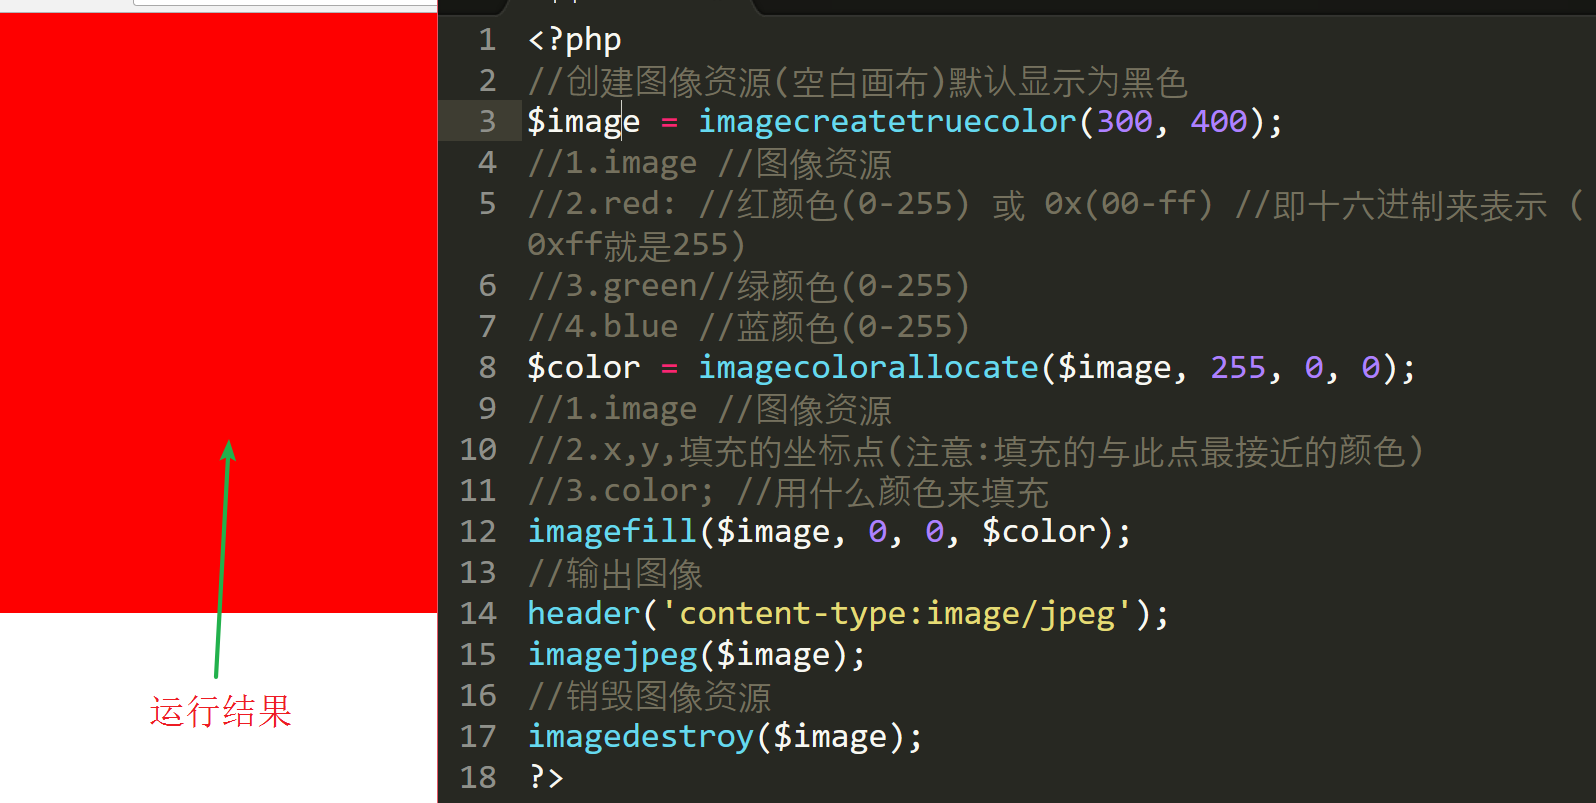
在没有给画布填充颜色时的效果

给画布填充颜色时的效果和代码
<?php //创建图像资源(空白画布)默认显示为黑色 $image = imagecreatetruecolor(300, 400); //1.image //图像资源 //2.red: //红颜色(0-255) 或 0x(00-ff) //即十六进制来表示 (0xff就是255) //3.green//绿颜色(0-255) //4.blue //蓝颜色(0-255) $color = imagecolorallocate($image, 255, 0, 0); //1.image //图像资源 //2.x,y,填充的坐标点(注意:填充的与此点最接近的颜色or; //用什么颜色来填充 imagefill($image, 0, 0, $color); //输出图像 header(content-type:image/jpeg); imagejpeg($image); //销毁图像资源 imagedestroy($image); ?>
结果截图;
输出图像(以jpeg为例)
输出图像到浏览器
a) header(content-type:image/jpeg); //设置将图像通过浏览来查看
b) imagejpeg(图像资源)
按文件进行输出图像
a) imagejpeg(图像资源,图像路径,图像的质量) //质量取值0-100
b) 注意:
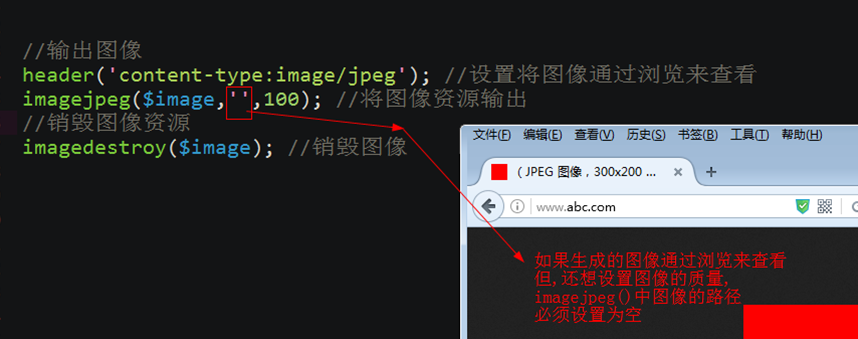
注意:只能jpeg格式才有质量这个参数.
销毁图像
imagedestroy($image); //销毁图像,释放内存资源.
注意: 当前生成几个图像资源,就销毁几个.
验证码的整个代码:
<?php //实例:让文本居于图像的正中 //创建图像资源(空白的画布) $image = imagecreatetruecolor(100, 50); $color = imagecolorallocate($image, mt_rand(20,200), mt_rand(20,200), mt_rand(20,200)); //为图像资源填充颜色 imagefill($image, 0, 0, $color); //绘制图像 $font = 5; //验证码的开始 $arr1 = range(a,z); $arr3 = range(A,Z); $arr2 = range(1,9); //array_merge — 合并一个或多个数组 $arr = array_merge($arr1,$arr2,$arr3); $index = array_rand($arr,5); //随机从原数组中找出5个下标 $string = ; foreach ($index as $value) { //$value 两个功能,即是$index中的值,又是$arr中的下标 $string .= $arr[$value]; //将得到字符进行连接 } //验证码的结束 //mt_rand — 生成更好的随机数 //echo mt_rand(1,5);die; //加入点干扰 $pointcolor = imagecolorallocate($image, mt_rand(20,200), mt_rand(20,200), mt_rand(20,200)); //循环创建1000个干扰点 for ($i=0; $i <1000 ; $i++) { imagesetpixel($image, mt_rand(0,imagesx($image)), mt_rand(0,imagesy($image)), $pointcolor); } //加入线的干扰 $lintecolor = imagecolorallocate($image, mt_rand(20,200), mt_rand(20,200), mt_rand(20,200)); // 循环创建50个线干扰 for ($i=0; $i <50 ; $i++) { imageline($image, mt_rand(0,imagesx($image)), mt_rand(0,imagesy($image)), mt_rand(0,imagesx($image)), mt_rand(0,imagesy($image)) ,$lintecolor); } //一个字符的宽度 imagefontwidth($font) //字符串的个数: strlen(字符串) //一个字符的宽度*字符串的个数 //所有字符串宽度和= 一个字符的宽度*字符串的个数 //$x = (画布的宽度-所有字符串宽度和)/2 $x = (imagesx($image)-imagefontwidth($font)*strlen($string))/2; //$y = (画布的高度-字符的高度)/2; //字符的高度: imagefontheight($font) $y = (imagesy($image)-imagefontheight($font))/2; $stringcolor = imagecolorallocate($image, mt_rand(20,200), mt_rand(20,200), mt_rand(20,200)); imagestring($image, $font, $x, $y, $string, $stringcolor); //输出图像 header(content-type:image/jpeg); //设置将图像通过浏览来查看 imagejpeg($image,,100); //将图像资源输出 //销毁图像资源 imagedestroy($image); //销毁图像
理解代码中的一些函数
加入干扰的点
imagesetpixel(image, x, y, color)
说明:x,y 一个点的坐标

加入干扰的线
imageline(image, x1, y1, x2, y2, color)
说明: x1,y1是线的一个端点坐标; x2,y2是线的另一个端口的坐标; 由两点画一条线

让验证码居于图像的正中
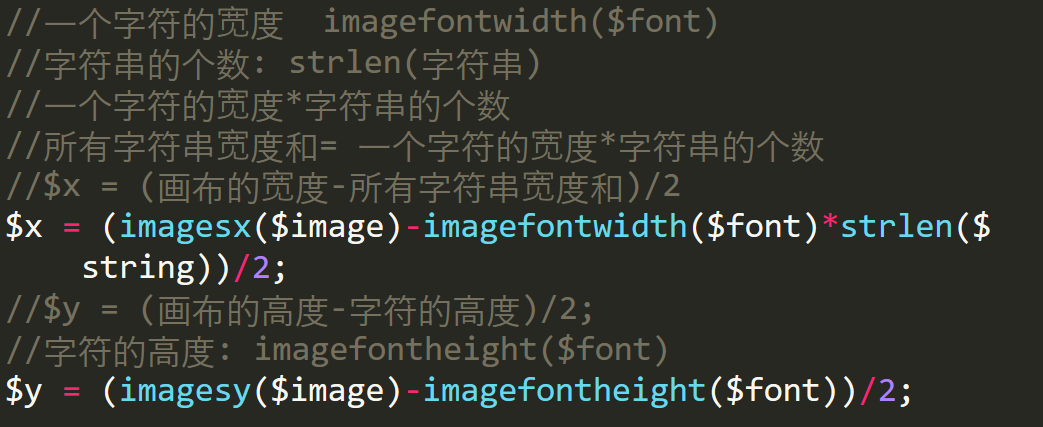
imagefontheight(font)获取字体的高度: imagefontwidth(font)获取字体的宽度: strlen(字符串)//获取字符串的长度 imagesx(image) //获取画布的宽度 imagesy(image) //获取画布的高度
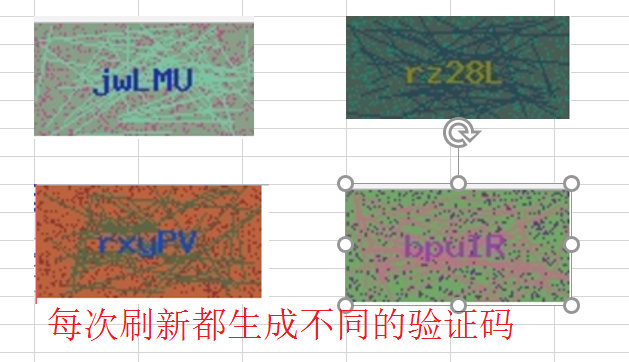
最后运行结果
再次完善(和html代码结合起来)
Html代码
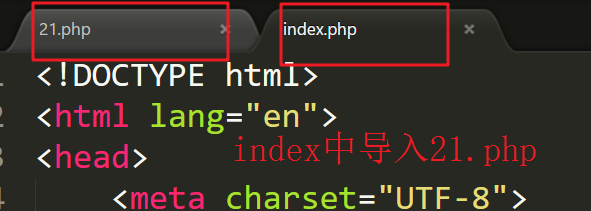
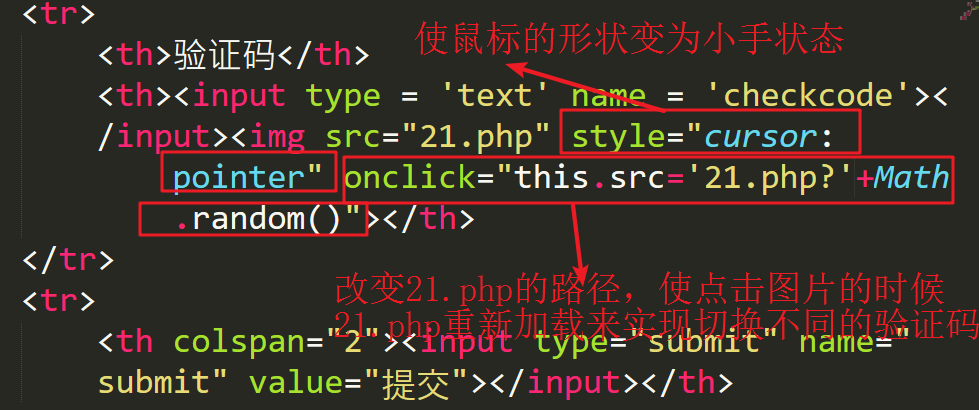
<!DOCTYPE html> <html lang=en> <head> <meta charset=UTF-8> <title>Document</title> </head> <body> <form name=frm method=post action=> <table width=30% border=2 align=center rules=all cellpadding=10> <tr> <th colspan=2>请输入信息</th> </tr> <tr> <th>姓名:</th> <th><input type=text name=username></input></th> </tr> <tr> <th>密码:</th> <th><input type=password name=userpwd></input></th> </tr> <tr> 555556 <th>验证码</th> <th><input type = text name = checkcode></input><img src=21.php style=cursor:pointer onclick=this.src=21.php?+Math.random()></th> </tr> <tr> <th colspan=2><input type=submit name=submit value=提交></input></th> </tr> </table> </form> </body> </html>
理解;
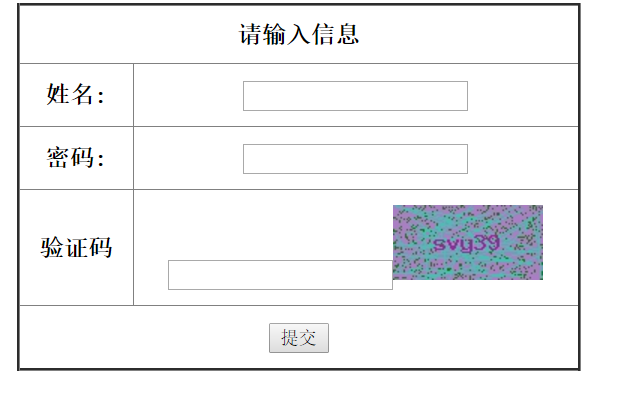
最后结果截图
以上就是本文的全部内容,希望本文的内容对大家的学习或者工作能带来一定的帮助,同时也希望多多支持脚本之家!