主机win7,VMware中debian6采用NET方式上网
2020-11-18 08:34
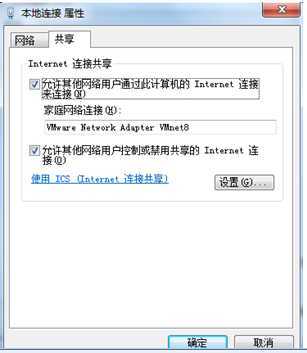
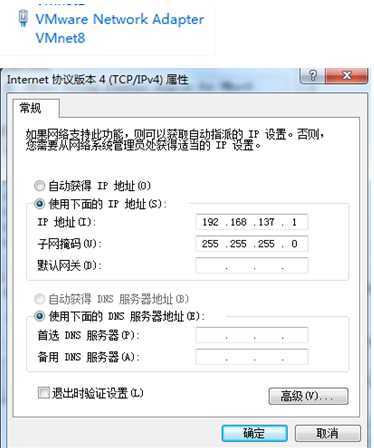
标签:style blog tar c ext color 很久以前就是net方式上网,最近重装虚拟机后上不去网了,弄了半天才成功,必须记下来免得以后又忘了 以下是网上找的方法,但是第2步不需要 原文地址http://www.cnblogs.com/sophine/archive/2012/04/26/2471227.html 1、现在安装好的虚拟机中设置网络连接为 NAT 2、在WIN7电脑的本地连接中设置如下:(不需求这步,跳过) 3、在VMware Nerwrk Adapter VMnet8 中设置IP 为192.168.137.1 (这个ip
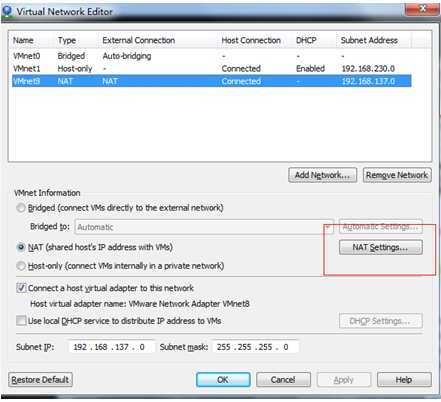
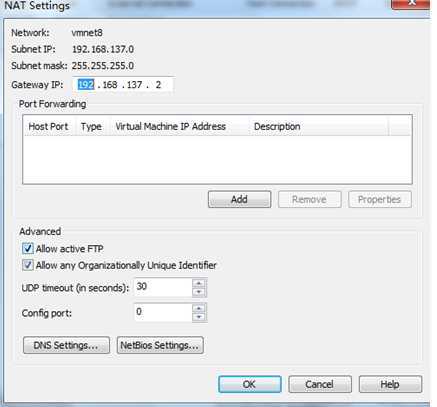
是在WIN 7 中 ifconfig 查看得知的。这个ip自己随意设)如下: 4、在VMware 虚拟机中选择 virtual netword editor 后进入下图: 设置VMnet8的网关IP为192.168.137.2,如下图: 在NAT Setting 中设置网关IP: 5.通过ifonfig命令设置ubuntu 临时生效IP. (1). 在终端: ping
192.168.137.2,检验是否可以连通,也可能还是联不通。若不通,通过ifconfig方式设置ip,具体见步骤b和c。 但是这种方式只能临时生效,如果重启Uunutu,IP,又会变化。 (2).设置网卡临时IP 这样就算设置好了网卡eth0的IP地址和子网掩码 (3). 设置网关 sudo route add default gw 192.168.137.2 (4). ping 网关就可以ping通了 (5). 设置DNS 修改/etc/resolv.conf,在其中加入 完成。 6. 为网卡配置静态Ubuntu IP地址(永久IP,重启电脑不会丢失)interfaces 和resolv.conf文件都要改 (1)打开要编辑的文件interfaces 它的的目录是/etc/network/interfaces sudo vi /etc/network/interfaces 或者:sudo gedit
/etc/networking/interfaces 此时便可以在文本编辑器中编写文件中的内容,要方便多 (2)将文件里的内容改为: auto eth0 iface eth0 inet static address 192.168.137.128 netmask 255.255.255.0 gateway 192.168.137.2 (3)配置DNS sudo gedit /etc/resolv.conf //使用此语句打开配置DNS的文件,修改即可 nameserver 192.168.137.2 (4)使用下面的命令使网络设置生效 sudo /etc/init.d/networking restart 主机win7,VMware中debian6采用NET方式上网,搜素材,soscw.com 主机win7,VMware中debian6采用NET方式上网 标签:style blog tar c ext color 原文地址:http://www.cnblogs.com/liu-bei/p/3704085.html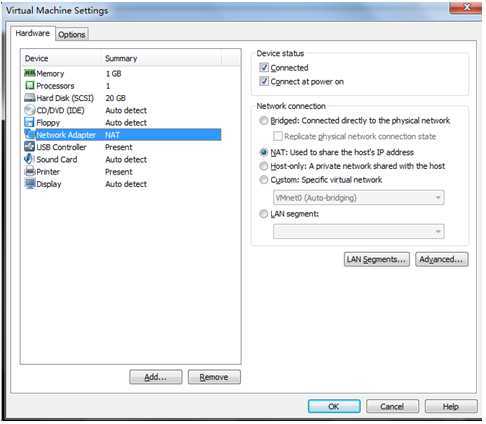

sudo ifconfig eth0 192.168.137.128 netmask
255.255.255.0
nameserver
192.168.137.2
nameserver 127.0.0.1
上一篇:WinForm 实现主程序(exe)与其关联类库(*.dll)分开存放
下一篇:You are attempting to run the 32-bit installer on a 64-bit version of Window
文章标题:主机win7,VMware中debian6采用NET方式上网
文章链接:http://soscw.com/index.php/essay/21828.html