基于HAproxy的web动静分离及输出状态检测页面
2020-11-26 23:25
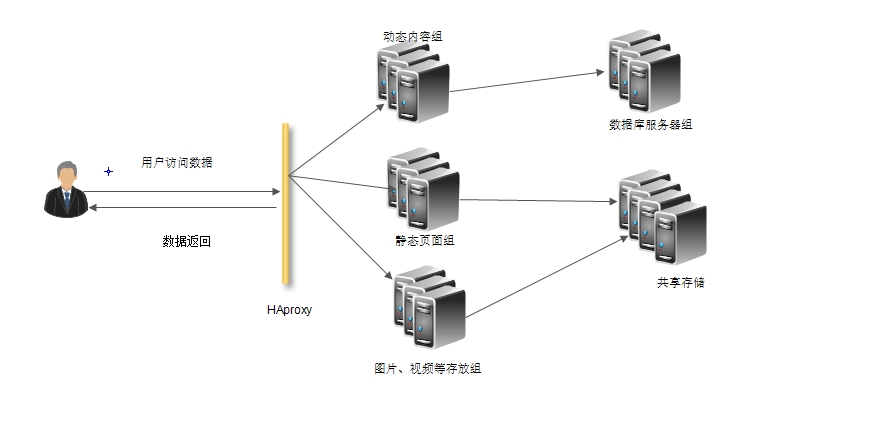
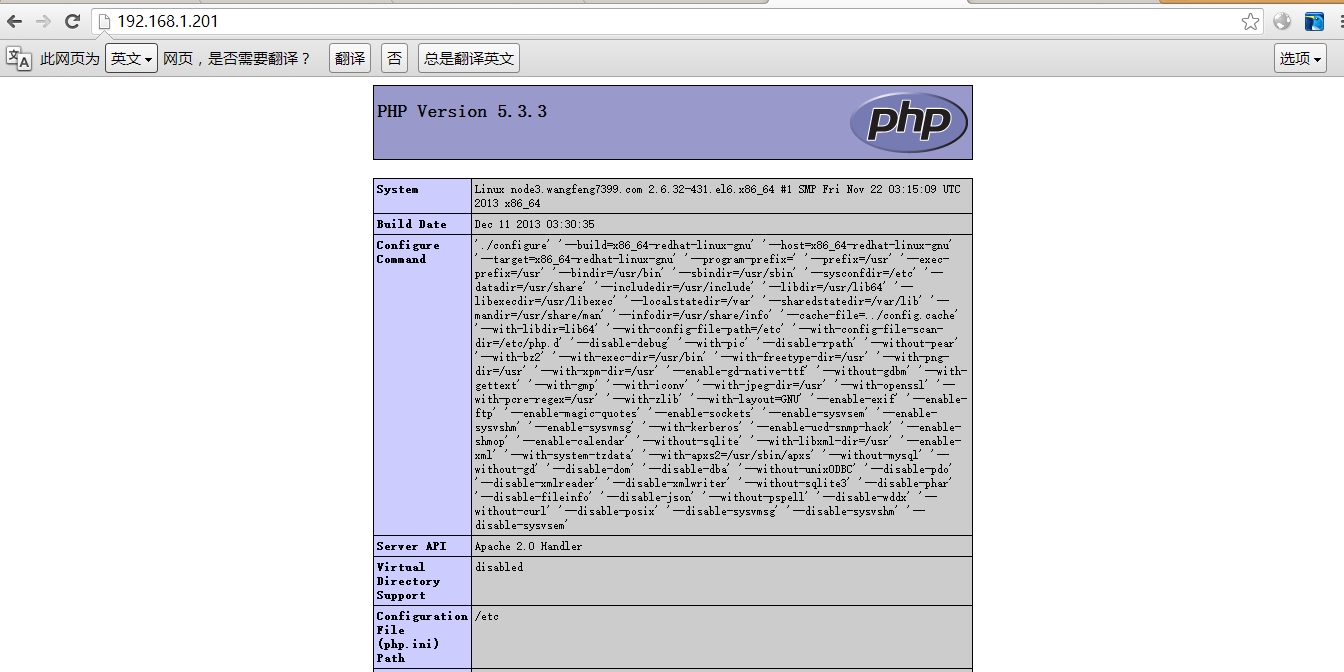
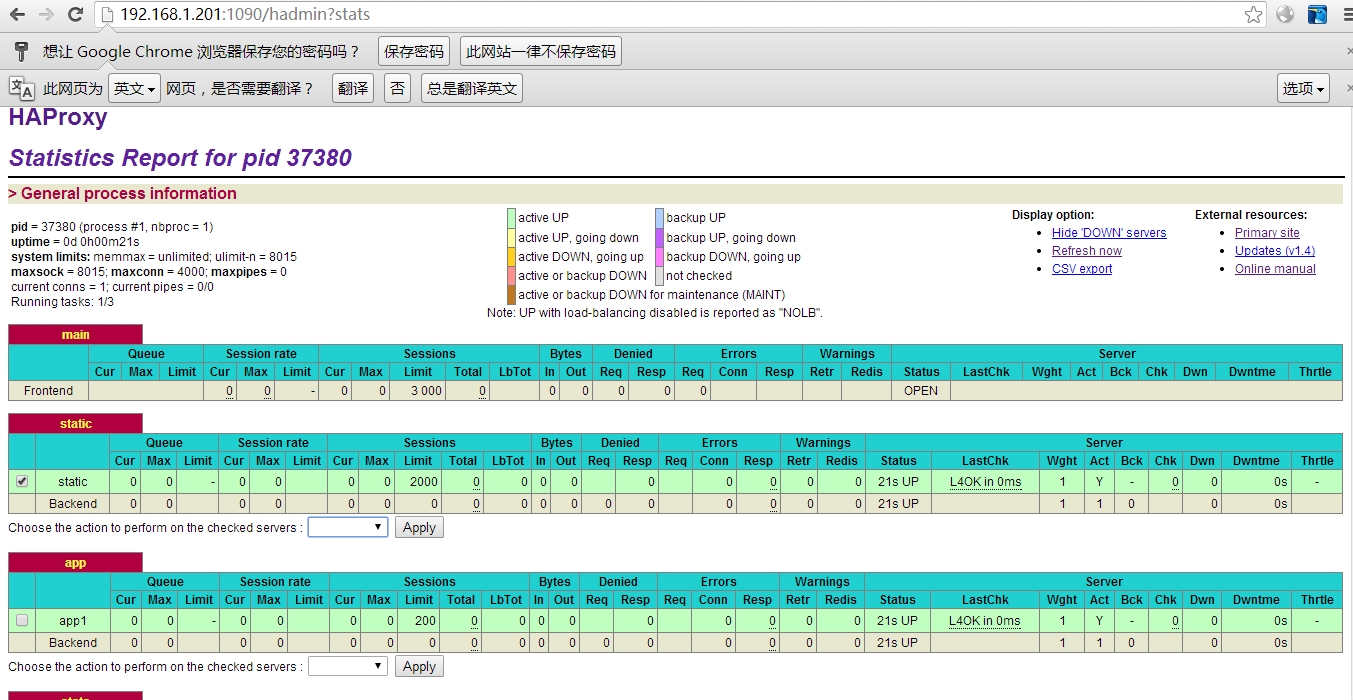
标签:haproxy 动静分离 状态输出页 负载均衡集群 集群 一、简介 HAProxy提供高可用性、负载均衡以及基于TCP和HTTP应用的代 理,支持虚拟主机,它是免费、快速并且可靠的一种解决方案。HAProxy特别适用于那些负载特大的web站点,这些站点通常又需要会话保持或七层处理。HAProxy运行在当前的硬件上,完全可以支持数以万计的并发连接。并且它的运行模式使得它可以很简单安全的整合进您当前的架构中, 同时可以保护你的web服务器不被暴露到网络上。 HAProxy是免费、极速且可靠的用于为TCP和基于HTTP应用程序提供高可用、负载均衡和代理服务的解决方案,尤其适用于高负载且需要持久连接或7层处理机制的web站点。 二、安装配置 1.拓扑图 说明:1.由于测试环境虚拟机有限,此处将静态页面和图片放在了一台机器上 2.由于测试环境虚拟机有限,此处动态页面和静态页面各提供一台机器,不考虑单点故障 3.用户看到的服务器为HAproxy对外提供的ip地址,看不到后面的各服务器组 4.此处不涉及php页面与数据库的交互内容 2.ip地址规划 3.安装配置HAproxy ①、安装 HAproxy可以通过yum源安装也可以通过源码编译安装,经查看得知yum源中提供的1.4.24版本,而官方提供的为1.4.25版本,所有本次我们通过yum来进行安装 ②、启动配置文件选项 将rsyslog日志文件系统重启 ③、配置动静分离 ④、准备静态页面与动态页面 动态页 ⑤、测试 ⑥、启动状态输出页面,在配置文件添加如下行 重新载入服务 大功告成 ,由于本人水平有限,可能有错误,请各位大牛匹配指正 本文出自 “IT民工--小枫” 博客,请务必保留此出处http://wangfeng7399.blog.51cto.com/3518031/1405758 基于HAproxy的web动静分离及输出状态检测页面,搜素材,soscw.com 基于HAproxy的web动静分离及输出状态检测页面 标签:haproxy 动静分离 状态输出页 负载均衡集群 集群 原文地址:http://wangfeng7399.blog.51cto.com/3518031/1405758
功用
ip地址
安装软件
操作系统
反向代理服务器
192.168.1.201
Haproxy
centos6.5
静态页面服务器
192.168.1.202
httpd
centos6.5
动态页面服务器
192.168.1.203
httpd、php
centos6.5
[root@node1 ~]# yum install haproxy -y
[root@node1 ~]# vi /etc/rsyslog.conf
启用一下两行
$ModLoad imudp
$UDPServerRun 514
添加以下一行
local2.*                       /var/log/haproxy.log
#---------------------------------------------------------------------
# Example configuration for a possible web application.  See the
# full configuration options online.
#
#   http://haproxy.1wt.eu/download/1.4/doc/configuration.txt
#
#---------------------------------------------------------------------
#---------------------------------------------------------------------
# Global settings
#---------------------------------------------------------------------
global
    # to have these messages end up in /var/log/haproxy.log you will
    # need to:
    #
    # 1) configure syslog to accept network log events.  This is done
    #    by adding the ‘-r‘ option to the SYSLOGD_OPTIONS in
    #    /etc/sysconfig/syslog
    #
    # 2) configure local2 events to go to the /var/log/haproxy.log
    #   file. A line like the following can be added to
    #   /etc/sysconfig/syslog
    #
    #    local2.*                       /var/log/haproxy.log
    #
    log         127.0.0.1 local2
    chroot      /var/lib/haproxy
    pidfile     /var/run/haproxy.pid
    maxconn     4000
    user        haproxy
    group       haproxy
    daemon
    # turn on stats unix socket
    stats socket /var/lib/haproxy/stats
#---------------------------------------------------------------------
# common defaults that all the ‘listen‘ and ‘backend‘ sections will
# use if not designated in their block
#---------------------------------------------------------------------
defaults
    mode                    http
    log                     global
    option                  httplog
    option                  dontlognull
    option http-server-close
    option forwardfor       except 127.0.0.0/8
    option                  redispatch
    retries                 3
    timeout http-request    10s
    timeout queue           1m
    timeout connect         10s
    timeout client          1m
    timeout server          1m
    timeout http-keep-alive 10s
    timeout check           10s
    maxconn                 3000
#---------------------------------------------------------------------
# main frontend which proxys to the backends
#---------------------------------------------------------------------
frontend  main *:80
    acl url_static       path_beg       -i /static /images /javascript /stylesheets
    acl url_static       path_end       -i .jpg .gif .png .css .js .html
    acl host_static  hdr_beg(host)  -i img. video. download. ftp. imgs.
    use_backend static          if url_static
    default_backend             app
#---------------------------------------------------------------------
# static backend for serving up images, stylesheets and such
#---------------------------------------------------------------------
backend static
    balance     roundrobin
    server      static 192.168.1.202:80 check maxconn 2000
#---------------------------------------------------------------------
# round robin balancing between the various backends
#---------------------------------------------------------------------
backend app
    balance     roundrobin
    server  app1 192.168.1.203:80    check maxconn 200
静态页面
[root@node2 ~]# vi /var/www/html/index.html
hello,wangfeng7399
[root@node3 ~]# yum install -y php httpd
[root@node3 html]# vi index.php

~


listen stats
    mode http
    bind *:1090
    stats enable
    stats hide-version
    stats uri     /hadmin?stats
    stats realm   Haproxy\ Statistics
    stats auth    admin:admin
    stats admin if TRUE


文章标题:基于HAproxy的web动静分离及输出状态检测页面
文章链接:http://soscw.com/index.php/essay/22752.html