自定义springboot - starter 实现日志打印
2021-01-03 01:27
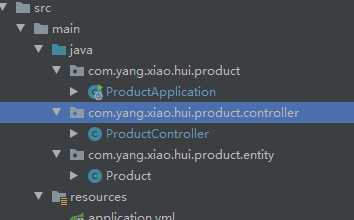
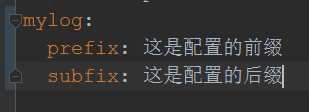
标签:jar print bind 苹果 snapshot retention owa 打印 doc 1. starter 命名规则: springboot项目有很多专一功能的starter组件,命名都是spring-boot-starter-xx,如spring-boot-starter-logging,spring-boot-starter-web, 如果是第三方的starter命名一般是:xx-springboot-starter 如:mongodb-plus-spring-boot-starter,mybatis-spring-boot-starter; 2.1 springboot的自动装配机制 2.2 属性文件自动装配 3. 需求,我们准备弄个日志相关的starter,当别人依赖我们的jar包时,在需要打印日志的方法上贴上对应的注解即可,日志打印的前置通知和后置通知内容可以在application.yml或者application.properties中配置 思路: 我们需要定义一个注解:这样别人在需要打日志的地方贴上该注解即可: 接着,我们要让注解生效,所以需要一个切面类: 切面类中有个配置文件类: 要让上面类注入spring容器,需要一个配置类: 到此为止,只要MyLogAutoConfiguration 注入spring容器了,那么他里面的bean也会被注入,而怎么样使得MyLogAutoConfiguration 注入spring呢,那就要用到springboot的自动装配机制: 在resources下创建一个META-INF文件夹,然后在创建一个文件:spring.factories文件加入内容:key是固定的org.springframework.boot.autoconfigure.EnableAutoConfiguration,value可以有多个 依赖: 平时我们在写application.yml时会有提示,那么我也想让我的日志配置也会生效,也就是当我输入mylog时,会提示mylog.prefix 或者mylog.subfix,此时需要下面的配置: 因为我们项目用到springboot和aop,所以需要: 注意:maven打包时,不能用spring-boot-maven-plugin,我用它打包没报错,给其他服务引用对应的jar时,启动报错了。需要换成: 至此,项目创建完毕: 现在看下整体情况: pom文件整体: 项目打包进行测试: 新建web项目引入我们的日志依赖: 测试项目提供一个controller,对应方法贴上我们的日志注解: 测试项目的整体情况: 此时我们没有在yml中配置日志前缀,启动测试项目测试: 浏览器输入:http://localhost:8673/info/3 控制台输出: 我们在yml配置文件输入前后缀: 可见,有提示,跟我们配置其他组件的属性一样: 重启测试项目,再次在浏览器输入:http://localhost:8673/info/3 至此,我们实现了一个完整的springboot starter,在springboot项目中,很多组件的底层原理都是这样实现的,通过这种实现,可以做底层架构,然后给其他服务使用,如可以校验请求参数,处理返回结果等 附加git代码地址: https://gitee.com/yangxioahui/log-spring-boot-starter.git 自定义springboot - starter 实现日志打印 标签:jar print bind 苹果 snapshot retention owa 打印 doc 原文地址:https://www.cnblogs.com/yangxiaohui227/p/12992820.html
2. starter的原理: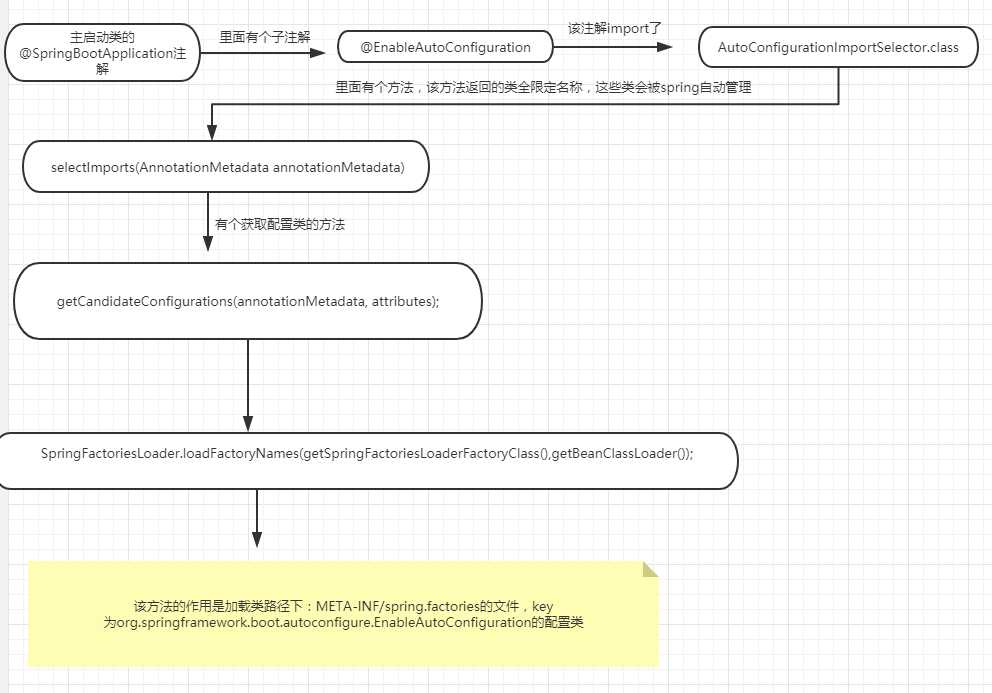
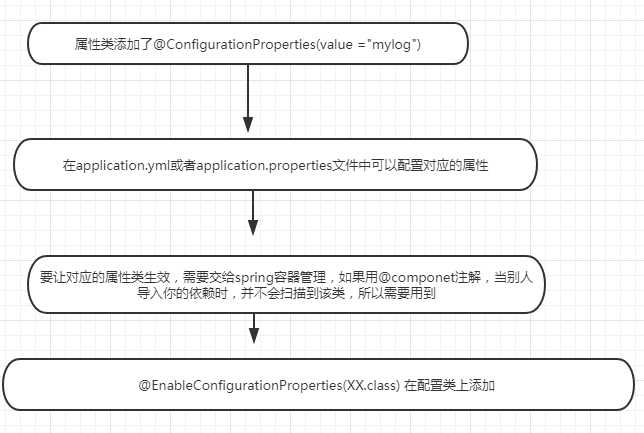
package com.yang.log.hui.annotion;

import java.lang.annotation.*;

@Retention(RetentionPolicy.RUNTIME)
@Target(ElementType.METHOD)
@Documented
public @interface MyLogAnnotation {
}
package com.yang.log.hui.config;


import org.aspectj.lang.ProceedingJoinPoint;
import org.aspectj.lang.annotation.Around;
import org.aspectj.lang.annotation.Aspect;
import org.aspectj.lang.annotation.Pointcut;

import java.util.Arrays;

@Aspect
public class MyLogAspect {
    private MylogProperties mylogProperties;
    public MyLogAspect(MylogProperties mylogProperties) {  当一个bean没有无参构造器时,spring创建bean时,对于构造器参数会从容器中取,这里其实是省略了@Autowired,该注解可以用在方法参数上
        this.mylogProperties=mylogProperties;
    }

    @Pointcut("@annotation(com.yang.log.hui.annotion.MyLogAnnotation)")
    public void logAnnotationAnnotationPointcut() {
    }
    @Around("logAnnotationAnnotationPointcut()")
    public Object logInvoke(ProceedingJoinPoint joinPoint) throws Throwable {
        System.out.println(mylogProperties.getOrDefualtPrefix("请求参数")+ Arrays.toString(joinPoint.getArgs())); //如果配置文件配了对应的前缀,就用配置文件的,否则用默认的
        Object obj = joinPoint.proceed();
        System.out.println(mylogProperties.getOrDefualtSubfix("返回值:")+ obj.toString());//跟前缀一样
        return obj;
    }


}
package com.yang.log.hui.config;

import org.springframework.boot.context.properties.ConfigurationProperties;
import org.springframework.util.StringUtils;

@ConfigurationProperties(value ="mylog") //这个注解可以让配置文件中的属性根据前缀来注入对应的属性
public class MylogProperties {
    //日志前缀
    private String prefix;  //会自动找配置文件中 mylog.prefix的值
    //日志后缀
    private String subfix; //会自动找配置文件中 mylog.subfix的值


    public String getOrDefualtPrefix(String defualtPrefix){
        if(StringUtils.isEmpty(prefix)){
            return defualtPrefix;
        }
        return prefix;
    }

    public String getOrDefualtSubfix(String defualtSubfix){
        if(StringUtils.isEmpty(subfix)){
            return defualtSubfix;
        }
        return subfix;
    }

    public void setPrefix(String prefix) {
        this.prefix = prefix;
    }

    public void setSubfix(String subfix) {
        this.subfix = subfix;
    }


}
package com.yang.log.hui.config;

import org.springframework.beans.factory.annotation.Autowired;
import org.springframework.boot.context.properties.EnableConfigurationProperties;
import org.springframework.context.annotation.Bean;
import org.springframework.context.annotation.Configuration;

@Configuration
@EnableConfigurationProperties(MylogProperties.class) //该注解可以使MylogProperties注入spring容器
public class MyLogAutoConfiguration {
    @Bean
    public MyLogAspect myLogAspect(@Autowired MylogProperties mylogProperties){
        return new MyLogAspect(mylogProperties);
    }
}
org.springframework.boot.autoconfigure.EnableAutoConfiguration=com.yang.log.hui.config.MyLogAutoConfiguration
      dependency>
           groupId>org.springframework.bootgroupId>
           artifactId>spring-boot-configuration-processorartifactId>
            optional>trueoptional>
       dependency>
       dependency>
            groupId>org.springframework.bootgroupId>
            artifactId>spring-boot-starterartifactId>
        dependency>
        dependency>
            groupId>org.springframework.bootgroupId>
            artifactId>spring-boot-starter-aopartifactId>
        dependency>
 build>
        plugins>
            plugin>
                groupId>org.apache.maven.pluginsgroupId>
                artifactId>maven-compiler-pluginartifactId>
                configuration>
                    source>1.8source>
                    target>1.8target>
                configuration>
            plugin>
        plugins>
    build>
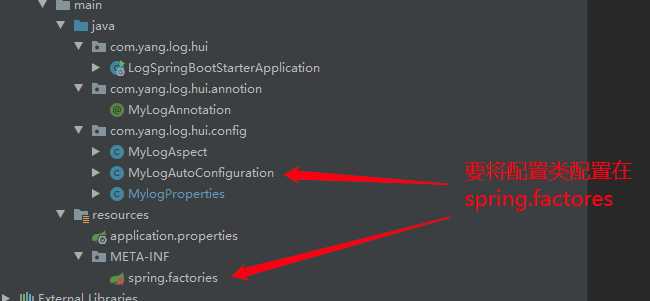
xml version="1.0" encoding="UTF-8"?>
project xmlns="http://maven.apache.org/POM/4.0.0" xmlns:xsi="http://www.w3.org/2001/XMLSchema-instance"
         xsi:schemaLocation="http://maven.apache.org/POM/4.0.0 https://maven.apache.org/xsd/maven-4.0.0.xsd">
    modelVersion>4.0.0modelVersion>
    parent>
        groupId>org.springframework.bootgroupId>
        artifactId>spring-boot-starter-parentartifactId>
        version>2.3.0.RELEASEversion>
        relativePath/>
    parent>
    groupId>com.yang.xiao.huigroupId>
    artifactId>log-spring-boot-starterartifactId>
    version>0.0.1-SNAPSHOTversion>
    name>log-spring-boot-startername>
    description>Demo project for Spring Bootdescription>
    packaging>jarpackaging>

    properties>
        java.version>1.8java.version>
    properties>

    dependencies>
        dependency>
            groupId>org.springframework.bootgroupId>
            artifactId>spring-boot-starterartifactId>
        dependency>
        dependency>
            groupId>org.springframework.bootgroupId>
            artifactId>spring-boot-starter-aopartifactId>
        dependency>
        dependency>
           groupId>org.springframework.bootgroupId>
           artifactId>spring-boot-configuration-processorartifactId>
            optional>trueoptional>
       dependency>
    dependencies>

    build>
        plugins>
            plugin>
                groupId>org.apache.maven.pluginsgroupId>
                artifactId>maven-compiler-pluginartifactId>
                configuration>
                    source>1.8source>
                    target>1.8target>
                configuration>
            plugin>
        plugins>
    build>

project>
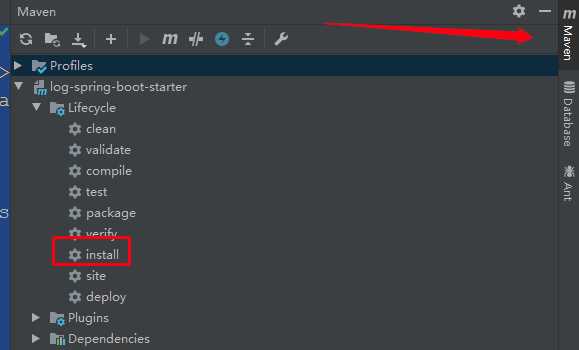
    dependency>
           groupId>com.yang.xiao.huigroupId>
           artifactId>log-spring-boot-starterartifactId>
           version>0.0.1-SNAPSHOTversion>
       dependency>
package com.yang.xiao.hui.product.controller;

import com.yang.log.hui.annotion.MyLogAnnotation;
import com.yang.xiao.hui.product.entity.Product;
import org.springframework.beans.factory.annotation.Value;
import org.springframework.stereotype.Controller;
import org.springframework.web.bind.annotation.PathVariable;
import org.springframework.web.bind.annotation.RequestMapping;
import org.springframework.web.bind.annotation.ResponseBody;

@Controller
public class ProductController {
    @RequestMapping("/info/{id}")
    @ResponseBody
    @MyLogAnnotation //这个是我们的日志注解
    public Product getProductInfo(@PathVariable("id") Integer id){
        Product product = new Product();
        product.setId(id);
        product.setName("苹果手机");
        return product;
    }
}



上一篇:C# MVC EF配置失败
下一篇:C#线程同步
文章标题:自定义springboot - starter 实现日志打印
文章链接:http://soscw.com/index.php/essay/39703.html