Spring的核心接口
2021-01-08 08:33
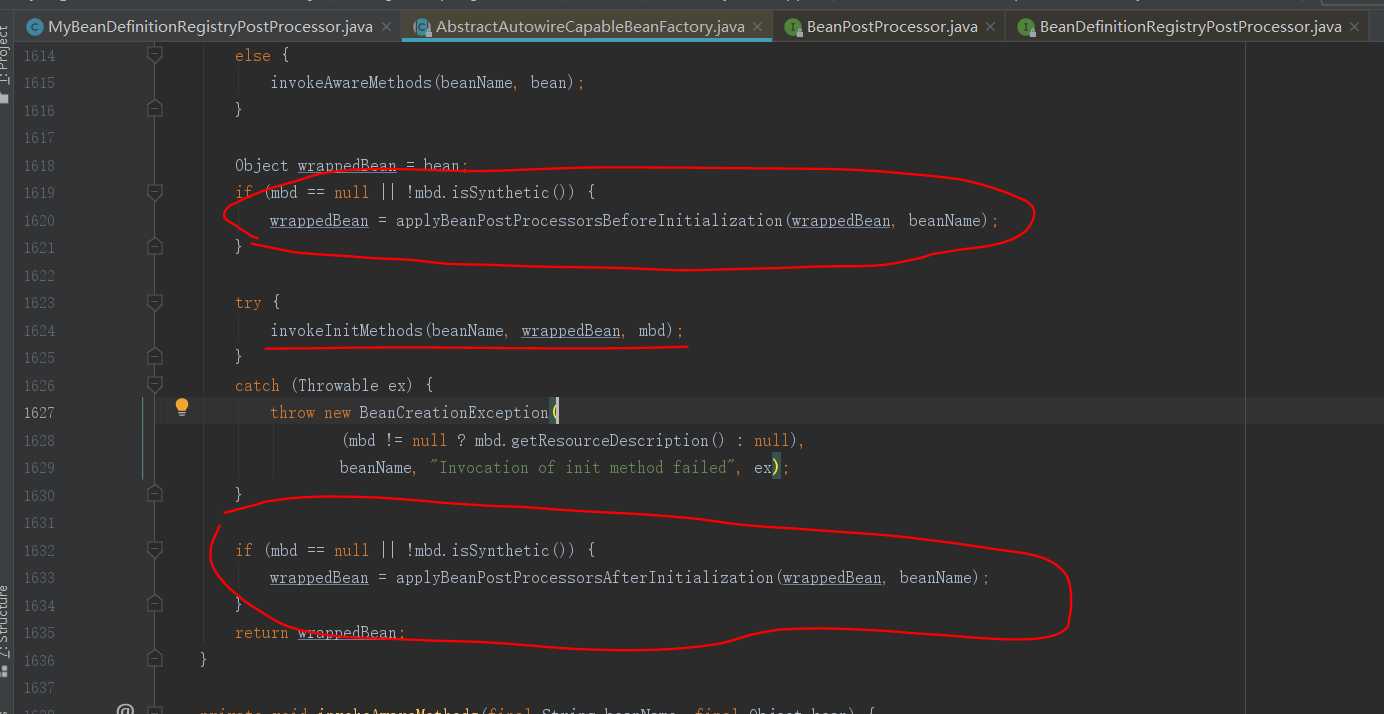
标签:config color 接口 原理 targe 源码 image tar 接收 BeanPostProcesser的作用是在Bean初始化前后处理一些工作 BeanPostProcesser名字虽然叫后置处理器,但是提供了两个方法postProcessBeforeInitialization和postProcessAfterInitialization,在Bean初始化之前和初始化之后分别调用, 我们的Bean可以实现此接口,然后重写上面两个方法 BeanPostProcesser调用原理: 像这种方法前后加一些东西的,一开始想到的是AOP,源码上看起来并不是AOP,而是在执行InitMethod(初始化方法)的前后分别调用两个方法 Spring对BeanPostProcesser的一些使用 BeanValidationPostProcessor 在Web里面对数据校验用的比较多 AutowiredAnnotationBeanPostProcessor 在对象创建完之后处理Autowired注解 BeanFactoryPostProcesser和BeanPostProcesser名字很类似 这个是BeanFactory的后置处理器 执行时机:在BeanFactory标准初始化之后调用,来定制和修改BeanFactory的内容,此时所有的bean定义已经加载到BeanFactory,但是bean的实列还未创建 BeanDefinitionRegistryPostProcessor 是BeanFactoryPostProcesser的子类和父类相比 它额外定义了一个新的方法postProcessBeanDefinitionRegistry() 执行时机:在bean的信息将要被加载的时候执行,优先于BeanFactoryProcesser执行,可以利用BeanDefinitionRegistryPostProcessor的postProcessBeanDefinitionRegistry()方法 给容器额外添加一些组件 ApplicationListener监听容器中发布的事件,事件驱动模型的开发 理解ApplicationListener 首先了解下观察者模式 现在我们自己发布一个事件的流程 1.首先写一个Listener实现ApplicationListener接口,接口中可以拿到事件源对象。相当于观察者模式的Observe实现类 2. 然后定义一个事件实现类,和观察者模式一样 拥有事件原对象 3.最后把事件发布出去即可 相当于观察者模式中的c.wakeUp();(小孩哭这个动作) Spring的核心接口 标签:config color 接口 原理 targe 源码 image tar 接收 原文地址:https://www.cnblogs.com/ssskkk/p/12942375.htmlBeanPostProcesser的API


    @Override
    public Object postProcessBeforeInitialization(Object bean, String beanName) throws BeansException {
        if (!this.afterInitialization) {
            doValidate(bean);
        }
        return bean;
    }

    @Override
    public Object postProcessAfterInitialization(Object bean, String beanName) throws BeansException {
        if (this.afterInitialization) {
            doValidate(bean);
        }
        return bean;
    }
BeanFactoryPostProcesser
ApplicationListener
@Component
public class MyApplicationListener implements ApplicationListener
public class MyApplicationEvent extends ApplicationEvent {
    private Object source;
    private Date eventDate;

    public MyApplicationEvent(Object source,Date eventDate) {
        super(eventDate);
        this.source=source;
        System.out.println("我发布的事件");
    }

    @Override
    public String toString() {
        return "MyApplicationEvent{" +
                "source=" + source +
                ", eventDate=" + eventDate +
                ‘}‘;
    }
}
    @Test
    public void test01(){
        AnnotationConfigApplicationContext applicationContext  = new AnnotationConfigApplicationContext(ExtConfig.class);
        applicationContext.publishEvent(new MyApplicationEvent(applicationContext,new Date()) {
        });
        applicationContext.close();
    }