34 selenium JS操作 文件上传 项目分析
2021-01-09 03:31
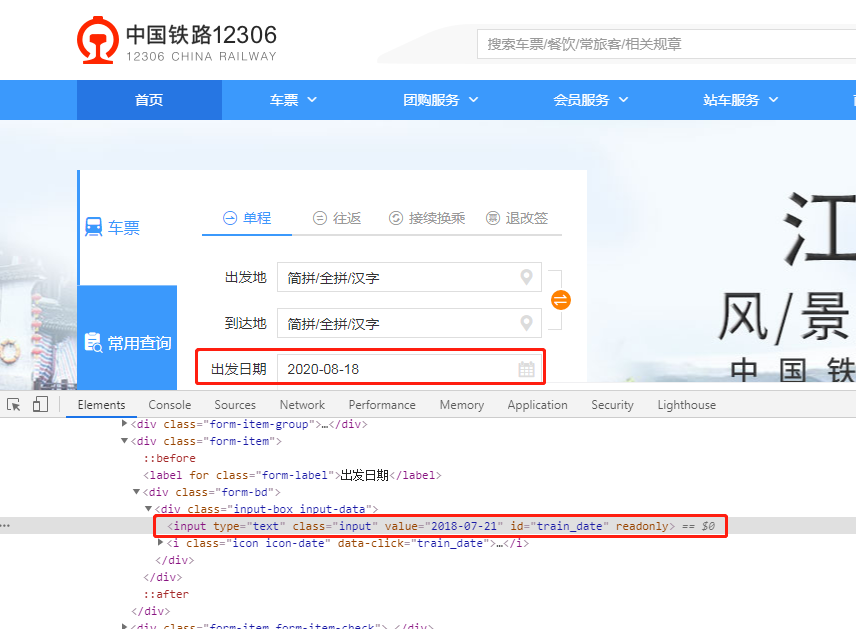
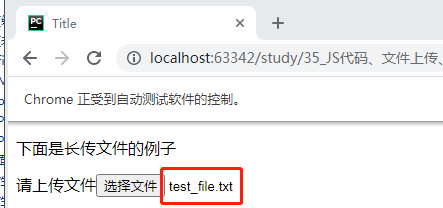
标签:span 规划 定位 web自动化测试 command 需求文档 自动 sleep windows 目录 一、JS操作 二、文件上传 三、项目分析 正文 75节 22min 一、JS操作 背景:selenium没有封装修改页面属性的方法,只能获取属性(get_attribute),没有set_attribute 前面的文章说过,Python自动化的脚本,通过webdriver中间服务器(js bot),最终都能转化成JS,再发送数据到浏览器去解析。(Python间接控制浏览器,JS在中间是桥梁作用) 但是set_attribute,selenium没有封装现成的方法,就无法控制浏览器 所以,想通过Python去设置属性,就必须自己封装,使用JS(使用DOM对象) selenium有发送JS 代码的方法:driver.excute_script() 1.语法: JS_code="""....................... """ driver.execute_script(js_code) 举例,修改12306网站的出发时间, 上图可知,该出发时间是readonly类型的,修改的话,需要通过JS修改(直接在F12中的console中修改,再将JS代码拷贝到py文件,这样不会出错;因为py中写js没有提示,容易出错) 如下,代码实现 上面的代码中,JS_code是一次性发出去,有时候会遇到set失败的情况,Python代码执行的时间很短,页面渲染时间长的话,就可能失败,所以可以将JS代码分条发送 上面的情况很少见,但是遇到的话,用这种方式解决即可。 上面的代码for循环简化: 2.参数化---在JS中混入Python对象 首先,看一下execute_script()的源码,除了script(表示js代码),还有个*args,可变长参数,*args表示任何可用的参数都可以 参数化步骤: ①先通过Python,定位input元素 :elem = driver.find_element_by_id("train_date") ②将elem这个webelement作为参数,加入到JS代码中 ------selenium中已有的arguments,占位符(类似格式化的format) -------arguments[index] 引入js_code中 -------arguments[0]表示*args的第一个参数,arguments[1]表示*args的第二个参数,以此类推 代码实现如下: 3.窗口滚动 1)为什么要进行窗口滚动?----有些元素,不滚动,看不到,是定位不到的。(比如,网页一直往下翻,一直翻一直有新信息更新出来) 窗口滚动步骤: ①定位到需要的元素 webelement ②将元素移动到可视范围内 driver.location_once_scrolled_into_view ------注意:location_once_scrolled_into_view是属性 源码如下:通过定位元素的坐标 以12306官网下面的“最新发布”为例,窗口滚动自动化代码如下: 2)懒加载------76节 ①什么是懒加载?-----有的页面,滑动到下面,又有新的信息出来,要一直滑动,才能滑动到页面最低部 这个用的不多,selenium没有封装的方法,需要自行封装。 怎么实现?====>坐标,(页面左上角的起点坐标是(0,0)) ②原理 JS代码:window.scrollTo(x,y) 比如:向下滑动100个像素点----window.scrollTo(0,100) 向下滑动到页面底部-----window.scrollTo(document.body.scrollHeight) 代码实现:页面滑动代替鼠标滚动的操作 二、文件上传 1.使用send_keys()方式上传文件 总结下send_keys()可以实现的功能:①输入文本text send_keys("python") ②可以输入键盘的位置 send_keys(Keys.ENTER) ③发送文件 send_keys("D:\file1.text") 先写个HTML文件,实现input上传文件 自动化代码实现: 2)windows下的桌面应该自动化工具:pywinauto 背景:有时候,文件上传不是一个普通的input元素,可能是其他的元素或者组件。就不能只用send_keys(),比如拖拽文件上传 在文件夹中选择文件,进行上传时,文件夹是属于windows/linux/os等系统的,不属于selenium,不能直接用selenium操作。 Python中使用的是桌面应用的自动化工具:pywinauto (windows系统下的) (1)安装 pip install pywinauto (安装失败的话,可以加个豆瓣源:pip install pywinauto -i https://pypi.doubanio.com/simple) (2)编写自动化脚本: 2个系统之间的交互 ①浏览器页面操作:定位到组件-----点击上传文件(弹出window的文件选择窗口) ※中间最好time.sleep(X)一下 ②windows界面操作: 初始化一个desktop()对象----->查询[""]弹框窗口名------>编辑输入查询的文件----->点击确认 代码实现: 结果: 3)跨平台的桌面应用自动化工具:pyautogui (windows ,mac,linux都可以,Python用3.7版本) 代码实现: 上面的方式,不能用中文,可以用pyperclip,转化 三、项目分析 1. 2.web自动化测试:成本高,效益低,到底什么时候介入? ①项目稳定了,功能都基本实现,才会引入自动化 ②web自动化测试场景:冒烟测试、回归测试(一般不会考虑测试覆盖率的问题) 3.web自动化测试的流程 ①需求分析:依据需求文档-需求功能的描述 规则约束:设计测试用例的(边界值、等价类) ②测试计划(哪些可以做自动化,用例的优先级,时间规划,选择技术框架(selenium、cypress))----不要盲目用新的技术 ③测试用例的编写、设计、审核 ④编写自动化测试代码(在②、③的空闲时,就可以写代码了) ⑤生成测试报告 以上要根据公司的具体业务,白话说成实际项目。 34 selenium JS操作 文件上传 项目分析 标签:span 规划 定位 web自动化测试 command 需求文档 自动 sleep windows 原文地址:https://www.cnblogs.com/ananmy/p/13524384.html

import time
from selenium import webdriver

#初始化浏览器对象driver
driver = webdriver.Chrome()
#打开12306网站
driver.get("https://www.12306.cn/index/")

time.sleep(2)

js_code = """e = document.getElementById("train_date");
e.readOnly=false;
e.value="2020-08-20";
"""
driver.execute_script(js_code)

time.sleep(5)
driver.quit()
import time
from selenium import webdriver

#初始化浏览器对象driver
driver = webdriver.Chrome()
#打开12306网站
driver.get("https://www.12306.cn/index/")

time.sleep(2)

# js_code = """e = document.getElementById("train_date");
# e.readOnly=false;
# e.value="2020-08-20";
# """
# driver.execute_script(js_code)
#
# time.sleep(5)
# driver.quit()


js_code = "e = document.getElementById(‘train_date‘);"
driver.execute_script(js_code)

time.sleep(1)
js_code = "e.readOnly=false;"
driver.execute_script(js_code)

time.sleep(1)
js_code = "e.value=‘2020-08-20‘;"
driver.execute_script(js_code)import time
from selenium import webdriver
#初始化浏览器对象driver
driver = webdriver.Chrome()
#打开12306网站
driver.get("https://www.12306.cn/index/")
time.sleep(2)
# js_code = "e = document.getElementById(‘train_date‘);"
# driver.execute_script(js_code)
#
# time.sleep(1)
# js_code = "e.readOnly=false;"
# driver.execute_script(js_code)
#
# time.sleep(1)
# js_code = "e.value=‘2020-08-20‘;"
# driver.execute_script(js_code)
js_codes = [ "e = document.getElementById(‘train_date‘);","e.readOnly=false;","e.value=‘2020-08-20‘;"]
for js_code in js_codes:
driver.execute_script(js_code)
time.sleep(0.5)
    def execute_script(self, script, *args):
        """
        Synchronously Executes JavaScript in the current window/frame.

        :Args:
         - script: The JavaScript to execute.
         - \*args: Any applicable arguments for your JavaScript. #表示任何可以用的参数

        :Usage:
            driver.execute_script(‘return document.title;‘)
        """
        converted_args = list(args)
        command = None
        if self.w3c:
            command = Command.W3C_EXECUTE_SCRIPT
        else:
            command = Command.EXECUTE_SCRIPT

        return self.execute(command, {
            ‘script‘: script,
            ‘args‘: converted_args})[‘value‘]
import time
from selenium import webdriver

#初始化浏览器对象driver
driver = webdriver.Chrome()
#打开12306网站
driver.get("https://www.12306.cn/index/")

time.sleep(2)

#python 定位元素
elem = driver.find_element_by_id("train_date")

js_code = """arguments[0].readOnly=false;
arguments[0].value="2020-08-20";"""     #arguments[0]占位符
driver.execute_script(js_code,elem) #arguments[0]表示elem(如果还有第二个element,就用arguments[1])

time.sleep(2)
driver.quit() @property
def location_once_scrolled_into_view(self):
"""THIS PROPERTY MAY CHANGE WITHOUT WARNING. Use this to discover
where on the screen an element is so that we can click it. This method
should cause the element to be scrolled into view.
Returns the top lefthand corner location on the screen, or ``None`` if
the element is not visible.
"""
if self._w3c:
old_loc = self._execute(Command.W3C_EXECUTE_SCRIPT, {
‘script‘: "arguments[0].scrollIntoView(true); return arguments[0].getBoundingClientRect()",
‘args‘: [self]})[‘value‘]
return {"x": round(old_loc[‘x‘]),
"y": round(old_loc[‘y‘])}
else:
return self._execute(Command.GET_ELEMENT_LOCATION_ONCE_SCROLLED_INTO_VIEW)[‘value‘]
import time
from selenium import webdriver

#初始化浏览器对象driver
driver = webdriver.Chrome()
#打开12306网站
driver.get("https://www.12306.cn/index/")

time.sleep(2)
#定位到最下面的 “最新发布”
latest_elem = driver.find_element_by_link_text("最新发布")
#将定位的元素滑动到可视范围
latest_elem.location_once_scrolled_into_view
latest_elem.click()import time
from selenium import webdriver
#初始化浏览器对象driver
driver = webdriver.Chrome()
#打开12306网站
driver.get("https://www.12306.cn/index/")
time.sleep(2)
#一直滑动到窗口底部
js_code = ‘window.scrollTo(0,document.body.scrollHeight);‘
driver.execute_script(js_code)
#如果是需要一直滑动的页面,可以用for循环
for i in range(4):
driver.execute_script(js_code)
DOCTYPE html>
html lang="en">
head>
    meta charset="UTF-8">
    title>Titletitle>
head>
body>
    p>下面是长传文件的例子p>
    label>请上传文件label>input type="file" name="my_file" id="upload_file">

body>
html>
import time
from selenium import webdriver

#初始化浏览器对象driver
driver = webdriver.Chrome()
#打开HTML页面
driver.get("http://localhost:63342/study/35_JS%E4%BB%A3%E7%A0%81%E3%80%81%E6%96%87%E4%BB%B6%E4%B8%8A%E4%BC%A0%E3%80%81%E9%A1%B9%E7%9B%AE%E5%88%86%E6%9E%90/%E4%B8%8A%E4%BC%A0%E6%96%87%E4%BB%B6%E7%9A%84HTML.html?_ijt=fsb98udr8v74v6gmlvpin0ribh")

time.sleep(2)

#先定位到input元素
input_elem  = driver.find_element_by_id("upload_file")
input_elem.send_keys("E:/test_file.txt")

time.sleep(2)
driver.quit()
import time
from selenium import webdriver

#初始化浏览器对象driver
driver = webdriver.Chrome()
#打开HTML页面
driver.get("http://localhost:63342/study/35_JS%E4%BB%A3%E7%A0%81%E3%80%81%E6%96%87%E4%BB%B6%E4%B8%8A%E4%BC%A0%E3%80%81%E9%A1%B9%E7%9B%AE%E5%88%86%E6%9E%90/%E4%B8%8A%E4%BC%A0%E6%96%87%E4%BB%B6%E7%9A%84HTML.html?_ijt=hc020pmih57cnl3vrg401d76a5")

time.sleep(2)

#先定位到input元素
# input_elem  = driver.find_element_by_id("upload_file")
# input_elem.send_keys("E:/test_file.txt")
# time.sleep(2)
# driver.quit()

# 先定位到input元素
input_elem  = driver.find_element_by_id("upload_file")
input_elem.click()

from pywinauto import Desktop

app = Desktop()
#根据名字找到弹出的窗口
dialog = app["打开"]
#在输入框中输入值
dialog["Edit"].type_keys(r"E:\test_file.txt")  #这里要使用原始字符串,否则\t会转移成tab,文件名出错
#点击
dialog["Button"].click()

import pyautogui

pyautogui.write(r"e:\test_file.txt") #这里只能是小写,且不能是中文
pyautogui.press("enter",presses=2)#按2次enter键
time.sleep(2)
import pyautogui
#pyperclip是pyautogui自带的,直接导入,不需要安装了
import pyperclip

#中文名称的实现方法
pyperclip.copy("d:\文件.txt")
time.sleep(2)
pyautogui.hotkey("ctrl","v")
pyautogui.press("enter",presses = 2)

下一篇:Jsoup_Select 选择器
文章标题:34 selenium JS操作 文件上传 项目分析
文章链接:http://soscw.com/index.php/essay/41076.html