树莓派启动流程 --- 004 systemd-modules-load [111]: Module'i2c_dev' inserted -- 02 How the R
2021-01-12 05:32
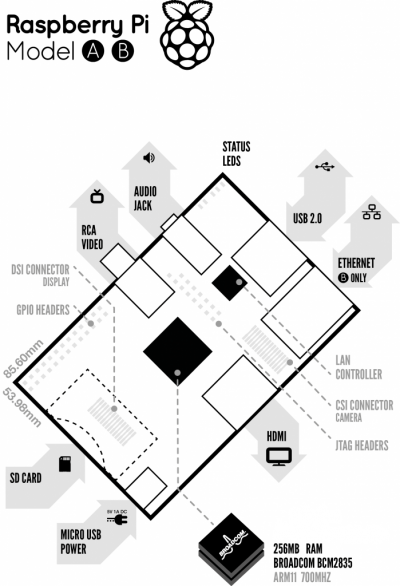
标签:mono gpu conf site map tags actually line trick This is an in-detail account of the Raspberry Pi boot process collected from various sources, mainly from the official forums. First, you need to know the RPi does not boot up like a conventional desktop computer. The VideoCore a.k.a the Graphics processor actually boots before the ARM CPU! Anyway, before we get into the details here’s a diagram of the RPi highlighting the Broadcom BCM2835 SoC. The SoC (or System-on-Chip) contains the ARM CPU, the VideoCore Graphics Processor, ROM (Read-Only-Memory) chips, the SDRAM and so many other things. Basically, think of a SoC as your Motherboard and CPU compressed together into a single chip. When you power on your Raspberry Pi, the first bits of code to run is stored in a ROM chip in the SoC and is built into the Pi during manufacture! This is the called the first-stage bootloader. The SoC is hardwired to run this code on startup on a small RISC Core (Reduced Instruction Set Computer). It is used to mount the FAT32 boot partition in your SDCard so that the second-stage bootloader can be accessed. So what is this ‘second-stage bootloader’ stored in the SD Card? It’s ‘bootcode.bin’. You might have seen this file if you had mounted the SD Card in Windows. Now here’s something tricky. The first-stage bootloader has not yet initialized your ARM CPU (meaning CPU is in reset) or your RAM. So, the second-stage bootloader also has to run on the GPU. The bootloader.bin file is loaded into the 128K 4 way set associative L2 cache of the GPU and then executed. This enables the RAM and loads start.elf which is also in your SD Card. This is the third-stage bootloader and is also the most important. It is the firmware for the GPU, meaning it contains the settings or in our case, has instructions to load the settings from config.txt which is also in the SD Card. You can think of the config.txt as the ‘BIOS settings’ (as is mentioned in the forum). Some of the settings you can control are (thanks to dom): arm_freq : frequency of ARM in MHz. Default 700. gpu_freq : Sets core_freq, h264_freq, isp_freq, v3d_freq together. core_freq : frequency of GPU processor core in MHz. Default 250. h264_freq: frequency of hardware video block in MHz. Default 250. isp_freq: frequency of image sensor pipeline block in MHz. Default 250. v3d_freq: frequency of 3D block in MHz. Default 250. sdram_freq: frequency of SDRAM in MHz. Default 400. The start.elf also splits the RAM between your GPU and the ARM CPU. The ARM only has access the to the address space left over by the GPU address space. For example, if the GPU was allocated addresses from 0x000F000 – 0x0000FFFF, the ARM has access to addresses from 0x00000000 – 0x0000EFFF. (These are not real address ranges. It’s just for demonstration purposes). Other than loading config.txt and splitting RAM, the start.elf also loads cmdline.txt if it exists. It contains the command line parameters for whatever kernel that is to be loaded. This brings us to the final stage of the boot process. The start.elf finally loads kernel.img which is the binary file containing the OS kernel (DUH!?) and releases the reset on the CPU. The ARM CPU then executes whatever instructions in the kernel.img thereby loading the operating system. Note: Special thanks to user dom in the official RPi forums and the community behind the official wiki. // ================================================================================================== 转载(如有侵权请通知删除):https://thekandyancode.wordpress.com/2013/09/21/how-the-raspberry-pi-boots-up/ 树莓派启动流程 --- 004 systemd-modules-load [111]: Module'i2c_dev' inserted -- 02 How the Raspberry Pi boots up 标签:mono gpu conf site map tags actually line trick 原文地址:https://www.cnblogs.com/jikexianfeng/p/13488236.html
Now what’s even funnier is that the ARM core perceives 0x00005001 as it’s beginning address 0x00000000. In other words, if the ARM core requests the address 0x0000000, the actual address in RAM is 0x00005001. Edit: The physical addresses perceived by the ARM core is actually mapped to another address in the VideoCore (0xC0000000 and beyond) by the MMU (Memory Management Unit) of the VideoCore. The config.txt is loaded after the split is done so you cannot specify the splitting amounts in the config.txt. However, different .elf files having different splits exist in the SD Card. So, depending on your requirement, you can rename those files to start.elf and boot the Pi. (The forums mention of having this functionality in a dynamic fashion, but I don’t know whether they have implemented it yet) [EDIT8/7/2014: As per Andrew’s comment it has been implemented in present firmware] In the Pi, the GPU is King!After starting the operating system, the GPU code is not unloaded. In fact, start.elf is not just firmware for the GPU, It is a proprietary operating system called VideoCore OS. When the normal OS (Linux) requires an element not directly accessible to it, Linux communicates with VCOS using the mailbox messaging system.
文章标题:树莓派启动流程 --- 004 systemd-modules-load [111]: Module'i2c_dev' inserted -- 02 How the R
文章链接:http://soscw.com/index.php/essay/41394.html