Asp.net Core WebApi使用Swagger
2021-01-19 09:13
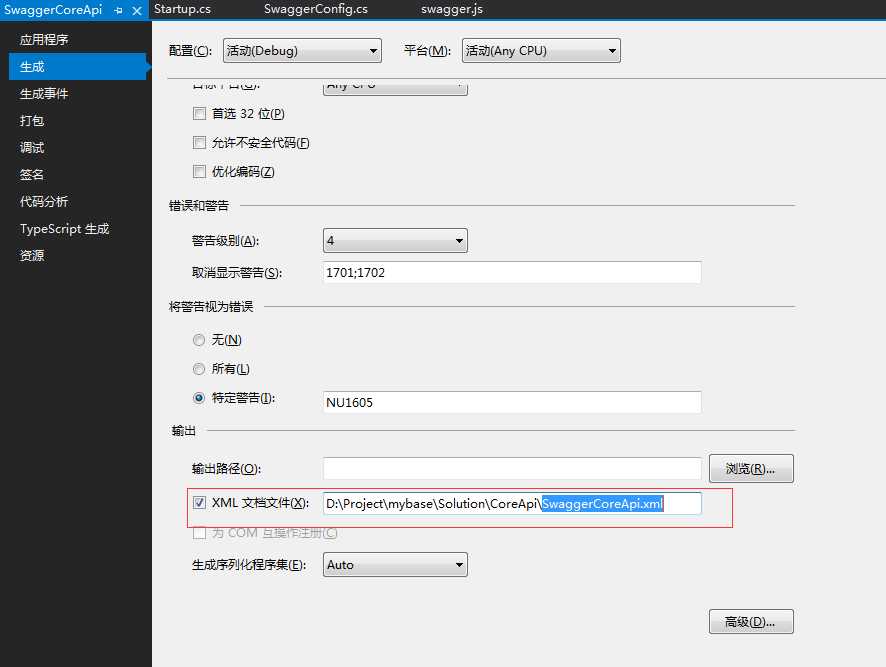
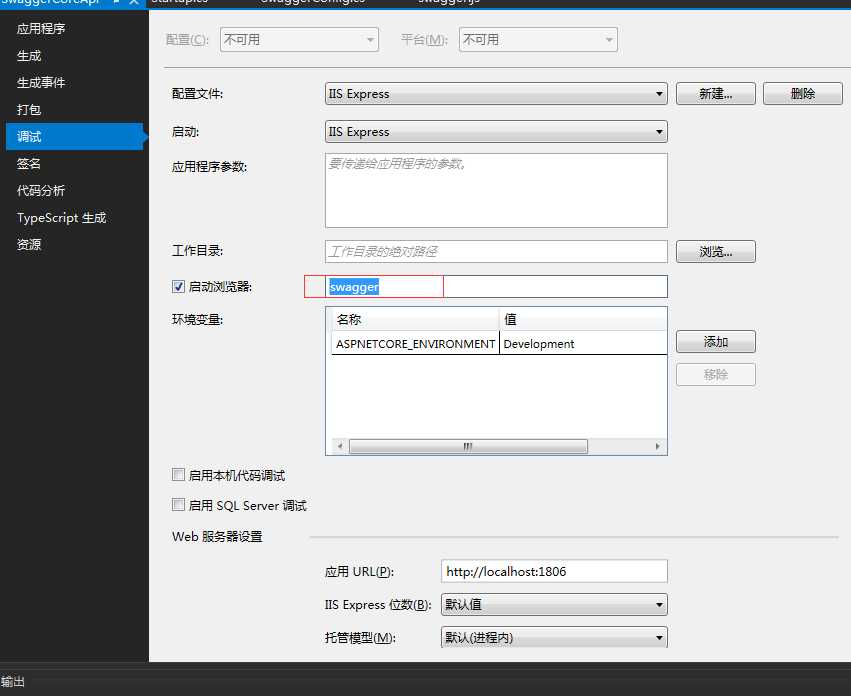
标签:asp include 浏览器 conf line ast product clu comment 1、安装: NuGet:搜索Swagger,安装Swashbuckle.AspNetCore 2、配置XML文件:右键项目--生成--XML文档,记录xml文档的位置并修改第3步中xml文档的名称 3、配置swagger中间件 4、启动更改:右键项目--调试--启动浏览器中输入:swagger 点保存。 5、配置好后直接启动api就可以看到效果了。 参考:https://www.cnblogs.com/lucky_hu/p/11130209.html 代码地址:https://github.com/bill1411/mybase/tree/master/Solution/CoreApi Asp.net Core WebApi使用Swagger 标签:asp include 浏览器 conf line ast product clu comment 原文地址:https://www.cnblogs.com/yhnet/p/12156823.html


// This method gets called by the runtime. Use this method to add services to the container.
        public void ConfigureServices(IServiceCollection services)
        {
            services.AddMvc().SetCompatibilityVersion(CompatibilityVersion.Version_2_2);
            //注册Swagger生成器,定义一个和多个Swagger 文档
            services.AddSwaggerGen(c =>
            {
                c.SwaggerDoc("v1.0", new Info { Title = "My Demo API", Version = "1.0" });
                c.IncludeXmlComments(System.IO.Path.Combine(System.AppContext.BaseDirectory, "SwaggerCoreApi.xml"));
            });
        }


// This method gets called by the runtime. Use this method to configure the HTTP request pipeline.
        public void Configure(IApplicationBuilder app, IHostingEnvironment env)
        {
            if (env.IsDevelopment())
            {
                app.UseDeveloperExceptionPage();
            }
            else
            {
                // The default HSTS value is 30 days. You may want to change this for production scenarios, see https://aka.ms/aspnetcore-hsts.
                app.UseHsts();
            }

            app.UseHttpsRedirection();
            app.UseMvc();
            app.UseSwagger();
            app.UseSwaggerUI(c =>
            {
                c.SwaggerEndpoint("/swagger/v1.0/swagger.json", "My Demo API (V 1.0)");
            });
        }

下一篇:C# 委托
文章标题:Asp.net Core WebApi使用Swagger
文章链接:http://soscw.com/index.php/essay/44019.html