85) kubeAdmin 安装kubernetes v1.14.0
2021-01-20 18:15
标签:hub ipc scheduler ash 根据 isa 内核 Plan gre 【ps】:清华源上有kubernetes的各种老版本,阿里源只有最新的版本,不建议使用阿里源 [安装过程]: 85) kubeAdmin 安装kubernetes v1.14.0 标签:hub ipc scheduler ash 根据 isa 内核 Plan gre 原文地址:https://www.cnblogs.com/lemanlai/p/13304380.html1- Kubernetes对软件和硬件的系统要求
软硬件
最低配置
推荐配置
CPU|内存
Master: 2cores|4G
Node:4cores|16Gmaster: 4cores|16G
Node: 根据需要运行的容器数量进行配置
Linux系统
CentOS,redhat,ubuntu,Fedora等,kernel 3.10以上,GCE,AWS等
CentOS7.ubuntu 16.04,kernel 4.4
etcd
3.0
3.3
docker
18.03
18.09
2- 支持的容器引擎
3- kubeadm config
4- 环境规划
4.1- OS环境
role
os
kernel
ip
cpu
ram
disk
master
centos7.7-mini
kernel-lt-4.4.227-1.el7
192.168.123.217
2 cores
8G
80G
node-1
centos7.7-mini
kernel-lt-4.4.227-1.el7
192.168.123.216
2 cores
8G
80G
node-2
centos7.7-mini
kernel-lt-4.4.227-1.el7
192.168.123.211
2 cores
8G
80G
4.2- 组件版本
组件
版本
下载地址
docker-ce
19.03
清华源
kubeadm,kubelet,kubectl
1.14.0
docker.io镜像
flannel
v0.12.0
https://raw.githubusercontent.com/coreos/flannel/master/Documentation/kube-flannel.yml
kube-dashboard
v2.0.0-beta1
https://raw.githubusercontent.com/kubernetes/dashboard/v2.0.0-beta1/aio/deploy/recommended.yaml
etcd
v3.3.10
docker.io镜像
5- 安装环境[所有节点]
5.1- 环境初始化
systemctl disable firewalld
systemctl stop firewalld
setenforce 0
sed -i.bak ‘s/SELINUX=enforcing/SELINUX=disabled/‘ /etc/selinux/config
swapoff -a
sed -i.bak ‘/ swap / s/^\(.*\)$/#\1/g‘ /etc/fstab
rm -rf /etc/yum.repos.d/*
curl -o /etc/yum.repos.d/CentOS-Base.repo https://files-cdn.cnblogs.com/files/lemanlai/CentOS-7.repo.sh
curl -o /etc/pki/rpm-gpg/RPM-GPG-KEY-7 https://mirror.tuna.tsinghua.edu.cn/centos/7/os/x86_64/RPM-GPG-KEY-CentOS-7
yum install epel-release -y
curl -o /etc/yum.repos.d/docker-ce.repo https://files-cdn.cnblogs.com/files/lemanlai/docker-ce.repo.sh
cat /etc/yum.repos.d/kubernetes.repo
[kubernetes]
name=kubernetes
baseurl=https://mirrors.tuna.tsinghua.edu.cn/kubernetes/yum/repos/kubernetes-el7-\$basearch
enabled=1
gpgcheck=0
EOF
yum clean all
yum makecache fast  -y
yum install nmap net-tools telnet curl wget vim lrzsz bind-utils -y
wget https://elrepo.org/linux/kernel/el7/x86_64/RPMS/kernel-lt-4.4.229-1.el7.elrepo.x86_64.rpm
wget https://elrepo.org/linux/kernel/el7/x86_64/RPMS/kernel-lt-devel-4.4.229-1.el7.elrepo.x86_64.rpm
yum localinstall kernel-lt-* -y

sed -i ‘s\saved\0\g‘ /etc/default/grub
grub2-mkconfig -o /boot/grub2/grub.cfg

reboot
systemctl enable rc-local
chmod a+x /etc/rc.d/rc.local
systemctl restart rc-local

cat >> /etc/rc.local
cat >/etc/sysctl.d/kubernetes.conf
cat > /etc/modules-load.d/ipvs.conf 5.2- 安装环境组件
yum remove docker docker-common docker-selinux docker-engine -y  #如果你之前安装过 docker,请先删掉
yum install -y yum-utils device-mapper-persistent-data lvm2 #安装一些依赖
yum -y install docker-ce
systemctl enable docker
mkdir /etc/docker/ -p
cat >> /etc/docker/daemon.json
 yum install kubeadm-1.14.0 kubelet-1.14.0 kubectl-1.14.0  kubernetes-cni-0.7.5  -y
 systemctl enable kubelet
6-安装集群master节点[master节点]
6.1- 配置集群内容
hostnamectl set-hostname master
mkdir -p /opt/k8s/cfg
kubeadm config print init-defaults > /opt/k8s/cfg/init.default.yaml
cat  init.default.yaml

apiVersion: kubeadm.k8s.io/v1beta1
bootstrapTokens:
- groups:
  - system:bootstrappers:kubeadm:default-node-token
  token: f589ad.12ecf4203d7c7773   ## 随机token值
  ttl: 24h0m0s   ## token过期时间,0表示永不过期
  usages:
  - signing
  - authentication
kind: InitConfiguration
localAPIEndpoint:
  advertiseAddress: 192.168.123.217   # apiserver的地址
  bindPort: 6443
nodeRegistration:
  criSocket: /var/run/dockershim.sock
  name: master
  taints:
  - effect: NoSchedule
    key: node-role.kubernetes.io/master
---
apiServer:
  timeoutForControlPlane: 4m0s
apiVersion: kubeadm.k8s.io/v1beta1
certificatesDir: /etc/kubernetes/pki
clusterName: kubernetes
controlPlaneEndpoint: ""
controllerManager: {}
dns:
  type: CoreDNS
etcd:
  local:
    dataDir: /var/lib/etcd
imageRepository: docker.io/dustise   # 镜像下载的地址
kind: ClusterConfiguration
kubernetesVersion: v1.14.0    # 版本
networking:
  dnsDomain: k8s.local    # 根域名
  podSubnet: 10.96.0.0/16   # pod的地址范围
  serviceSubnet: 10.254.0.0/24  # service的地址范围
scheduler: {}
cd /opt/k8s/cfg
kubeadm config images pull --config=init.default.yaml

## 下载过程
[config/images] Pulled docker.io/dustise/kube-apiserver:v1.14.0
[config/images] Pulled docker.io/dustise/kube-controller-manager:v1.14.0
[config/images] Pulled docker.io/dustise/kube-scheduler:v1.14.0
[config/images] Pulled docker.io/dustise/kube-proxy:v1.14.0
[config/images] Pulled docker.io/dustise/pause:3.1
[config/images] Pulled docker.io/dustise/etcd:3.3.10
[config/images] Pulled docker.io/dustise/coredns:1.3.1
kubeadm init --config=init.default.yaml
[root@master cfg]# kubeadm init --config=init.default.yaml
[init] Using Kubernetes version: v1.14.0
[preflight] Running pre-flight checks
        [WARNING SystemVerification]: this Docker version is not on the list of validated versions: 19.03.12. Latest validated version: 18.09
[preflight] Pulling images required for setting up a Kubernetes cluster
[preflight] This might take a minute or two, depending on the speed of your internet connection
[preflight] You can also perform this action in beforehand using ‘kubeadm config images pull‘
[kubelet-start] Writing kubelet environment file with flags to file "/var/lib/kubelet/kubeadm-flags.env"
[kubelet-start] Writing kubelet configuration to file "/var/lib/kubelet/config.yaml"
[kubelet-start] Activating the kubelet service
[certs] Using certificateDir folder "/etc/kubernetes/pki"
[certs] Generating "etcd/ca" certificate and key
[certs] Generating "apiserver-etcd-client" certificate and key
[certs] Generating "etcd/server" certificate and key
[certs] etcd/server serving cert is signed for DNS names [master localhost] and IPs [192.168.123.217 127.0.0.1 ::1]
[certs] Generating "etcd/peer" certificate and key
[certs] etcd/peer serving cert is signed for DNS names [master localhost] and IPs [192.168.123.217 127.0.0.1 ::1]
[certs] Generating "etcd/healthcheck-client" certificate and key
[certs] Generating "ca" certificate and key
[certs] Generating "apiserver" certificate and key
[certs] apiserver serving cert is signed for DNS names [master kubernetes kubernetes.default kubernetes.default.svc kubernetes.default.svc.k8s.local] and IPs [10.254.0.1 192.168.123.217]
[certs] Generating "apiserver-kubelet-client" certificate and key
[certs] Generating "front-proxy-ca" certificate and key
[certs] Generating "front-proxy-client" certificate and key
[certs] Generating "sa" key and public key
[kubeconfig] Using kubeconfig folder "/etc/kubernetes"
[kubeconfig] Writing "admin.conf" kubeconfig file
[kubeconfig] Writing "kubelet.conf" kubeconfig file
[kubeconfig] Writing "controller-manager.conf" kubeconfig file
[kubeconfig] Writing "scheduler.conf" kubeconfig file
[control-plane] Using manifest folder "/etc/kubernetes/manifests"
[control-plane] Creating static Pod manifest for "kube-apiserver"
[control-plane] Creating static Pod manifest for "kube-controller-manager"
[control-plane] Creating static Pod manifest for "kube-scheduler"
[etcd] Creating static Pod manifest for local etcd in "/etc/kubernetes/manifests"
[wait-control-plane] Waiting for the kubelet to boot up the control plane as static Pods from directory "/etc/kubernetes/manifests". This can take up to 4m0s
[kubelet-check] Initial timeout of 40s passed.
[apiclient] All control plane components are healthy after 92.004687 seconds
[upload-config] storing the configuration used in ConfigMap "kubeadm-config" in the "kube-system" Namespace
[kubelet] Creating a ConfigMap "kubelet-config-1.14" in namespace kube-system with the configuration for the kubelets in the cluster
[upload-certs] Skipping phase. Please see --experimental-upload-certs
[mark-control-plane] Marking the node master as control-plane by adding the label "node-role.kubernetes.io/master=‘‘"
[mark-control-plane] Marking the node master as control-plane by adding the taints [node-role.kubernetes.io/master:NoSchedule]
[bootstrap-token] Using token: f589ad.12ecf4203d7c7773
[bootstrap-token] Configuring bootstrap tokens, cluster-info ConfigMap, RBAC Roles
[bootstrap-token] configured RBAC rules to allow Node Bootstrap tokens to post CSRs in order for nodes to get long term certificate credentials
[bootstrap-token] configured RBAC rules to allow the csrapprover controller automatically approve CSRs from a Node Bootstrap Token
[bootstrap-token] configured RBAC rules to allow certificate rotation for all node client certificates in the cluster
[bootstrap-token] creating the "cluster-info" ConfigMap in the "kube-public" namespace
[addons] Applied essential addon: CoreDNS
[addons] Applied essential addon: kube-proxy

Your Kubernetes control-plane has initialized successfully!

To start using your cluster, you need to run the following as a regular user:

  mkdir -p $HOME/.kube
  sudo cp -i /etc/kubernetes/admin.conf $HOME/.kube/config
  sudo chown $(id -u):$(id -g) $HOME/.kube/config

You should now deploy a pod network to the cluster.
Run "kubectl apply -f [podnetwork].yaml" with one of the options listed at:
  https://kubernetes.io/docs/concepts/cluster-administration/addons/

Then you can join any number of worker nodes by running the following on each as root:

kubeadm join 192.168.123.217:6443 --token f589ad.12ecf4203d7c7773     --discovery-token-ca-cert-hash sha256:2ee27e9a66e61b99d2e35cad4d9022b64e3a7fe9ece26264a26dcc63807b318c
mkdir -p $HOME/.kube
sudo cp -i /etc/kubernetes/admin.conf $HOME/.kube/config
sudo chown $(id -u):$(id -g) $HOME/.kube/config
6.2- 验证部署结果
[root@master cfg]# kubectl get configmap -n kube-system
NAME                                 DATA   AGE
coredns                              1      8m43s
extension-apiserver-authentication   6      8m54s
kube-proxy                           2      8m41s
kubeadm-config                       2      8m52s
kubelet-config-1.14                  1      8m52s
[root@master cfg]# kubectl describe configmap kubeadm-config -n kube-system
Name: kubeadm-config
Namespace: kube-system
Labels:
[root@master cfg]# kubectl get node -o wide
NAME STATUS ROLES AGE VERSION INTERNAL-IP EXTERNAL-IP OS-IMAGE KERNEL-VERSION CONTAINER-RUNTIME
master NotReady master 15m v1.14.0 192.168.123.217 7- 安装集群node节点[node节点]
7.1- 加入之前的准备
hostnamectl set-hostname node-1
7.2- 加入方式一
kubeadm join 192.168.123.217:6443 --token f589ad.12ecf4203d7c7773 --discovery-token-ca-cert-hash sha256:2ee27e9a66e61b99d2e35cad4d9022b64e3a7fe9ece26264a26dcc63807b318c
7.3- 加入方式二
mkdir -p /opt/k8s/cfg
kubeadm config print join-defaults > /opt/k8s/cfg/join-config.yaml
[root@node-1 cfg]# cat /opt/k8s/cfg/join-config.yaml
apiVersion: kubeadm.k8s.io/v1beta1
caCertPath: /etc/kubernetes/pki/ca.crt
discovery:
  bootstrapToken:
    apiServerEndpoint: 192.168.123.217:6443   ## master的kube-apiserver地址和端口
    token: f589ad.12ecf4203d7c7773   # init.default.yaml的token值
    unsafeSkipCAVerification: true
  timeout: 5m0s
  tlsBootstrapToken: f589ad.12ecf4203d7c7773    # init.default.yaml的token值
kind: JoinConfiguration
nodeRegistration:
  criSocket: /var/run/dockershim.sock
  name: node-1    # node节点的主机名
## 加入过程
[root@node-1 cfg]# kubeadm join --config=/opt/k8s/cfg/join-config.yaml
[preflight] Running pre-flight checks
        [WARNING SystemVerification]: this Docker version is not on the list of validated versions: 19.03.12. Latest validated version: 18.09
[preflight] Reading configuration from the cluster...
[preflight] FYI: You can look at this config file with ‘kubectl -n kube-system get cm kubeadm-config -oyaml‘
[kubelet-start] Downloading configuration for the kubelet from the "kubelet-config-1.14" ConfigMap in the kube-system namespace
[kubelet-start] Writing kubelet configuration to file "/var/lib/kubelet/config.yaml"
[kubelet-start] Writing kubelet environment file with flags to file "/var/lib/kubelet/kubeadm-flags.env"
[kubelet-start] Activating the kubelet service
[kubelet-start] Waiting for the kubelet to perform the TLS Bootstrap...

This node has joined the cluster:
* Certificate signing request was sent to apiserver and a response was received.
* The Kubelet was informed of the new secure connection details.

Run ‘kubectl get nodes‘ on the control-plane to see this node join the cluster.
7.4- 验证结果[master节点]
[root@master cfg]# kubectl get node -o wide
NAME STATUS ROLES AGE VERSION INTERNAL-IP EXTERNAL-IP OS-IMAGE KERNEL-VERSION CONTAINER-RUNTIME
master NotReady master 35m v1.14.0 192.168.123.217 7.5- 允许node节点使用kubectl访问集群[node节点]
mkdir -p $HOME/.kube
scp  root@192.168.123.217:/etc/kubernetes/admin.conf $HOME/.kube/config
chown $(id -u):$(id -g) $HOME/.kube/config
[root@node-1 cfg]# kubectl get node
NAME STATUS ROLES AGE VERSION
master NotReady master 39m v1.14.0
node-1 NotReady 8- 安装其他应用[master节点]
8.1- 安装flannel
wget https://raw.githubusercontent.com/coreos/flannel/master/Documentation/kube-flannel.yml
sed -i ‘s\quay.io\quay-mirror.qiniu.com\g‘ kube-flannel.yml
[root@master cfg]# cat kube-flannel.yml  -n  ##修改第128行的pod网络信息为kubeadm部署的信息
   126    net-conf.json: |
   127      {
   128        "Network": "10.96.0.0/16",
   129        "Backend": {
   130          "Type": "vxlan"
   131        }
   132      }
[root@master cfg]# kubectl apply -f kube-flannel.yml
podsecuritypolicy.policy/psp.flannel.unprivileged created
clusterrole.rbac.authorization.k8s.io/flannel created
clusterrolebinding.rbac.authorization.k8s.io/flannel created
serviceaccount/flannel created
configmap/kube-flannel-cfg created
daemonset.apps/kube-flannel-ds-amd64 created
daemonset.apps/kube-flannel-ds-arm64 created
daemonset.apps/kube-flannel-ds-arm created
daemonset.apps/kube-flannel-ds-ppc64le created
daemonset.apps/kube-flannel-ds-s390x created
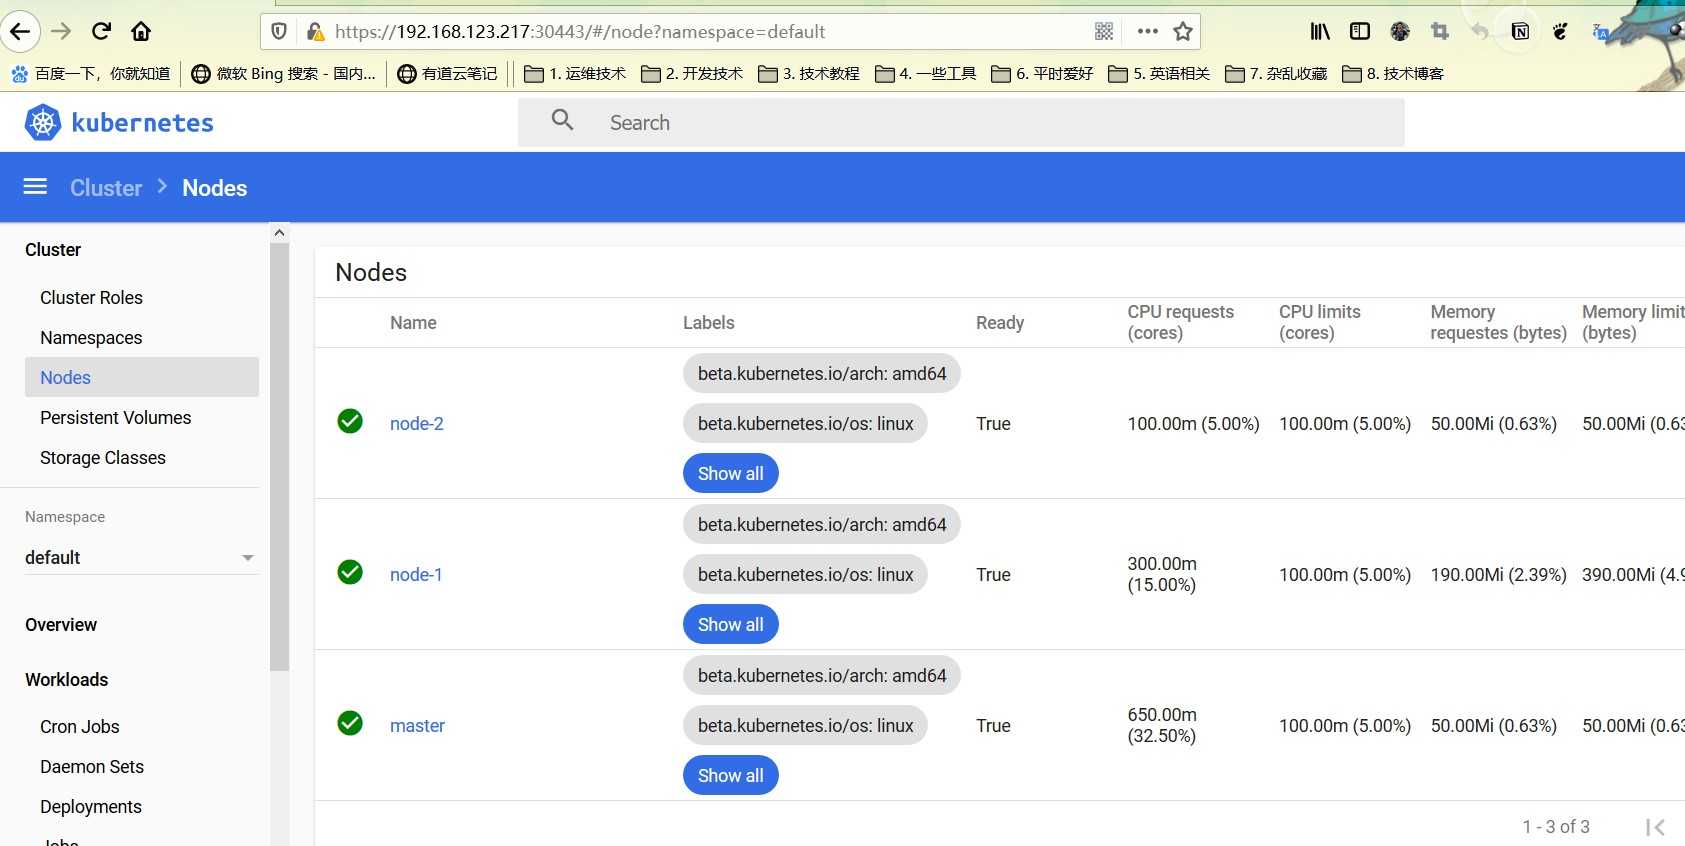
[root@master cfg]# kubectl get node
NAME STATUS ROLES AGE VERSION
master Ready master 131m v1.14.0
node-1 Ready 8.2- 部署kube-dashboard
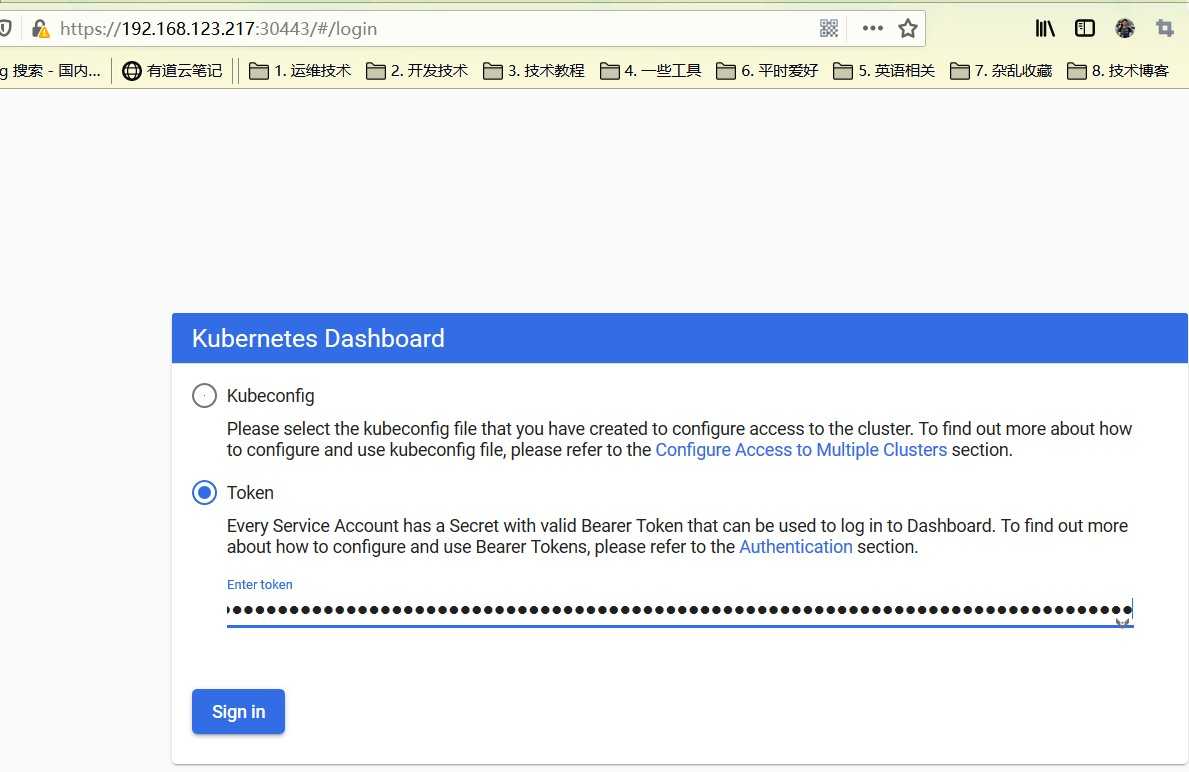
https://raw.githubusercontent.com/kubernetes/dashboard/v2.0.0-beta1/aio/deploy/recommended.yaml
[root@master cfg]# cat -n  recommended.yaml |grep 4[0-7]
    40    type: NodePort   #增加type
    41    ports:
    42      - port: 443
    43        targetPort: 8443
    44        nodePort: 30443  #增加端口
[root@master cfg]# cat -n recommended.yaml |grep image
   193            image: kubernetesui/dashboard:v2.0.0-beta1
   194            imagePullPolicy: IfNotPresent  #修改成IfNotPresent
   268            image: kubernetesui/metrics-scraper:v1.0.0
[root@master cfg]# kubectl apply -f recommended.yaml
namespace/kubernetes-dashboard created
serviceaccount/kubernetes-dashboard created
service/kubernetes-dashboard created
secret/kubernetes-dashboard-certs created
secret/kubernetes-dashboard-csrf created
secret/kubernetes-dashboard-key-holder created
configmap/kubernetes-dashboard-settings created
role.rbac.authorization.k8s.io/kubernetes-dashboard created
clusterrole.rbac.authorization.k8s.io/kubernetes-dashboard created
rolebinding.rbac.authorization.k8s.io/kubernetes-dashboard created
clusterrolebinding.rbac.authorization.k8s.io/kubernetes-dashboard created
deployment.apps/kubernetes-dashboard created
service/dashboard-metrics-scraper created
deployment.apps/kubernetes-metrics-scraper created
[root@master cfg]# kubectl get svc,pod -o wide -A
NAMESPACE NAME TYPE CLUSTER-IP EXTERNAL-IP PORT(S) AGE SELECTOR
default service/kubernetes ClusterIP 10.254.0.1
kubectl create serviceaccount dashboard-admin -n kube-system
kubectl create clusterrolebinding dashboard-admin --clusterrole=cluster-admin --serviceaccount=kube-system:dashboard-admin
[root@master cfg]# kubectl get secret -n kube-system|grep dashboard
dashboard-admin-token-rwm29 kubernetes.io/service-account-token 3 17s
[root@master cfg]# kubectl describe secret dashboard-admin-token-rwm29 -n kube-system
Name: dashboard-admin-token-rwm29
Namespace: kube-system
Labels:


上一篇:webpack代理设置
下一篇:如何解决json返回的乱码
文章标题:85) kubeAdmin 安装kubernetes v1.14.0
文章链接:http://soscw.com/index.php/essay/44658.html