.NET Core使用swagger进行API接口文档管理
2021-02-12 09:19
一、问题背景
随着技术的发展,现在的开发模式已经更多的转向了前后端分离的模式,在前后端开发的过程中,联系的方式也变成了API接口,但是目前项目中对于API的管理很多时候还是通过手工编写文档,每次的需求变更只要涉及到接口的变更,文档都需要进行额外的维护,如果有哪个小伙伴忘记维护,很多时候就会造成一连续的问题,那如何可以更方便的解决API的沟通问题?Swagger给我们提供了一个方式,由于目前主要我是投入在.NET Core项目的开发中,所以以.NET Core作为示例
二、什么是Swagger
Swagger可以从不同的代码中,根据注释生成API信息,swagger拥有强大的社区,并且对于各种语言都支持良好,有很多的工具可以通过swagger生成的文件生成API文档
三、.NET Core中使用
.NET Core中使用首先要用nuget引用Swashbuckle.AspNetCore,在startup.cs中加入如下代码
// This method gets called by the runtime. Use this method to add services to the container.
public void ConfigureServices(IServiceCollection services)
{
services.AddMvc();
services.AddSwaggerGen(c =>
{
c.SwaggerDoc("v1", new Info { Title = "Hello", Version = "v1" });
var basePath = PlatformServices.Default.Application.ApplicationBasePath;
var xmlPath = Path.Combine(basePath, "WebApplication2.xml");
c.IncludeXmlComments(xmlPath);
});
services.AddMvcCore().AddApiExplorer();
}
// This method gets called by the runtime. Use this method to configure the HTTP request pipeline.
public void Configure(IApplicationBuilder app, IHostingEnvironment env)
{
if (env.IsDevelopment())
{
app.UseDeveloperExceptionPage();
}
app.UseMvcWithDefaultRoute();
app.UseSwagger(c =>
{
});
app.UseSwaggerUI(c =>
{
c.ShowExtensions();
c.ValidatorUrl(null);
c.SwaggerEndpoint("/swagger/v1/swagger.json", "test V1");
});
}
以上部分为加载swagger的代码,位于startup.cs中,下面是controller代码:
using System;
using System.Collections.Generic;
using System.Linq;
using System.Threading.Tasks;
using Microsoft.AspNetCore.Mvc;
namespace WebApplication2.Controllers
{
///
/// 测试信息
///
[Route("api/[controller]/[action]")]
public class ValuesController : Controller
{
///
/// 获取所有信息
///
///
[HttpGet]
public IEnumerable
{
return new string[] { "value1", "value2" };
}
///
/// 根据ID获取信息
///
///
///
// GET api/values/5
[HttpGet("{id}")]
public string Get(int id)
{
return "value";
}
///
/// POST了一个数据信息
///
///
// POST api/values
[HttpPost]
public void Post([FromBody]string value)
{
}
///
/// 根据ID put 数据
///
///
///
// PUT api/values/5
[HttpPut("{id}")]
public void Put(int id, [FromBody]string value)
{
}
///
/// 根据ID删除数据
///
///
// DELETE api/values/5
[HttpDelete("{id}")]
public void Delete(int id)
{
}
///
/// 复杂数据操作
///
///
// DELETE api/values/5
[HttpPost]
public namevalue test(namevalue _info)
{
return _info;
}
}
public class namevalue
{
///
/// name的信息
///
public String name { get; set; }
///
/// value的信息
///
public String value { get; set; }
}
}
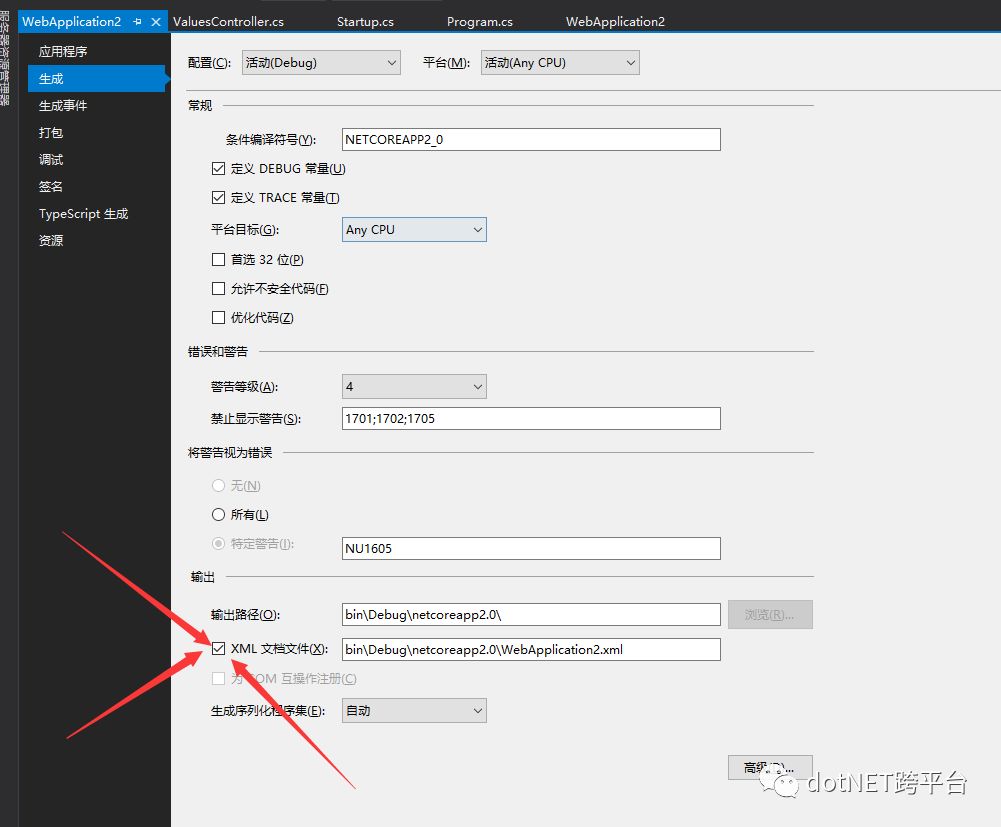
接下来我们还需要在生成中勾上XML生成文档,如图所示

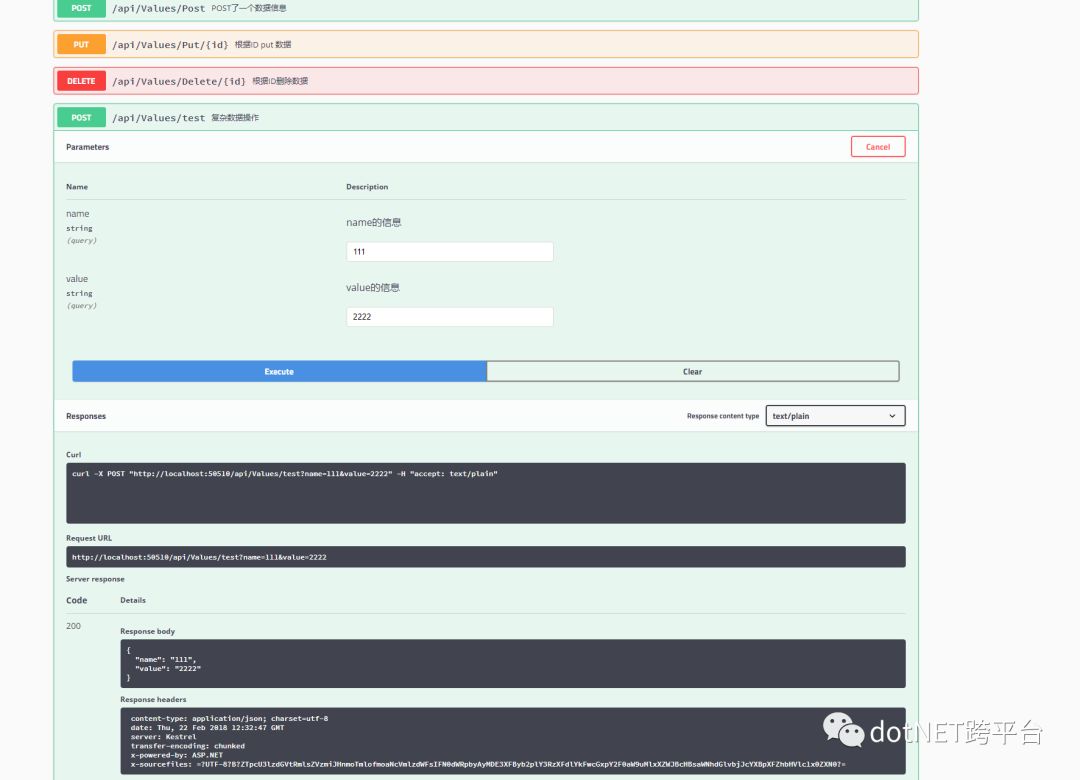
接下去我们可以运行起来了,调试,浏览器中输入http://localhost:50510/swagger/,这里端口啥的根据实际情况来,运行效果如下图所示:

可以看到swagger将方法上的注释以及实体的注释都抓出来了,并且显示在swaggerui,整体一目了然,并且可以通过try it按钮进行简单的调试,但是在具体项目中,可能存在需要将某些客户端信息通过header带到服务中,例如token信息,用户信息等(我们项目中就需要header中带上token传递到后端),那针对于这种情况要如何实现呢?可以看下面的做法
// This method gets called by the runtime. Use this method to add services to the container.
public void ConfigureServices(IServiceCollection services)
{
services.AddMvc();
services.AddSwaggerGen(c =>
{
c.SwaggerDoc("v1", new Info { Title = "Hello", Version = "v1" });
var basePath = PlatformServices.Default.Application.ApplicationBasePath;
var xmlPath = Path.Combine(basePath, "WebApplication2.xml");
c.IncludeXmlComments(xmlPath);
c.OperationFilter();
});
services.AddMvcCore().AddApiExplorer();
}
public class AddAuthTokenHeaderParameter : IOperationFilter
{
public void Apply(Operation operation, OperationFilterContext context)
{
if (operation.Parameters == null)
{
operation.Parameters = new List
}
operation.Parameters.Add(new NonBodyParameter()
{
Name = "token",
In = "header",
Type = "string",
Description = "token认证信息",
Required = true
});
}
}
我们在ConfigureServices添加了OperationFilter(),通过这种方式我们可以在swagger中显示token的header,并且进行调试(如图所示),AddAuthTokenHeaderParameter 的apply的属性context中带了controller以及action的各种信息,可以配合实际情况使用

四、与其他API管理工具结合
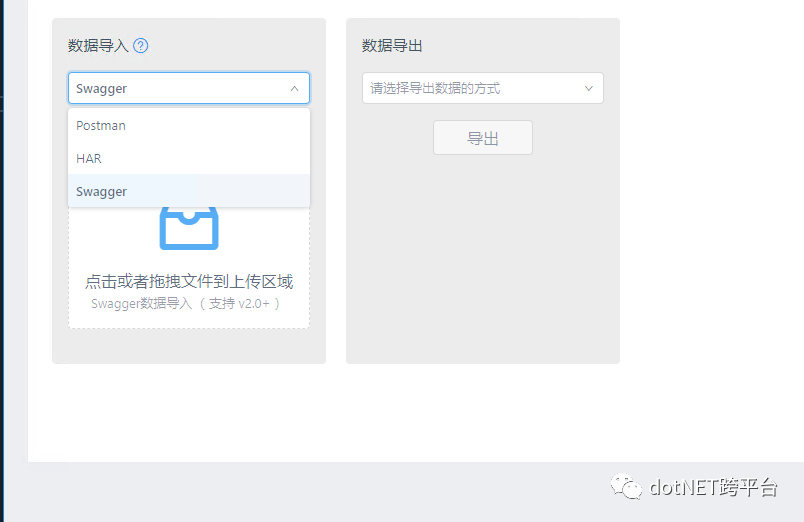
swagger强大的功能以及社区的力量,目前很多的API管理工具都支持YApi,目前我们使用的是由去哪儿开源的YApi,从图中可以看到YApi支持导入swagger生成的JSON文件,除该工具 之外DOClever(开源)也是一个不错的API管理工具,也支持Swagger文件导入(具体工具用法,大家可以去看他们的官网)

五、总结
Swagger是一个很好的工具,并且在前后端分离开发越来越流行的情况下,在后续的开发过程中,我觉得会扮演着越来越重要的作用,目前我们公司小的项目已经准备开始使用swagger+yapi进行API的管理方式,而这篇文章也是这段时间抽空整理API管理的结果,希望可以帮助到大家,这里可能有很多不足的地方,欢迎大家拍砖,也希望可以跟大家一起进步
原文地址: https://www.cnblogs.com/OMango/p/8460092.html
文章标题:.NET Core使用swagger进行API接口文档管理
文章链接:http://soscw.com/index.php/essay/54408.html