Netty源码死磕二(Netty的启动流程)
2021-02-20 10:17
标签:factor ack logger socket 通过 failure 逻辑 lock top 上一篇文章介绍了 开始之前,我们先来分析下 启动流程大致分为五步 下面我们就从启动源码来进一步分析 Netty 服务端的启动流程 首先来看下常见的启动代码 这篇文章主要是分析Netty的启动流程。so我们直接看 创建完成的 将 下面我们来看下 下面是它的构造方法的调用顺序,依次分为了四步 可以看到 这里主要是为服务端Channel配置一些参数,以及对应的处理器 完成注册流程 到这里为止,其实Netty服务端已经基本启动完成了,就差绑定一个监听端口了。可能读者会很诧异,怎么没有看到Nio线程轮询 IO事件的循环呢,讲道理肯定应该有一个死循环才对?那我们下面就把这段代码找出来 在之前的代码中,我们经常会看到这样一段代码 通过上面的代码可以知道这里主要做了两件事情 到这里的代码是不是就非常熟悉了,熟悉的死循环轮询事件 实际的Bind逻辑在 本篇文章把Netty的启动流程粗略的捋了一遍,目的不是为了抠细节,而是大致能够清楚Netty服务端启动时主要做了哪些事情,所以有些地方难免会比较粗略一笔带过。在后面的文章我会把一些细节的源码单独拎出来深入分析 Netty源码死磕二(Netty的启动流程) 标签:factor ack logger socket 通过 failure 逻辑 lock top 原文地址:https://www.cnblogs.com/taromilk/p/12919069.html引言
Netty的线程模型及EventLoop机制,相信大家对Netty已经有一个基本的认识。那么本篇文章我会根据Netty提供的Demo来分析一下Netty启动流程。启动流程概览
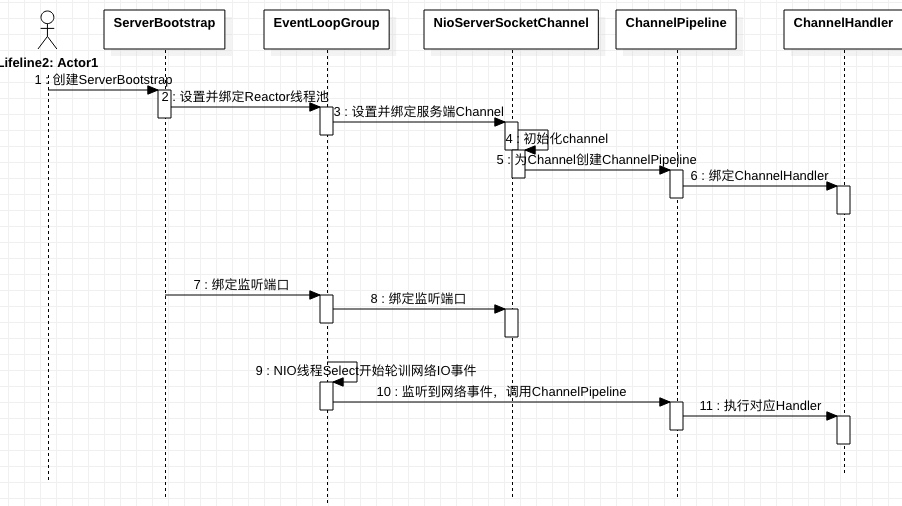
Netty服务端的启动流程,下面是一个简单的流程图
ServerBootstrap实例,ServerBootstrap是Netty服务端的启动辅助类,其存在意义在于其整合了Netty可以提供的所有能力,并且尽可能的进行了封装,以方便我们使用EventLoopGroup,EventLoopGroup其实是一个包含了多个EventLoop的NIO线程池,在上一篇文章我们也有比较详细的介绍过EventLoop事件循环机制,不过值得一提的是,Netty 中的EventLoop不仅仅只处理IO读写事件,还会处理用户自定义或系统的Task任务NioServerSocketChannel,并绑定至一个EventLoop上。在初始化NioServerSocketChannel的同时,会创建ChannelPipeline,ChannelPipeline其实是一个绑定了多个ChannelHandler的执行链,后面我们会详细介绍Channel添加并绑定ChannelHandler,ChannelHandler是Netty开放给我们的一个非常重要的接口,在触发网络读写事件后,Netty都会调用对应的ChannelHandler来处理,后面我们会详细介绍Channel绑定监听端口,完成绑定之后,Reactor线程(也就是第三步绑定的EventLoop线程)就开始执行Selector轮询网络IO事件了,如果Selector轮询到网络IO事件了,则会调用Channel对应的ChannelPipeline来依次执行对应的ChannelHandler
启动流程源码分析
入口
// 配置bossEventLoopGroup 配置大小为1
EventLoopGroup bossGroup = new NioEventLoopGroup(1);
// 配置workEventLoopGroup 配置大小默认为cpu数*2
EventLoopGroup workerGroup = new NioEventLoopGroup();
// 自定义handler
final EchoServerHandler serverHandler = new EchoServerHandler();
try {
// 启动辅助类 配置各种参数(服务端Channel类,EventLoopGroup,childHandler等)
ServerBootstrap b = new ServerBootstrap();
b.group(bossGroup, workerGroup)
// 配置 channel通道,会反射实例化
.channel(NioServerSocketChannel.class)
.option(ChannelOption.SO_BACKLOG, 100)
.handler(new LoggingHandler(LogLevel.INFO))
.childHandler(new ChannelInitializer
EventLoopGroup,在上一篇文章我们有介绍过Netty的线程模型有三种,而不同的EventLoopGroup配置对应了三种不同的线程模型。这里创建的两个EventLoopGroup则是用了多线程Reactor模型,其中bossEventLoopGroup对应的就是处理Accept事件的线程组,而workEventLoopGroup则负责处理IO读写事件。ServerBootstrap,并且配置了如下几个重要参数
SO_BACKLOG指定内核未连接的Socket连接排队个数ChannelFuture f = b.bind(PORT).sync();
b.bind(PORT).sync()的源码bind 发现该方法内部实际调用的是doBind(final SocketAddress localAddress)方法doBind
private ChannelFuture doBind(final SocketAddress localAddress) {
// 初始化服务端Channel
    final ChannelFuture regFuture = initAndRegister();
    final Channel channel = regFuture.channel();
    if (regFuture.cause() != null) {
        return regFuture;
    }

    if (regFuture.isDone()) {
    // 初始化一个 promise(异步回调)
        ChannelPromise promise = channel.newPromise();
        // 绑定监听端口
        doBind0(regFuture, channel, localAddress, promise);
        return promise;
    }
    .... // 省略其他代码
}
doBind主要做了两个事情
initAndRegister() 初始化ChanneldoBind0 绑定监听端口initAndRegister()final ChannelFuture initAndRegister() {
Channel channel = null;
try {
// new一个新的服务端Channel
channel = channelFactory.newChannel();
// 初始化Channel
init(channel);
} catch (Throwable t) {
...
}
// 将Channel注册到EventLoopGroup中一个EventLoop上
ChannelFuture regFuture = config().group().register(channel);
if (regFuture.cause() != null) {
if (channel.isRegistered()) {
channel.close();
} else {
channel.unsafe().closeForcibly();
}
}
return regFuture;
}
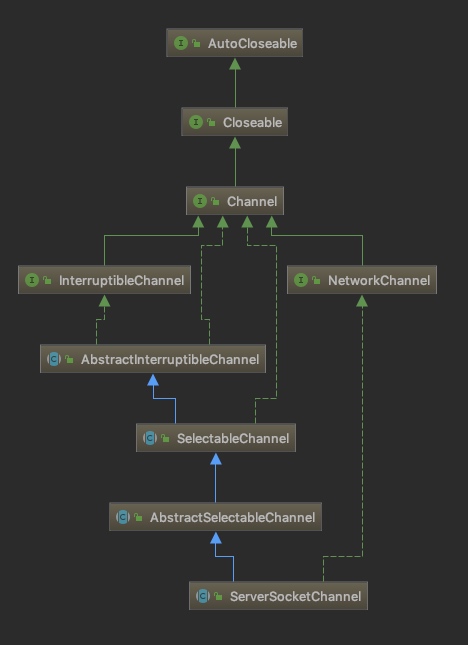
channelFactory.newChannel()其实就是通过反射创建配置的服务端Channel类,在这里是NioServerSocketChannelNioServerSocketChannel进行一些初始化操作,例如将我们配置的Handler加到服务端Channel的pipeline中Channel注册到EventLoopGroup中一个EventLoop上NioServerSocketChannel类的构造方法,看看它到底初始化了哪些东西,先看下其继承结构NioServerSocketChannel初始化

// 1
public NioServerSocketChannel() {
// 通过 SelectProvider来初始化一个Java NioServerChannel
    this(newSocket(DEFAULT_SELECTOR_PROVIDER));
}

// 2.
public NioServerSocketChannel(ServerSocketChannel channel) {
    super(null, channel, SelectionKey.OP_ACCEPT);
    // 创建一个配置类,持有Java Channel
    config = new NioServerSocketChannelConfig(this, javaChannel().socket());
}

// 3.
protected AbstractNioChannel(Channel parent, SelectableChannel ch, int readInterestOp) {
    super(parent);
    this.ch = ch;
    this.readInterestOp = readInterestOp;
    try {
    // 设置Channel为非阻塞
        ch.configureBlocking(false);
    } catch (IOException e) {
        try {
            ch.close();
        } catch (IOException e2) {
            logger.warn(
                        "Failed to close a partially initialized socket.", e2);
        }

        throw new ChannelException("Failed to enter non-blocking mode.", e);
    }
}

// 4
protected AbstractChannel(Channel parent) {
    this.parent = parent;
    // 生成一个channel Id
    id = newId();
    // 创建一个 unSafe 类,unsafe封装了Netty底层的IO读写操作
    unsafe = newUnsafe();
    // 创建一个 pipeline类
    pipeline = newChannelPipeline();
}
NioServerSocketChannel的构造函数主要是初始化并绑定了以下3类
ServerSocketChannel类unsafe类,unsafe封装了Netty底层的IO读写操作pipeline,每个Channel都会唯一绑定一个pipeline
init(Channel channel)
void init(Channel channel) {
// 设置Socket参数
setChannelOptions(channel, newOptionsArray(), logger);
setAttributes(channel, attrs0().entrySet().toArray(EMPTY_ATTRIBUTE_ARRAY));
ChannelPipeline p = channel.pipeline();
// 子EventLoopGroup用于完成Nio读写操作
final EventLoopGroup currentChildGroup = childGroup;
// 为workEventLoop配置的自定义Handler
final ChannelHandler currentChildHandler = childHandler;
final EntryChannelHandler,注意这里不仅仅会把我们自定义配置的ChannelHandler加上去,同时还会自动帮我们加入一个系统Handler (ServerBootstrapAcceptor),这就是Netty用来接收客户端请求的Handler,在ServerBootstrapAcceptor内部会完成SocketChannel的连接,EventLoop的绑定等操作,之后我们会着重分析这个类Channel的注册
// MultithreadEventLoopGroup
public ChannelFuture register(Channel channel) {
// next()会选择一个EventLoop来完成Channel的注册
    return next().register(channel);
}

// SingleThreadEventLoop
public ChannelFuture register(Channel channel) {
    return register(new DefaultChannelPromise(channel, this));
}
// AbstractChannel
public final void register(EventLoop eventLoop, final ChannelPromise promise) {
    ObjectUtil.checkNotNull(eventLoop, "eventLoop");
    if (isRegistered()) {
        promise.setFailure(new IllegalStateException("registered to an event loop already"));
        return;
    }
    if (!isCompatible(eventLoop)) {
        promise.setFailure(
                new IllegalStateException("incompatible event loop type: " + eventLoop.getClass().getName()));
        return;
    }

    AbstractChannel.this.eventLoop = eventLoop;

    if (eventLoop.inEventLoop()) {
    // 注册逻辑
        register0(promise);
    }
    ....
}
ServerSocketChannel与Select选择器的绑定channelRegistered以及channelActive事件// 往EventLoop中丢了一个异步任务(其实是同步的,因为只有一个Nio线程,不过因为是事件循环机制(丢到一个任务队列中),看起来像是异步的)
eventLoop.execute(new Runnable() {
@Override
public void run() {
...
}
});
eventLoop.execute到底做了什么事情?private void execute(Runnable task, boolean immediate) {
boolean inEventLoop = inEventLoop();
// 把当前任务添加到任务队列中
addTask(task);
// 不是Nio线程自己调用的话,则表明是初次启动
if (!inEventLoop) {
// 启动EventLoop的Nio线程
startThread();
...
}
...
}
/**
* 启动EventLoop的Nio线程
*/
private void doStartThread() {
assert thread == null;
// 启动Nio线程
executor.execute(new Runnable() {
@Override
public void run() {
thread = Thread.currentThread();
if (interrupted) {
thread.interrupt();
}
boolean success = false;
updateLastExecutionTime();
try {
SingleThreadEventExecutor.this.run();
success = true;
} catch (Throwable t) {
logger.warn("Unexpected exception from an event executor: ", t);
} finally {
...
}
看下 NioEventLoop的Run方法实现protected void run() {
int selectCnt = 0;
for (;;) {
try {
int strategy;
try {
// 获取IO事件类型
strategy = selectStrategy.calculateStrategy(selectNowSupplier, hasTasks());
...
default:
}
} catch (IOException e) {
// 出现异常 重建Selector
rebuildSelector0();
selectCnt = 0;
handleLoopException(e);
continue;
}
selectCnt++;
cancelledKeys = 0;
needsToSelectAgain = false;
final int ioRatio = this.ioRatio;
boolean ranTasks;
if (ioRatio == 100) {
try {
if (strategy > 0) {
// 处理对应事件,激活对应的ChannelHandler事件
processSelectedKeys();
}
} finally {
// 处理完事件了才执行全部Task
ranTasks = runAllTasks();
}
}
...
}
}
}
doBind0
NioServerSocketChannel中执行,我们直接省略前面一些冗长的调用,来看下最底层的调用代码,发现其实就是调用其绑定的Java Channel来执行对应的监听端口绑定逻辑protected void doBind(SocketAddress localAddress) throws Exception {
// 如果JDK版本大于7
if (PlatformDependent.javaVersion() >= 7) {
javaChannel().bind(localAddress, config.getBacklog());
} else {
javaChannel().socket().bind(localAddress, config.getBacklog());
}
}
尾言
文章标题:Netty源码死磕二(Netty的启动流程)
文章链接:http://soscw.com/index.php/essay/57926.html