springboot 单元测试添加
2021-03-03 22:28
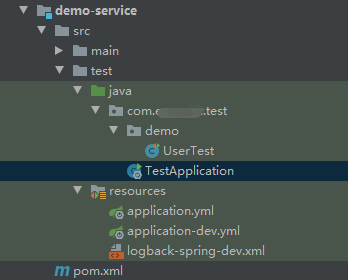
标签:size 连接数 owa add hang nta return pac junit4 如果出现以下错误 这是因为你将与数据库连接的jar放在了web层,导致测试类启动的时候,无法与数据库进行连接。 只需要将jar移入到service中即可不出错。 在 service 层进行单元测试时,需要用到服务,需要将服务注册到容器中,因此需要在单元测试木块添加启动类。 springboot 单元测试添加 标签:size 连接数 owa add hang nta return pac junit4 原文地址:https://www.cnblogs.com/buzheng/p/14380740.htmlService层单元测试
步骤一:添加 jar 包

步骤二:添加启动类

import org.mybatis.spring.annotation.MapperScan;
import org.springframework.boot.SpringApplication;
import org.springframework.boot.autoconfigure.SpringBootApplication;

@SpringBootApplication(scanBasePackages = "com.buzheng")
@MapperScan("com.buzheng.demo.mapper")
public class TestApplication {
    public static void main(String[] args) {
        SpringApplication.run(TestApplication.class, args);
    }
}
步骤三:添加测试类
import com.buzheng.demo.entity.TestUser;
import com.buzheng.demo.service.TestUserService;
import com.buzheng.test.TestApplication;
import org.junit.Test;
import org.junit.runner.RunWith;
import org.springframework.beans.factory.annotation.Autowired;
import org.springframework.boot.test.context.SpringBootTest;
import org.springframework.test.context.junit4.SpringRunner;
@RunWith(SpringRunner.class)
@SpringBootTest(classes = TestApplication.class)
public class UserTest {
@Autowired(required = false)
private TestUserService testUserService;
@Test
public void test() {
List
Controller 层单元测试
步骤一:因为 service 已经添加过jar 所以无需重复添加
步骤二:启动类使用web自带的。
步骤三:添加测试类
import org.junit.Test;
import org.junit.runner.RunWith;
import org.springframework.beans.factory.annotation.Autowired;
import org.springframework.boot.test.context.SpringBootTest;
import org.springframework.test.context.junit4.SpringRunner;
@RunWith(SpringRunner.class)
@SpringBootTest(classes = Application.class)
public class ApiTest {
@Autowired
private TestApi testApi;
@Test
public void testApi() throws Exception {
List
yml 文件配置
application.yml
spring:
  profiles:
    active: dev
  main:
    allow-bean-definition-overriding: true
  #  messages:
  #    encoding: UTF-8
  #    basename: i18n/messages
  # jackson时间格式化
  jackson:
    time-zone: GMT+8
    date-format: yyyy-MM-dd HH:mm:ss
  servlet:
    multipart:
      max-file-size: 100MB
      max-request-size: 100MB
      enabled: true
  #druid连接池
  datasource:
    type: com.alibaba.druid.pool.DruidDataSource
    driver-class-name: com.mysql.cj.jdbc.Driver
    druid:
      filters: stat
      #配置初始化大小/最小/最大
      initial-size: 1
      min-idle: 1
      max-active: 20
      #获取连接等待超时时间
      max-wait: 60000
      #间隔多久进行一次检测,检测需要关闭的空闲连接
      time-between-eviction-runs-millis: 60000
      #一个连接在池中最小生存的时间
      min-evictable-idle-time-millis: 300000
      validation-query: SELECT 1
      test-while-idle: true
      test-on-borrow: false
      test-on-return: false
      #打开PSCache,并指定每个连接上PSCache的大小。oracle设为true,mysql设为false。分库分表较多推荐设置为false
      pool-prepared-statements: false
      max-pool-prepared-statement-per-connection-size: 20
  #redis配置
  ################################################
  redis:
    #连接redis超时时间(毫秒)
    time-out: 5000ms
    lettuce:
      pool:
        max-active: 50         # 连接池最大连接数(使用负值表示没有限制) 默认 8
        max-wait: -1ms        # 连接池最大阻塞等待时间(使用负值表示没有限制) 默认 -1
        max-idle: 8           # 连接池中的最大空闲连接 默认 8
        min-idle: 0           # 连接池中的最小空闲连接 默认 0
#mybatis
mybatis-plus:
  mapper-locations: classpath*:/mapper/**/**.xml
  #实体扫描,多个package用逗号或者分号分隔
  typeAliasesPackage: com.enzenith.**.entity
  global-config:
    #数据库相关配置
    db-config:
      #      select-strategy: not_empty
      #      insert-strategy: not_empty
      update-strategy: not_empty
      #主键类型  AUTO:"数据库ID自增", INPUT:"用户输入ID", ID_WORKER:"全局唯一ID (数字类型唯一ID)", UUID:"全局唯一ID UUID";
      id-type: ID_WORKER
    banner: false
  #原生配置
  configuration:
    #开启二级缓存
    map-underscore-to-camel-case: true
    cache-enabled: false

    call-setters-on-nulls: true
    jdbc-type-for-null: ‘null‘
application-dev.yml
server:
  port: 8081
  servlet:
    context-path: /demo
spring:
  datasource:
    url: jdbc:mysql://192.168.1.201:3306/zhjd_temp?useUnicode=true&characterEncoding=utf-8&serverTimezone=Asia/Shanghai&allowMultiQueries=true&useSSL=false
    username: web
    password: YZ518@web!
#    username: ENC(nezyIshmWqXrLS1IJngSZPvGtrRn2Svu)
#    password: ENC(5LSC7u9QRreCv0SoVzYLA14VoKh9/nSqGPdke2lNp24=)

  #redis配置
  ################################################
  redis:
    #redis数据库索引(默认为0)
    database: 0
    #redis服务器IP地址host:
    host: 127.0.0.1
    #redis端口号
    port: 6379
    #redis密码,默认为空
    #password: enzenith123
knife4j:
  ## 开启生产环境,屏蔽所有Swagger资源,不可访问,production配置为true时,basic认证功能不可用
  production: false
  basic:
    ## 开启HTTP Basic认证,访问Swagger资源需要提供服务端配置的用户名以及密码,默认是false。
    enable: false
    ## Basic认证用户名
    username: buzheng
    ## Basic认证密码
    password: buzheng
logging:
  config: classpath:logback-spring-dev.xml
logback-spring-dev.xml