从执行上下文角度重新理解.NET(Core)的多线程编程[3]:安全上下文
2021-03-13 22:29
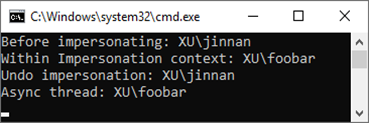
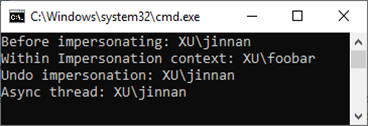
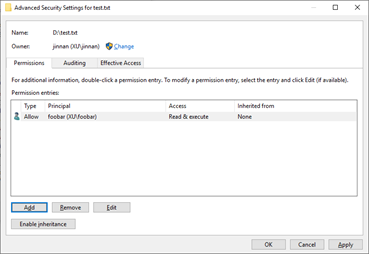
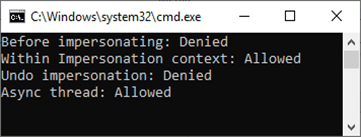
标签:否则 异步操作 test str 基于 oid mac style 返回 在前两篇文章(《基于调用链的”参数”传递》和《同步上下文》)中,我们先后介绍了CallContext(IllogicalCallContext和LogicalCallContext)、AsyncLocal 目录 SecurityContext类型表示的安全上下文主要携带两种类型的安全信息,一种是通过WindowsIdentity对象表示Windows认证身份,体现为SecurityContext类型的WindowsIdentity属性。如果采用Windows认证和授权,这个WindowsIdentity对象决定了当前代码具有的权限。SecurityContext类型的另一个属性返回的CompressedStack携带了调用堆栈上关于CAS(Code Access Security)相关的信息。。 由于CAS在.NET Core和.NET 5中不再被支持,所以我们不打算对此展开讨论,所以本篇文章讨论的核心就是SecurityContext的WindowsIdentity属性返回的WindowsIdentity对象,这个对象与一种被称为Impersonation的安全机制。 Windows进程总是在一个指定账号下执行,该账号决定了当前进程访问Windows资源(比如Windows文件系统)的权限。安全起见,我们一般会选择一个权限较低的账号(比如Network Service)。如果某些代码涉及的资源访问需要更高的权限,我们可以针对当前登录用户对应的Windows账号(如果采用Windows认证)或者是任意指定的Windows账号创建一个上下文,在此上下文中的代相当于在指定的Windows账号下执行,自然拥有了对应账号的权限。这种策略相当于模拟/假冒了(Impersonate)了指定账号执行了某种操作,所以我们将这种机制称为Impersonation。 我们通过一个简单的例子来演示一下Impersonation机制。我们首先编写了如下这个GetWindowsIdentity方法根据指定的账号和密码创建对应的WindowsIdentity对象。如代码片段所示,方法利用指定的用户名和密码调用了Win31函数LogonUser实施了登录操作,并领用返回的token创建代码登录用户的WindowsIdentity对象。 我们编写了如下的代码来演示不同执行上下文中当前的Windows账号是什么,当前Windows账号对应的WindowsIdentity对象通过调用WindowsIdentity类型的静态方法GetCurrent获得。如代码片段所示,我们在程序初始化时打印出当前Windows账号。然后针对账号foobar(XU\foobar)创建了对应的模拟上下文(Impersonation Context),并在此上下文中打印出当前Windows账号。我们在模拟上下文中通过创建一个线程的方式执行了一个异步操作,并在异步线程中在此输出当前Windows账号。在模拟上下文终结之后,我们在此输出当前的Windows账号看看是否恢复到最初的状态。 程序运行之后,控制台上会输出如下所示的结果。可以看出在默认情况下,模拟的Windows账号不仅在当前线程中有效,还会自动传递到异步线程中。 通过上面的实例我们可以看出在默认情况下安全上下文携带的模拟Windows账号支持跨线程传播,但是有的时候这个机制是不必要的,甚至会代码安全隐患,在此情况下我们可以按照如下的当时调用SecurityContext的 再次执行修改后的程序会得到如下所示的输出结果,可以看出模拟的Windows账号(XU\foobar)并没有传递到异步线程中。 访问当前账号无权访问的资源是Impersonation机制的主要应用场景,接下来我们就来演示一下基于文件访问的Impersonation应用场景。我们创建了一个文本文件d:\test.txt,并对其ACL进行如下的设置:只有Xu\foobar账号才具有访问权限。 我们修改了上面的代码,将验证当前Windows账号的代码替换成验证文件读取权限的代码。 如下所示程序执行后的输出结果,可以看出在文件只有在针对XU\foobar的模拟上下文中才能被读取。如果执行模拟WindowsIdentity的跨线程传播,异步线程也具有文件读取的权限(如图),否则在异步线程中也无法读取该文件(感兴趣的朋友可以自行测试一下)。 从执行上下文角度重新理解.NET(Core)的多线程编程[1]:基于调用链的”参数”传递 从执行上下文角度重新理解.NET(Core)的多线程编程[3]:安全上下文 标签:否则 异步操作 test str 基于 oid mac style 返回 原文地址:https://www.cnblogs.com/artech/p/multiple-threading-via-execution-context-03.html
一、SecurityContext
二、让代码在指定Windows账号下执行
三、抑制模拟账号的跨线程传播
四、利用Impersonation机制读取文件一、SecurityContext
public sealed class SecurityContext : IDisposable
{
    ...
    internal WindowsIdentity WindowsIdentity { get; set; }
    internal CompressedStack CompressedStack { get; set; }
}
二、让代码在指定Windows账号下执行
[DllImport("advapi32.dll")]
public static extern int LogonUser(string lpszUserName,
    string lpszDomain,
    string lpszPassword,
    int dwLogonType,
    int dwLogonProvider,
    ref IntPtr phToken);

public static WindowsIdentity GetWindowsIdentity(string username, string password)
{
    IntPtr token = IntPtr.Zero;
    var status = LogonUser(username, Environment.MachineName, password, 2, 0, ref token);
    if (status != 0)
    {
        return new WindowsIdentity(token);
    }
    throw new InvalidProgramException("Invalid user name or password");
}
class Program
{

    static void Main()
    {
        Console.WriteLine("Before impersonating: {0}", WindowsIdentity.GetCurrent().Name);
        using (GetWindowsIdentity(@"foobar", "password").Impersonate())
        {
            Console.WriteLine("Within Impersonation context: {0}", WindowsIdentity.GetCurrent().Name);
            new Thread(() => Console.WriteLine("Async thread: {0}", WindowsIdentity.GetCurrent().Name)).Start();
        }
        Console.WriteLine("Undo impersonation: {0}", WindowsIdentity.GetCurrent().Name);
        Console.Read();
    }
}

三、抑制模拟账号的跨线程传播
class Program
{

    static void Main()
    {
        Console.WriteLine("Before impersonating: {0}", WindowsIdentity.GetCurrent().Name);
            using (GetWindowsIdentity(@"foobar", "password").Impersonate())
            {
                SecurityContext.SuppressFlowWindowsIdentity();
                Console.WriteLine("Within Impersonation context: {0}", WindowsIdentity.GetCurrent().Name);
                new Thread(() => Console.WriteLine("Async thread: {0}", WindowsIdentity.GetCurrent().Name)).Start();
            }
        Console.WriteLine("Undo impersonation: {0}", WindowsIdentity.GetCurrent().Name);
        Console.Read();
    }
}

四、利用Impersonation机制读取文件

class Program
{

    static void Main()
    {
        Console.WriteLine("Before impersonating: {0}", CanRead() ? "Allowed" : "Denied");
        using (GetWindowsIdentity("foobar", "password").Impersonate())
        {
            Console.WriteLine("Within Impersonation context: {0}", CanRead() ? "Allowed" : "Denied");
            new Thread(() => Console.WriteLine("Async thread: {0}", CanRead() ? "Allowed" : "Denied")).Start();
        }
        Console.WriteLine("Undo impersonation: {0}", CanRead() ? "Allowed" : "Denied");
        Console.Read();
        bool CanRead()
        {
            var userName = WindowsIdentity.GetCurrent().Name;
            try
            {
                File.ReadAllText(@"d:\test.txt");
                return true;
            }
            catch
            {
                return false;
            }
        }
    }
}

从执行上下文角度重新理解.NET(Core)的多线程编程[2]:同步上下文
从执行上下文角度重新理解.NET(Core)的多线程编程[3]:安全上下文
上一篇:vba数颜色代码
文章标题:从执行上下文角度重新理解.NET(Core)的多线程编程[3]:安全上下文
文章链接:http://soscw.com/index.php/essay/64299.html