跨域解决方案 - webpack devServer
2021-03-17 19:24
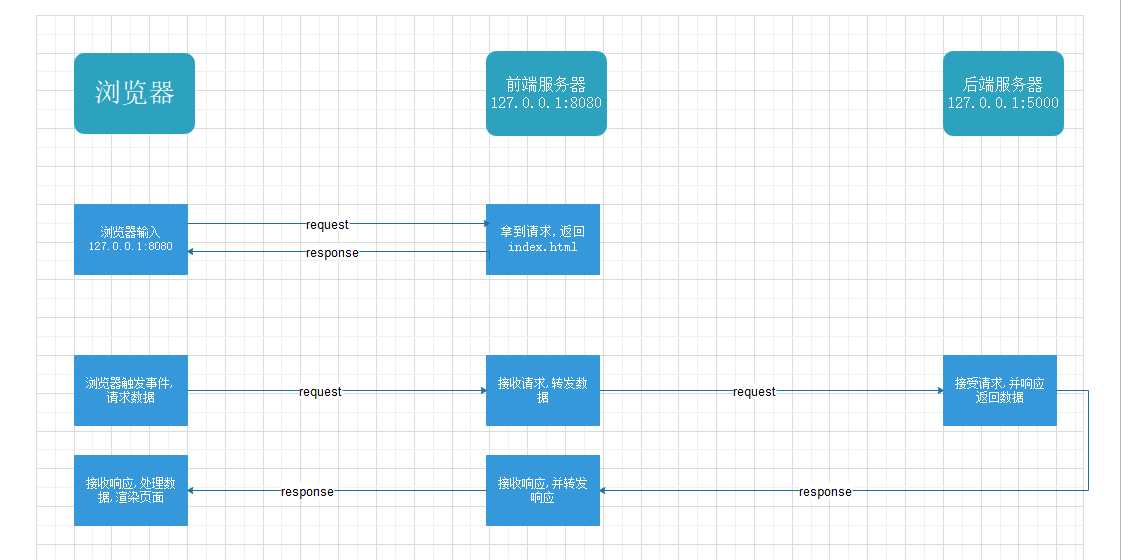
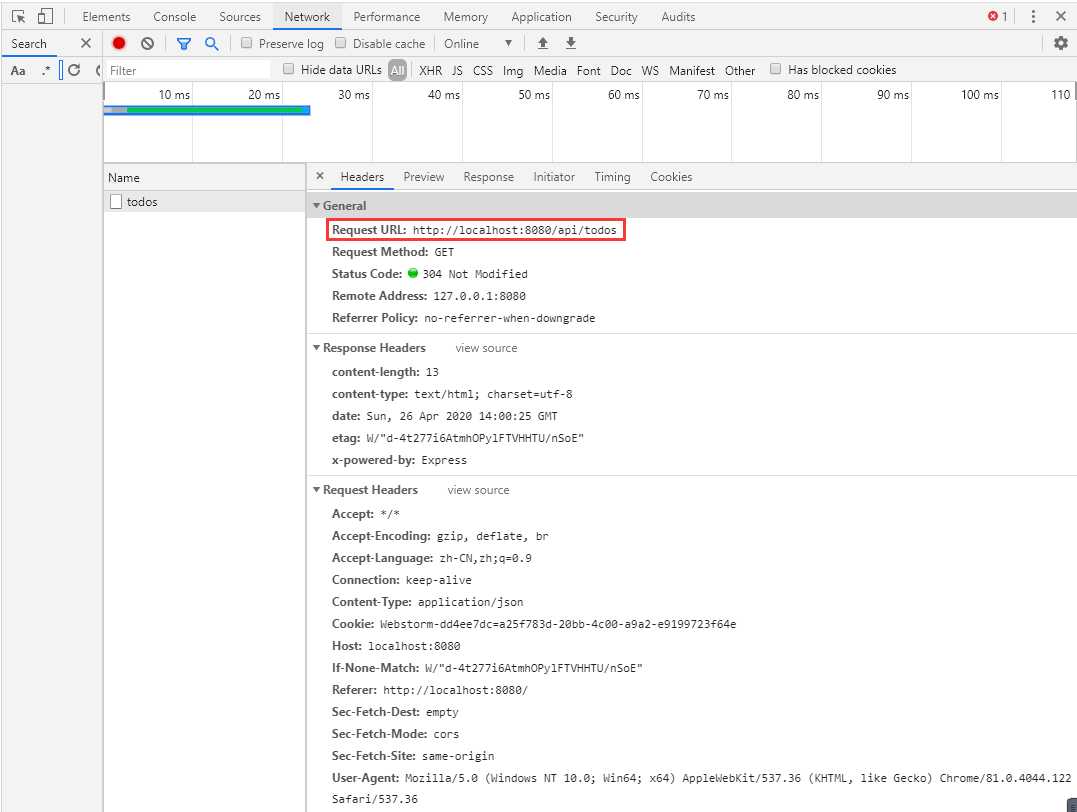
标签:加载完成 信息 应用 配置 require develop eve build 目的 如果一个项目中配置了webpack, 那么我们使用 webpack devServer 来配置代理转发请求来达到解决跨域问题的目的 webpack devServer 能够解决跨域问题的根本原因在于代理转发请求, 下面我们来介绍一下代理转发的流程 代理转发的过程如下图所示: 如上图所示, 转发代理的流程表述: express(app.js) webpack代码: 代码运行之后, 点击发送请求: 控制台的输出表明, 完成正常的通信, 并且接收到了后端的请求; 接下来我们看一下具体的请求头部信息: 我们发现, 浏览器是向http://127.0.0.1:8080/api/todos 发送的数据, 而我们后端的url 为:http://127.0.0.1:2300 以上就是webpack devServer 解决跨域问题的整个流程 跨域解决方案 - webpack devServer 标签:加载完成 信息 应用 配置 require develop eve build 目的 原文地址:https://www.cnblogs.com/oulae/p/12784188.html1. 定义
2. 代理转发

3. webpack devServer 解决跨域问题
const express = require(‘express‘)

const log = console.log.bind(console)
const app = express()

// cors 模块用来解决跨域问题,只要声明了 cor,就说明该服务器允许跨域的访问
// const cors = require(‘cors‘)

// app.use(cors())

app.get(‘/helloworld‘, (request, response) => {
    log(‘触发了该事件‘)
    response.send(‘hello‘)
})

app.get(‘/singlecors‘, (request, response) => {
    response.set(‘Access-Control-Allow-Origin‘, ‘*‘)
    response.send(‘hello‘)
})

app.get(‘/api/todos‘, (request, response) => {
    response.send(‘request todos‘)
})

const main = () => {
    let server = app.listen(2300, () => {
        let host = server.address().address
        let port = server.address().port

        log(`应用实例,访问地址为 http://${host}:${port}`)
    })
}

if (require.main === module) {
    main()
}
const path = require(‘path‘)
const { CleanWebpackPlugin } = require(‘clean-webpack-plugin‘)
const HtmlWebpackPlugin = require(‘html-webpack-plugin‘)

module.exports = {
    entry: ‘./src/a.js‘,
    output: {
        filename: "a_[chunkhash:8].js",
        path: path.resolve(__dirname, ‘build‘)
    },
    plugins: [
        new CleanWebpackPlugin(),
        new HtmlWebpackPlugin({
            title: ‘devServer Demo‘,
            filename: ‘index.html‘,
            template: path.resolve(__dirname, ‘a.html‘)
        })
    ],
    devServer: {
        contentBase: path.resolve(__dirname, ‘build‘),
        open: true,
        proxy: {
            ‘/api‘: ‘http://localhost:2300‘
        }
    },
    mode: ‘development‘,
    devtool: ‘inline-source-map‘
}


4. 代码演示
5. 参考链接
上一篇:跨域解决方案 - JSONP
下一篇:Json
文章标题:跨域解决方案 - webpack devServer
文章链接:http://soscw.com/index.php/essay/65433.html