从零开始实现ASP.NET Core MVC的插件式开发(六) - 如何加载插件引用

2021-04-01 07:28

阅读:760

标签:mon   custom   pat   意思   避免   第三方库   service   tip   开始   

标题:从零开始实现ASP.NET Core MVC的插件式开发(六) - 如何加载插件引用。
作者:Lamond Lu
地址:https://www.cnblogs.com/lwqlun/p/11717254.html
源代码:https://github.com/lamondlu/DynamicPlugins


前景回顾#

  • 从零开始实现ASP.NET Core MVC的插件式开发(一) - 使用Application Part动态加载控制器和视图
  • 从零开始实现ASP.NET Core MVC的插件式开发(二) - 如何创建项目模板
  • 从零开始实现ASP.NET Core MVC的插件式开发(三) - 如何在运行时启用组件
  • 从零开始实现ASP.NET Core MVC的插件式开发(四) - 插件安装
  • 从零开始实现ASP.NET Core MVC的插件式开发(五) - 使用AssemblyLoadContext实现插件的升级和删除

简介#

在前一篇中,我给大家演示了如何使用.NET Core 3.0中新引入的AssemblyLoadContext来实现运行时升级和删除插件。完成此篇之后,我得到了很多园友的反馈,很高兴有这么多人能够参与进来,我会根据大家的反馈,来完善这个项目。本篇呢,我将主要解决加载插件引用的问题,这个也是反馈中被问的最多的问题。

问题用例#

在之前做的插件中,我们做的都是非常非常简单的功能,没有引入任何的第三方库。但是正常情况下,我们所创建的插件或多或少的都会引用一些第三方库,那么下面我们来尝试一下,使用我们先前的项目,加载一个第三方程序集, 看看会的得到什么结果。

这里为了模拟,我创建了一个新的类库项目DemoReferenceLibrary, 并在之前的DemoPlugin1项目中引用DemoReferenceLibrary项目。

DemoReferenceLibrary中,我新建了一个类Demo.cs文件, 其代码如下:

Copy
	public class Demo
    {
        public string SayHello()
        {
            return "Hello World. Version 1";
        }
    }

这里就是简单的通过SayHello方法,返回了一个字符串。

然后在DemoPlugin1项目中,我们修改之前创建的Plugin1Controller,从Demo类中通过SayHello方法得到需要在页面中显示的字符串。

Copy
    [Area("DemoPlugin1")]
    public class Plugin1Controller : Controller
    {
        public IActionResult HelloWorld()
        {
            var content = new Demo().SayHello();
            ViewBag.Content = content;
            return View();
        }
    }
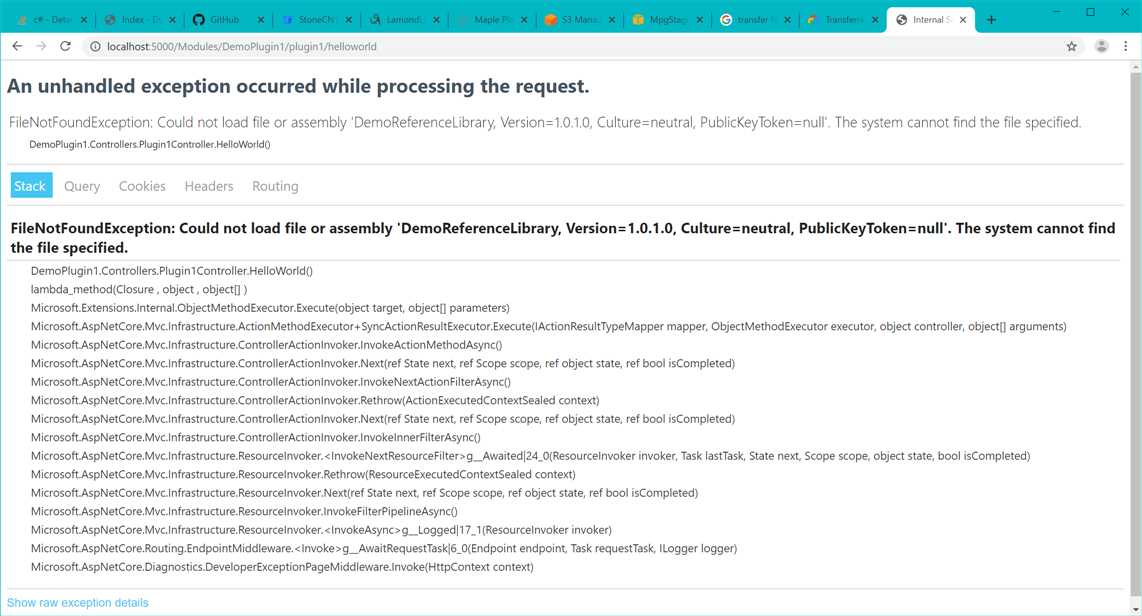
最后我们打包一下插件,重新将其安装到系统中,访问插件路由之后,就会得到以下错误。

技术图片

这里就是大部分同学遇到的问题,无法加载程序集DemoReferenceLibrary

如何加载插件引用?#

这个问题的原因很简单,就是当通过AssemblyLoadContext加载程序集的时候,我们只加载了插件程序集,没有加载它引用的程序集。

例如,我们以DemoPlugin1的为例,在这个插件的目录如下

技术图片

在这个目录中,除了我们熟知的DemoPlugin1.dll,DemoPlugin1.Views.dll之外,还有一个DemoReferenceLibrary.dll文件。 这个文件我们并没有在插件启用时加载到当前的AssemblyLoadContext中,所以在访问插件路由时,系统找不到这个组件的dll文件。

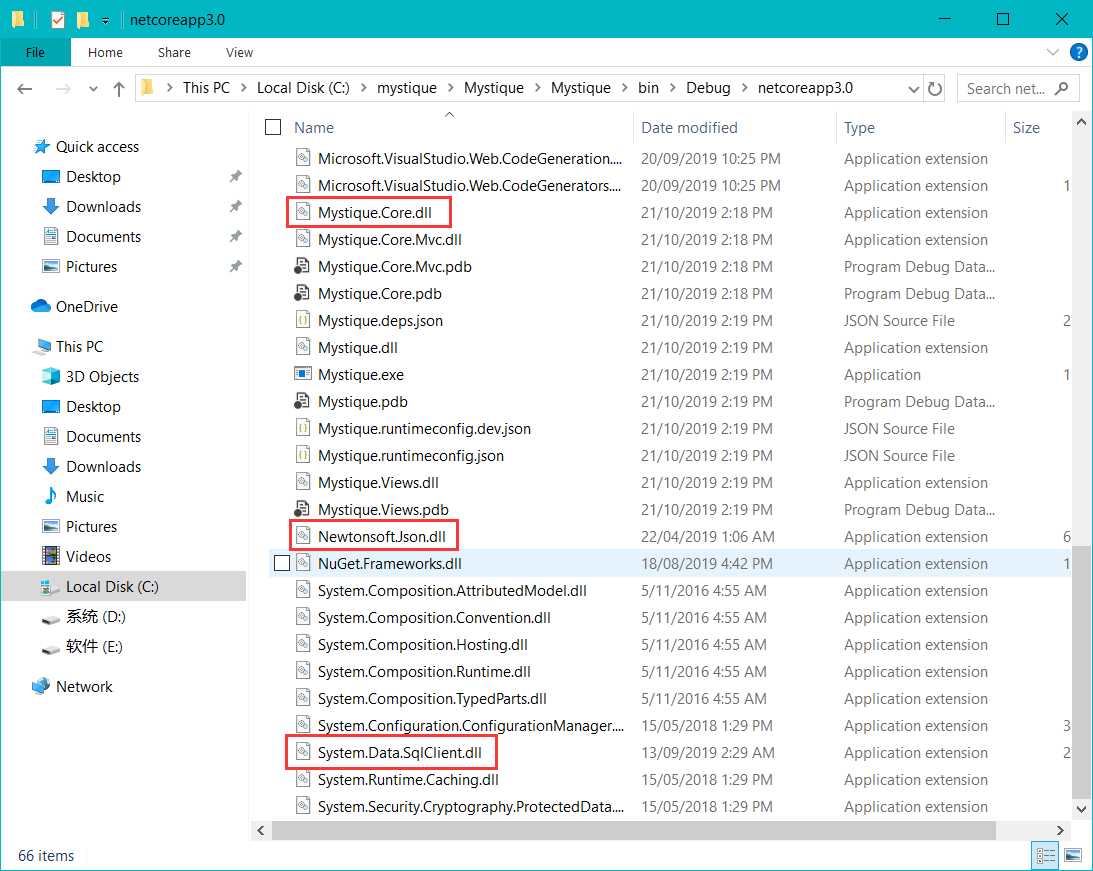
为什么Mystique.Core.dllSystem.Data.SqlClient.dllNewtonsoft.Json.dll这些DLL不会出现问题呢?#

在.NET Core中有2种LoadContext。 一种是我们之前介绍的AssemblyLoadContext, 它是一种自定义LoadContext。 另外一种就是系统默认的DefaultLoadContext。当一个.NET Core应用启动的时候,都会创建并引用一个DefaultLoadContext

如果没有指定LoadContext, 系统默认会将程序集都加载到DefaultLoadContext中。这里我们可以查看一下我们的主站点项目,这个项目我们也引用了Mystique.Core.dllSystem.Data.SqlClient.dllNewtonsoft.Json.dll

技术图片

在.NET Core的设计文档中,对于程序集加载有这样一段描述

If the assembly was already present in A1‘s context, either because we had successfully loaded it earlier, or because we failed to load it for some reason, we return the corresponding status (and assembly reference for the success case).

However, if C1 was not found in A1‘s context, the Load method override in A1‘s context is invoked.

  • For Custom LoadContext, this override is an opportunity to load an assembly before the fallback (see below) to Default LoadContext is attempted to resolve the load.
  • For Default LoadContext, this override always returns null since Default Context cannot override itself.

这里简单来说,意思就是当在一个自定义LoadContext中加载程序集的时候,如果找不到这个程序集,程序会自动去默认LoadContext中查找,如果默认LoadContext中都找不到,就会返回null

由此,我们之前的疑问就解决了,这里正是因为主站点已经加载了所需的程序集,虽然在插件的AssemblyLoadContext中找不到这个程序集,程序依然可以通过默认LoadContext来加载程序集。

那么是不是真的就没有问题了呢?#

其实我不是很推荐用以上的方式来加载第三方程序集。主要原因有两点

  • 不同插件可以引用不同版本的第三方程序集,可能不同版本的第三方程序集实现不同。 而默认LoadContext只能加载一个版本,导致总有一个插件引用该程序集的功能失效。
  • 默认LoadContext中可能加载的第三方程序集与其他插件都不同,导致其他插件功能引用该程序集的功能失效。

所以这里最正确的方式,还是放弃使用默认LoadContext加载程序集,保证每个插件的AssemblyLoadContext都完全加载所需的程序集。

那么如何加载这些第三方程序集呢?我们下面就来介绍两种方式

  • 原始方式
  • 使用插件缓存

原始方式#

原始方式比较暴力,我们可以选择加载插件程序集的同时,加载程序集所在目录中所有的dll文件。

这里首先我们创建了一个插件引用库加载器接口IReferenceLoader

Copy
	public interface IRefenerceLoader
    {
        public void LoadStreamsIntoContext(CollectibleAssemblyLoadContext context, 
            string folderName, 
            string excludeFile);
    }

然后我们创建一个默认的插件引用库加载器DefaultReferenceLoader,其代码如下:

Copy
	public class DefaultReferenceLoader : IRefenerceLoader
    {
        public void LoadStreamsIntoContext(CollectibleAssemblyLoadContext context, 
        	string folderName, 
        	string excludeFile)
        {
            var streams = new List();
            var di = new DirectoryInfo(folderName);
            var allReferences = di.GetFiles("*.dll").Where(p => p.Name != excludeFile);

            foreach (var file in allReferences)
            {
                using (var sr = new StreamReader(file.OpenRead()))
                {
                    context.LoadFromStream(sr.BaseStream);
                }
            }
        }
    }

代码解释

  • 这里我是为了排除当前已经加载插件程序集,所以添加了一个excludeFile参数。
  • folderName即当前插件的所在目录,这里我们通过DirectoryInfo类的GetFiles方法,获取了当前指定folderName目录中的所有dll文件。
  • 这里我依然通过文件流的方式加载了插件所需的第三方程序集。

完成以上代码之后,我们还需要修改启用插件的两部分代码

  • [MystiqueStartup.cs] - 程序启动时,注入IReferenceLoader服务,启用插件
  • [MvcModuleSetup.cs] - 在插件管理页面,触发启用插件操作

MystiqueStartup.cs

Copy
	public static void MystiqueSetup(this IServiceCollection services, IConfiguration configuration)
    {

        ...
            
        services.AddSingleton();

        var mvcBuilder = services.AddMvc();

        var provider = services.BuildServiceProvider();
        using (var scope = provider.CreateScope())
        {
            ...

            foreach (var plugin in allEnabledPlugins)
            {
                var context = new CollectibleAssemblyLoadContext();
                var moduleName = plugin.Name;
                var filePath = $"{AppDomain.CurrentDomain.BaseDirectory}Modules\\{moduleName}\\{moduleName}.dll";
                var referenceFolderPath = $"{AppDomain.CurrentDomain.BaseDirectory}Modules\\{moduleName}";

                _presets.Add(filePath);
                using (var fs = new FileStream(filePath, FileMode.Open))
                {
                    var assembly = context.LoadFromStream(fs);
                    loader.LoadStreamsIntoContext(context, 
                          referenceFolderPath,
                          $"{moduleName}.dll");

                   ...
                }
            }
        }

        ...
    }

MvcModuleSetup.cs

Copy
	public void EnableModule(string moduleName)
    {
        if (!PluginsLoadContexts.Any(moduleName))
        {
            var context = new CollectibleAssemblyLoadContext();

            var filePath = $"{AppDomain.CurrentDomain.BaseDirectory}Modules\\{moduleName}\\{moduleName}.dll";
            var referenceFolderPath = $"{AppDomain.CurrentDomain.BaseDirectory}Modules\\{moduleName}";
            using (var fs = new FileStream(filePath, FileMode.Open))
            {
                var assembly = context.LoadFromStream(fs);
                _referenceLoader.LoadStreamsIntoContext(context, 
                      referenceFolderPath, 
                      $"{moduleName}.dll");

                ...
            }
        }
        else
        {
            var context = PluginsLoadContexts.GetContext(moduleName);
            var controllerAssemblyPart = new MystiqueAssemblyPart(context.Assemblies.First());
            _partManager.ApplicationParts.Add(controllerAssemblyPart);
        }

        ResetControllActions();
    }

现在我们重新运行之前的项目,并访问插件1的路由,你会发现页面正常显示了,并且页面内容也是从DemoReferenceLibrary程序集中加载出来了。

技术图片

使用插件缓存#

原始方式虽然可以帮助我们成功加载插件引用程序集,但是它并不效率,如果插件1和插件2引用了相同的程序集,当插件1的AssemblyLoadContext加载所有的引用程序集之后,插件2会将插件1所干的事情重复一遍。这并不是我们想要的,我们希望如果多个插件同时使用了相同的程序集,就不需要重复读取dll文件了。

如何避免重复读取dll文件呢?这里我们可以使用一个静态字典来缓存文件流信息,从而避免重复读取dll文件。

如果大家觉着在ASP.NET Core MVC中使用静态字典来缓存文件流信息不安全,可以改用其他缓存方式,这里只是为了简单演示。

这里我们首先创建一个引用程序集缓存容器接口IReferenceContainer, 其代码如下:

Copy
	public interface IReferenceContainer
    {
        List GetAll();

        bool Exist(string name, string version);

        void SaveStream(string name, string version, Stream stream);

        Stream GetStream(string name, string version);
    }

代码解释

  • GetAll方法会在后续使用,用来获取系统中加载的所有引用程序集
  • Exist方法判断了指定版本程序集的文件流是否存在
  • SaveStream是将指定版本的程序集文件流保存到静态字典中
  • GetStream是从静态字典中拉取指定版本程序集的文件流

然后我们可以创建一个引用程序集缓存容器的默认实现DefaultReferenceContainer类,其代码如下:

Copy
	public class DefaultReferenceContainer : IReferenceContainer
    {
        private static Dictionary _cachedReferences = new Dictionary();

        public List GetAll()
        {
            return _cachedReferences.Keys.ToList();
        }

        public bool Exist(string name, string version)
        {
            return _cachedReferences.Keys.Any(p => p.ReferenceName == name
                && p.Version == version);
        }

        public void SaveStream(string name, string version, Stream stream)
        {
            if (Exist(name, version))
            {
                return;
            }

            _cachedReferences.Add(new CachedReferenceItemKey { ReferenceName = name, Version = version }, stream);
        }

        public Stream GetStream(string name, string version)
        {
            var key = _cachedReferences.Keys.FirstOrDefault(p => p.ReferenceName == name
                && p.Version == version);

            if (key != null)
            {
                _cachedReferences[key].Position = 0;
                return _cachedReferences[key];
            }

            return null;
        }
    }

这个类比较简单,我就不做太多解释了。

完成了引用缓存容器之后,我修改了之前创建的IReferenceLoader接口,及其默认实现DefaultReferenceLoader

Copy
	public interface IReferenceLoader
    {
        public void LoadStreamsIntoContext(CollectibleAssemblyLoadContext context, string moduleFolder, Assembly assembly);
    }
Copy
	public class DefaultReferenceLoader : IReferenceLoader
    {
        private IReferenceContainer _referenceContainer = null;
        private readonly ILogger _logger = null;

        public DefaultReferenceLoader(IReferenceContainer referenceContainer, ILogger logger)
        {
            _referenceContainer = referenceContainer;
            _logger = logger;
        }

        public void LoadStreamsIntoContext(CollectibleAssemblyLoadContext context, string moduleFolder, Assembly assembly)
        {
            var references = assembly.GetReferencedAssemblies();

            foreach (var item in references)
            {
                var name = item.Name;

                var version = item.Version.ToString();

                var stream = _referenceContainer.GetStream(name, version);

                if (stream != null)
                {
                    _logger.LogDebug($"Found the cached reference ‘{name}‘ v.{version}");
                    context.LoadFromStream(stream);
                }
                else
                {

                    if (IsSharedFreamwork(name))
                    {
                        continue;
                    }

                    var dllName = $"{name}.dll";
                    var filePath = $"{moduleFolder}\\{dllName}";

                    if (!File.Exists(filePath))
                    {
                        _logger.LogWarning($"The package ‘{dllName}‘ is missing.");
                        continue;
                    }

                    using (var fs = new FileStream(filePath, FileMode.Open))
                    {
                        var referenceAssembly = context.LoadFromStream(fs);

                        var memoryStream = new MemoryStream();

                        fs.Position = 0;
                        fs.CopyTo(memoryStream);
                        fs.Position = 0;
                        memoryStream.Position = 0;
                        _referenceContainer.SaveStream(name, version, memoryStream);

                        LoadStreamsIntoContext(context, moduleFolder, referenceAssembly);
                    }
                }
            }
        }

        private bool IsSharedFreamwork(string name)
        {
            return SharedFrameworkConst.SharedFrameworkDLLs.Contains($"{name}.dll");
        }
    }

代码解释:

  • 这里LoadStreamsIntoContext方法的assembly参数,即当前插件程序集。
  • 这里我通过GetReferencedAssemblies方法,获取了插件程序集引用的所有程序集。
  • 如果引用程序集在引用容器中不存在,我们就是用文件流加载它,并将其保存到引用容器中, 如果引用程序集已存在于引用容器,就直接加载到当前插件的AssemblyLoadContext中。这里为了检验效果,如果程序集来自缓存,我使用日志组件输出了一条日志。
  • 由于插件引用的程序集,有可能是来自Shared Framework, 这种程序集是不需要加载的,所以这里我选择跳过这类程序集的加载。(这里我还没有考虑Self-Contained发布的情况,后续这里可能会更改)

最后我们还是需要修改MystiqueStartup.csMvcModuleSetup.cs中启用插件的代码。

MystiqueStartup.cs

Copy
	public static void MystiqueSetup(this IServiceCollection services, IConfiguration configuration)
    {

        ...
        services.AddSingleton();
        services.AddSingleton();
        ...

        var mvcBuilder = services.AddMvc();

        var provider = services.BuildServiceProvider();
        using (var scope = provider.CreateScope())
        {
            ...

            foreach (var plugin in allEnabledPlugins)
            {
                ...
               
                using (var fs = new FileStream(filePath, FileMode.Open))
                {
                    var assembly = context.LoadFromStream(fs);
                    loader.LoadStreamsIntoContext(context, referenceFolderPath, assembly);

                    ...
                }
            }
        }

        ...
    }

MvcModuleSetup.cs

Copy
	public void EnableModule(string moduleName)
    {
        if (!PluginsLoadContexts.Any(moduleName))
        {
            ...
            using (var fs = new FileStream(filePath, FileMode.Open))
            {
                var assembly = context.LoadFromStream(fs);
                _referenceLoader.LoadStreamsIntoContext(context, referenceFolderPath, assembly);
			   ...
            }
        }
        else
        {
            ...
        }

        ResetControllActions();
    }

完成代码之后,为了检验效果,我创建了另外一个插件DemoPlugin2, 这个项目的代码和DemoPlugin1基本一样。程序启动时,你会发现DemoPlugin2所使用的引用程序集都是从缓存中加载的,而且DemoPlugin2的路由也能正常访问。

技术图片

添加页面来显示加载的第三方程序集#

这里为了显示一下系统中加载了哪些程序集,我添加了一个新页面Assembilies, 这个页面就是调用了IReferenceContainer接口中定义的GetAll方法,显示了静态字典中,所有加载的程序集。
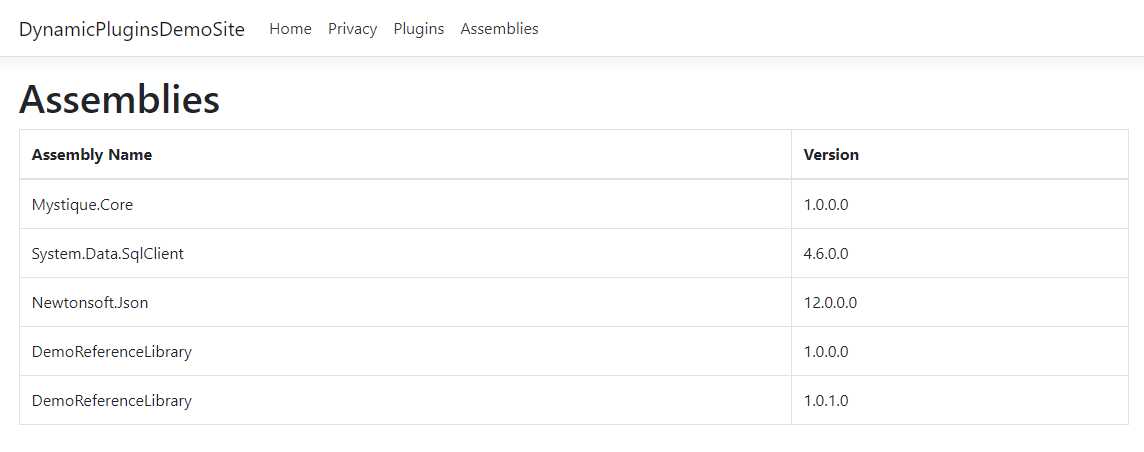
效果如下:

技术图片

几个测试场景#

最后,在编写完成以上代码功能之后,我们使用以下几种场景来测试一下,看一看AssemblyLoadContext为我们提供的强大功能。

场景1#

2个插件,一个引用DemoReferenceLibrary的1.0.0.0版本,另外一个引用DemoReferenceLibrary的1.0.1.0版本。其中1.0.0.0版本,SayHello方法返回的字符串是"Hello World. Version 1", 1.0.1.0版本, SayHello方法返回的字符串是“Hello World. Version 2”。

技术图片

启动项目,安装插件1和插件2,分别运行插件1和插件2的路由,你会得到不同的结果。这说明AssemblyLoadContext为我们做了很好的隔离,插件1和插件2虽然引用了相同插件的不同版本,但是互相之间完全没有影响。

场景2#

当2个插件使用了相同的第三方库,并加载完成之后,禁用插件1。虽然他们引用的程序集相同,但是你会发现插件2还是能够正常访问,这说明插件1的AssemblyLoadContext的释放,对插件2的AssemblyLoadContext完全没有影响。

技术图片

总结#

本篇我为大家介绍了如何解决插件引用程序集的加载问题,这里我们讲解了两种方式,原始方式和缓存方式。这两种方式的最终效果虽然相同,但是缓存方式的效率明显更高。后续我会根据反馈,继续添加新内容,大家敬请期待。

从零开始实现ASP.NET Core MVC的插件式开发(六) - 如何加载插件引用

标签:mon   custom   pat   意思   避免   第三方库   service   tip   开始   

原文地址:https://www.cnblogs.com/luomingui/p/12573264.html


评论


亲,登录后才可以留言!