使用Maven创建Spring-web项目的基本流程
2021-04-01 12:26
YPE mapper PUBLIC "-//mybatis.org//DTD Mapper 3.0//EN" "http://mybatis.org/dtd/mybatis-3-mapper.dtd">
标签:https 获取 active dir ret open 操作 读取 oid
使用Maven创建Spring-web项目的基本流程
简介:使用Spring、mybatis框架实现学生注册查询功能。
- 使用Maven创建Spring-web项目的基本流程
- 第一步:创建Maven项目
- 第二步:准备前端页面index.jsp
- 第三步:准备Student实体类
- 第四步:准备StudentService和StudentServiceImpl
- 第五步:准备StudentDao和StudentDao.xml
- 第六步:书写mybatis主配置文件mybatis.xml
- 第七步:书写RegisterServlet
- 第八步:书写spring配置文件applicationContext.xml
- 第九步:书写web.xml文件
- 第十步:测试
第一步:创建Maven项目
-
使用提供的maven-archetype-webapp模板。
- 创建好之后,将java文件夹标记为
Sources Root. - 创建资源文件夹
resources,将资源文件夹标记为Resources Root.
- 创建好之后,将java文件夹标记为
-
配置
pom.xml文件。主要的配置内容有:
- 修改
1.7 为1.8 - 添加依赖:主要有:junit、spring-context、mybatis、spring-tx(在本项目中没用到事务)、spring-jdbc(与事务一块使用的)、mybatis-spring、mysql-connector-java、druid、jsp-api、servlet-api、spring-web。
- 添加build中的resources配置,目的是将Sources Root中的配置文件在编译的时候能够拷贝到classes对应的文件夹下。
4.0.0 com.example Spring10_web1.0-SNAPSHOT war UTF-8 1.8 1.8 junit junit4.11 test org.springframework spring-context5.2.5.RELEASE org.mybatis mybatis3.5.1 org.springframework spring-tx5.2.5.RELEASE org.springframework spring-jdbc5.2.5.RELEASE org.mybatis mybatis-spring1.3.2 mysql mysql-connector-java8.0.16 com.alibaba druid1.1.10 javax.servlet.jsp jsp-api2.1 provided javax.servlet servlet-api2.5 provided org.springframework spring-web5.2.5.RELEASE src/main/java **/*.properties **/*.xml false - 修改
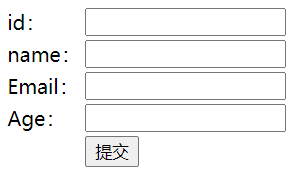
第二步:准备前端页面index.jsp
学生注册页面
效果如下:

第三步:准备Student实体类
public class Student {
    private Integer id;
    private String name;
    private String email;
    private Integer age;
    //对应的无参、有参的构造方法。
	//对应的get、set和toString方法。
}
第四步:准备StudentService和StudentServiceImpl
StudentService.java
public interface StudentService {
    //添加学生信息
    Integer addStudent(Student student);
	//查询所有学生信息
    List getAllStudent();
}
StudentServiceImpl.java
public class StudentServiceImpl implements StudentService {
    //引用类型
    private StudentDao studentDao;
    //用于setter方法注入
    public void setStudentDao(StudentDao studentDao) {
        this.studentDao = studentDao;
    }

    //添加学生信息
    @Override
    public Integer addStudent(Student student) {
        Integer integer = studentDao.insertStudent(student);
        return integer;
    }

    //查询所有学生信息
    @Override
    public List getAllStudent() {
        List studentList = studentDao.getStudents();
        return studentList;
    }
第五步:准备StudentDao和StudentDao.xml
StudentDao.java
public interface StudentDao {
    Integer insertStudent(Student student);
    List getStudents();
}
StudentDao.xml
insert into student values (#{id},#{name},#{email},#{age})
第六步:书写mybatis主配置文件mybatis.xml
主要的配置内容有:
-
设置mybatis的打印日志,在调试的时候使用。
-
设置别名,目的是在mapper映射文件中,使用resultType可以使用别名。
格式是:接口名称首字母小写大写都可以。如:studentDao或者StudentDao
-
配置sql mapper(sql映射文件)的位置。
mybatis.xml
第七步:书写RegisterServlet
RegisterServlet.java
public class RegisterServlet extends HttpServlet {
    protected void doPost(HttpServletRequest request, HttpServletResponse response) throws ServletException, IOException {
        //处理中文乱码
        request.setCharacterEncoding("utf-8");
        String id = request.getParameter("id");
        String name = request.getParameter("name");
        String email = request.getParameter("email");
        String age = request.getParameter("age");
        Student student = new Student(Integer.valueOf(id), name, email, Integer.valueOf(age));

        //获取ApplicationContext对象
        WebApplicationContext ac = WebApplicationContextUtils.getRequiredWebApplicationContext(getServletContext());
		//获取StudentService对象
        StudentService studentService = (StudentService) ac.getBean("studentService");
        //执行添加学生信息的操作
        Integer integer = studentService.addStudent(student);
        if (integer > 0) {
        response.sendRedirect(request.getContextPath()+"/result.jsp");
    } else {
        response.getWriter().print("注册失败");
    }
}

    protected void doGet(HttpServletRequest request, HttpServletResponse response) throws ServletException, IOException {
        doPost(request, response);
    }
}
第八步:书写spring配置文件applicationContext.xml
主要的配置内容有:
-
配置数据库配置文件的路径。
db.properties的内容如下:
jdbc.url=jdbc:mysql://localhost:3306/test?serverTimezone=UTC jdbc.username=root jdbc.password=root jdbc.maxActive=20 -
声明数据源,使用阿里的druid连接池。
-
声明mybatis中提供的SqlSessionFactoryBean类,该类可以创建SqlSessionFactory对象。
-
声明MapperScannerConfigurer类,该类内部封装了生成每个dao接口的代理对象。
-
声明StudentServiceImpl实现类.
applicationContext.xml
第九步:书写web.xml文件
主要的配置内容有:
-
注册ContextLoaderListener监听器,监听器的名称为:
org.springframework.web.context.ContextLoaderListener -
指定spring配置文件的位置。
contextConfigLocation classpath:applicationContext.xml -
注册Studentservlet。
contextConfigLocation classpath:applicationContext.xml org.springframework.web.context.ContextLoaderListener RegisterServlet com.example.controller.RegisterServlet RegisterServlet /register 第十步:测试

使用Maven创建Spring-web项目的基本流程
标签:https 获取 active dir ret open 操作 读取 oid
原文地址:https://www.cnblogs.com/nieaojie625/p/13538345.html
上一篇:java学习05-scanner
下一篇:Java Tree 树 数据结构
文章标题:使用Maven创建Spring-web项目的基本流程
文章链接:http://soscw.com/index.php/essay/70919.html