Springboot如何创建一个项目
2021-04-24 10:27
标签:别名 doc 连接 定义 com package nbsp oct dma
一、什么是SpringBoot;
Springboot是一个快速开发框架。其采用了完全注解的方式,简化了xml配置。并通过springboot 父项目定义好了各类框架的版本信息,简化了maven依赖配置,及版本兼容性问题。内部通过java类配置了各类框架的整合配置,能够做到框架的自动装配。 总体来说简化了spring项目的初始搭建,降低了框架整合的复杂度,做到开箱即用。
优点:
1)简化了maven配置
2)自动装配spring和其他框架
3)简化了xml配置
4)内置了tomcat,无需war部署
5)天然集成微服务开发springcloud
二、Springboot项目的创建;
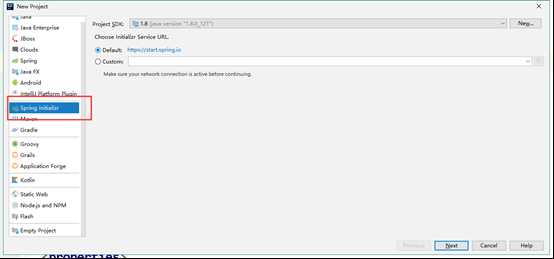
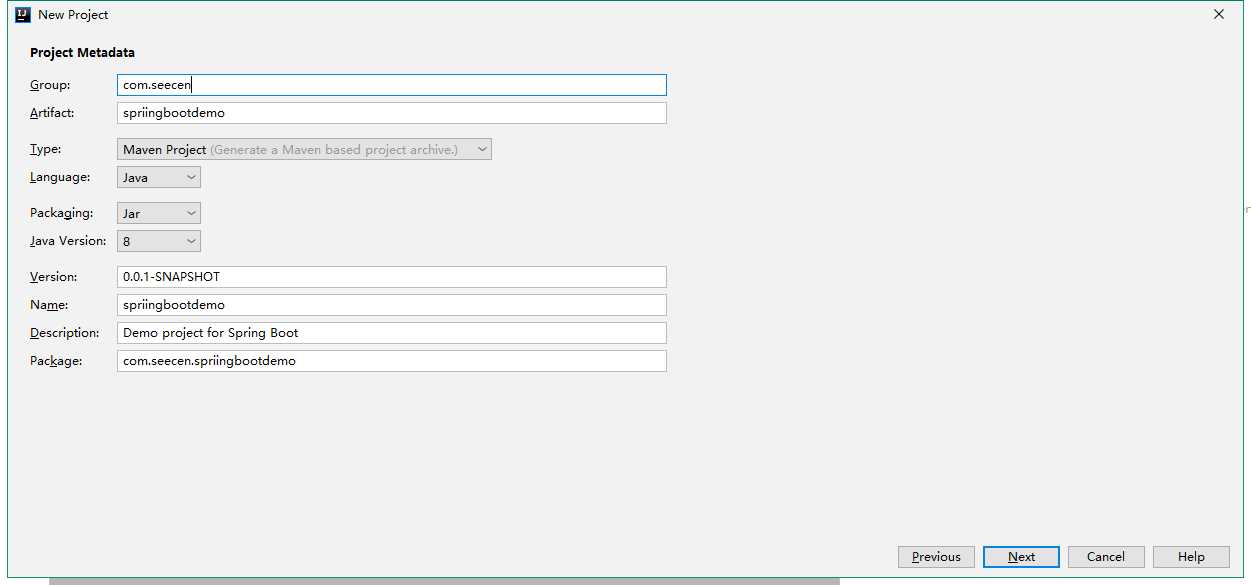
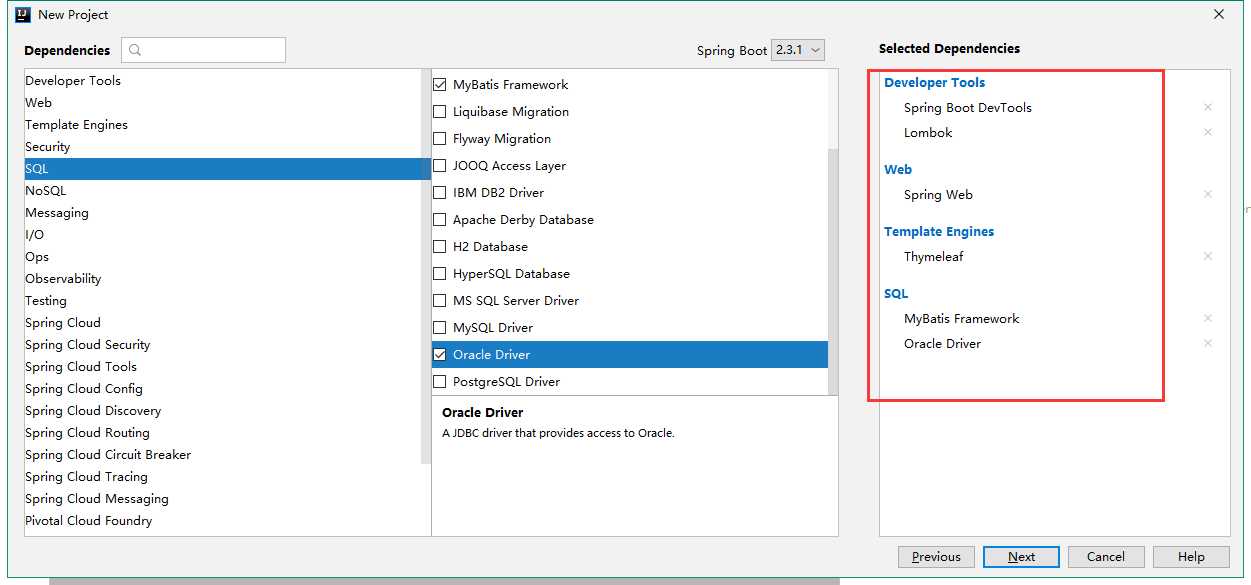
然后点击确定即可;
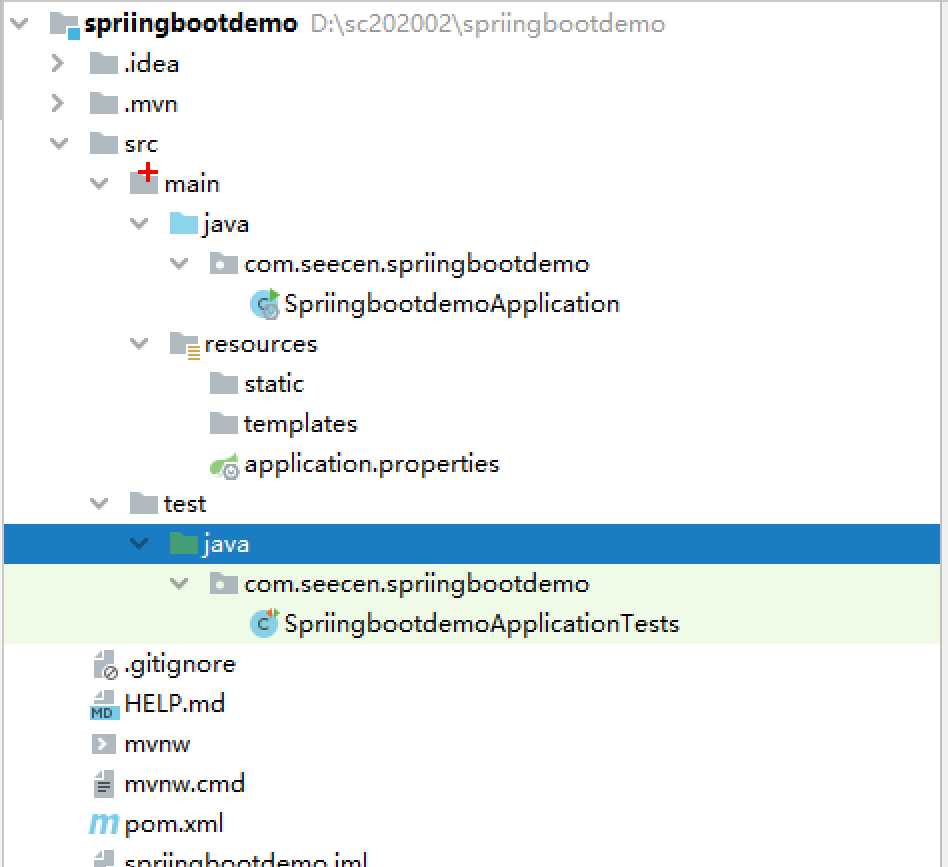
我们最开始的项目结构是这样的;
三、使用项目;
1)Springboot项目是一个标准的maven项目。
Resources目录下,默认生成了static,templates,application.properties三个目录和文件;
Static:用来存放静态资源(css js 图片 静态html);
Templates:用来存放模板页面(动态的页面,类似于jsp),templates下的内容是不能直接访问的,必须通过控制层进行跳转;
Src目录下会按groupid 和项目生成对应的包结构。在包中会生成一个springboot项目的启动类。我们可以通过运行该类中的main方法启动springboot项目;
Springboot推崇约定大于配置的思想。
2)@SpringBootApplication 注解是springboot启动类的注解。
其相当于以前版本中的三个注解:
@SpringbootConfiguration 指定springboot配置类的注解
@ComponentScan:组件扫描注解,相当于
Springboot中约定,自动会扫描启动类所在包及其子包下的所有的类。
@EnableAutoConfiguration 自动装配注解,springboot会根据导入的依赖关系,去自动配置装载框架相关的配置项。
3)Springboot整合mybatis;
1、导入mybatis依赖;
org.mybatis.spring.boot mybatis-spring-boot-starter2.1.3
2、在springboot启动类上添加@MapperScan注解,扫描Mapper接口所在的包;
@SpringBootApplication//springboot项目的启动类注解
@MapperScan("com.seecen.springboot.mapper")//扫描mybatis Mapper接口
public class SpringbootApplication {
    public static void main(String[] args) {
        SpringApplication.run(SpringbootApplication.class, args);
    }
}
3、Springboot的配置文件中Application.properties中配置 mapper.xml位置,别名等配置;
#mybatis配置
#配置mybatis mapper.xml文件的位置
mybatis.mapper-locations=classpath:mapper/*.xml
#配置别名,指定实体类所在包
mybatis.type-aliases-package=com.seecen.springboot.entity
4、Springboot整合mybatis分页插件;
1) 导入分页插件依赖;
        com.github.pagehelper
        pagehelper-spring-boot-starter
        1.2.12
2) 在springboot application.properties配置文件中配置分页插件;
#mybatis分页插件
#指定数据库方言
pagehelper.helper-dialect=oracle
pagehelper.reasonable=true
pagehelper.params=pageNum=pageHelperStart;pageSize=pageHelperRows
pagehelper.page-size-zero=true
pagehelper.support-methods-arguments=true
3)然后需要在方法中写PageInfo分页方法;
@Controller @RequestMapping("/admin") public class AdminController { @Autowired private AdminService adminService; @ResponseBody @GetMapping("/all") public PageInfoselectAll(Integer pageSize, Integer pageNum){ return adminService.selectAll(pageSize,pageNum); } }
public interface AdminService { PageInfoselectAll(Integer pageSize, Integer pageNum); }
@Service public class AdminServiceImpl implements AdminService{ @Autowired private AdminMapper adminMapper; @Override public PageInfoselectAll(Integer pageSize, Integer pageNum) { PageHelper.startPage(pageNum,pageSize); List tAdmins = adminMapper.selectAll(); return new PageInfo(tAdmins); } }
@Repository public interface AdminMapper { @Select("select * from t_admin") ListselectAll(); TAdmin selectById(Integer id); }
5、Springboot mybatis打印sql日志;
#配置springboot的日志级别
#配置日志的级别(全局配置)debug  error
logging.level.root=info
#配置特定包下的日志级别
logging.level.com.seecen.springboot.mapper=debug
logging.level.com.seecen.springboot.service=debug
6、Mybatis 逆向工程,生成Mapper 和mapper.xml文件
(1) 导入maven的mybatis逆向工程插件;
        org.mybatis.generator
            mybatis-generator-core
            1.3.5
org.mybatis.generator
mybatis-generator-maven-plugin
1.3.5 src/main/resources/mybatis/generatorConfig.xml true true
(2) 编写配置文件;
generatorConfig.xml文件代码为:
"1.0" encoding="UTF-8" ?> span>"-//mybatis.org//DTD MyBatis Generator Configuration 1.0//EN" "http://mybatis.org/dtd/mybatis-generator-config_1_0.dtd" >"mybatis/jdbc.properties" /> "${driverClassPath}" /> "context1" targetRuntime="MyBatis3"> "org.mybatis.generator.plugins.ToStringPlugin"/> "org.mybatis.generator.plugins.SerializablePlugin"/> "suppressAllComments" value="true" /> "${jdbc.driver}" connectionURL="${jdbc.url}" userId="${jdbc.username}" password="${jdbc.password}" /> "forceBigDecimals" value="false"/> "com.seecen.springboot.entity" targetProject="src/main/java"> "trimStrings" value="true" /> "mapper" targetProject="src/main/resources"> "com.seecen.springboot.mapper" targetProject="src/main/java" type="XMLMAPPER" />
jdbc.properties文件代码为:
jdbc.driver=oracle.jdbc.driver.OracleDriver
jdbc.url=jdbc:oracle:thin:@localhost:1521:XE
jdbc.username=blog
jdbc.password=123456
#\u9A71\u52A8jar\u5305\u7684\u4F4D\u7F6E,\u5177\u4F53\u7684\u8DEF\u5F84\u3002\u9006\u5411\u751F\u6210\u4EE3\u7801\u65F6\u4F7F\u7528
driverClassPath=C:\\Users\\Administrator\\.m2\\repository\\com\\oracle\\ojdbc\\ojdbc8\\19.3.0.0\\ojdbc8-19.3.0.0.jar
driverClassPath为你自己maven仓库的包的路径;
(3) 运行插件;
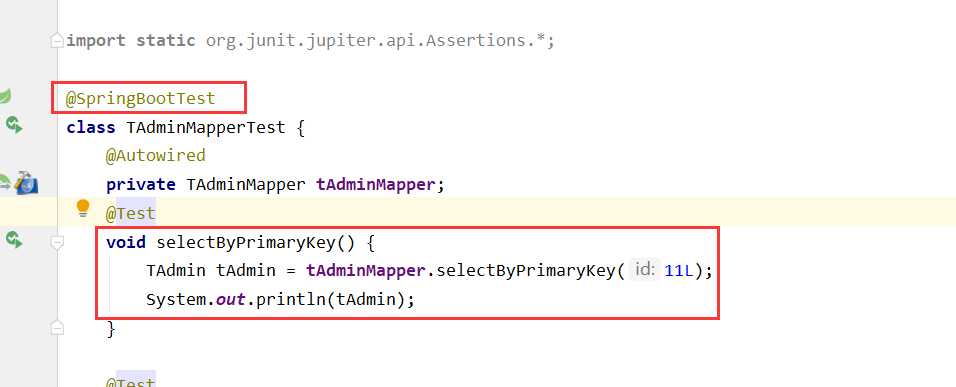
我们如果是测试的话,就在那个mapper.java文件对着那个实体类ctrl+shift+T,就可以快速生成测试方法了;

测试文件为:
测试结果为:

Springboot如何创建一个项目
标签:别名 doc 连接 定义 com package nbsp oct dma
原文地址:https://www.cnblogs.com/xie-qi/p/13264355.html
文章标题:Springboot如何创建一个项目
文章链接:http://soscw.com/index.php/essay/78897.html