springboot重新认识
2021-04-29 15:27
标签:source create 依赖 pid mamicode 工作 ssm 零配置 ora
4.1.3.微服务的核心之springboot重新认识【上】
3.1.springboot重新认识
3.1.1.springboot的前世今生
3.1.1.1.spring boot是什么?
从spring framework开始,核心功能:IOC/DI和MVC,AOP.
spring中bean自动注入,可以基于注解和xml配置方式。基于spring+spring mvc +mybatis,即ssm框架开发web项目。
往往需要进行多个文件配置。这个配置对于开发人员来说,也是繁重的工作量。
spring是个好人呀,它说,我看开发人员很辛苦啊,我准备开发一个新产品,把配置文件的工作也给做了。让开发人员
可以“零配置”搭建web项目。
spring团队,再一想,基于ssm开发,还需要在pom.xml中添加很多依赖,也很是消耗开发人员的时间呀。这个添加依赖的
工作,我们也来做了吧!于是,spring想出了starter思想,设计starter依赖包。开发时只要引入这个依赖包,spring开发的一些基本包
依赖就可以省事了。
spring 团队,在spring的基础上,开发了新产品springboot,在2014年发布1.0版本,它成为了一个更加轻量级的框架。
springboot就具有基本功能:零配置,starter封装依赖,main启动项目。
3.1.1.2.spring boot产生
在2014年发布1.0版本。
3.1.2.spring mvc项目构建与springboot构建web项目
3.1.2.1.基于ssm框架构建web项目流程
1.创建一个web项目工程【基于maven或gradle】
2.pom.xml中添加相关依赖,spring+mybatis+mysql+servlet+...
3.web.xml配置DispatcherServlet
4.创建spring-mvc.xml配置【配置自动扫描,注解驱动。。。】
5.创建Controller,及相关服务bean【添加spring-bean.xml配置。。。】
6.启动项目,发布到tomcat
这种流程,是每一个基于ssm开发web项目的通用模板。为了减少这个模板化创建过程,可以基于已经创建好的web项目结构,
手动创建一个maven项目骨架。
然后,通过命令行,输入基本参数,创建一个基本ssm项目模板。
1.基于ssm搭建简单的web工程demo
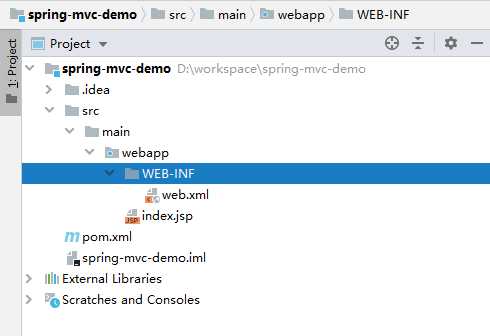
[1]使用maven的web骨架创建web工程
工程结构如下所示:

【2】pom.xml中添加相关依赖
spring相关依赖:
org.springframework spring-core${spring.version} org.springframework spring-beans${spring.version} org.springframework spring-context${spring.version} org.springframework spring-web${spring.version} org.springframework spring-webmvc${spring.version} org.springframework spring-expression${spring.version} org.springframework spring-aop${spring.version}
【2】修改web.xml,配置DispatcherServlet
span>app PUBLIC "-//Sun Microsystems, Inc.//DTD Web Application 2.3//EN" "http://java.sun.com/dtd/web-app_2_3.dtd" >Archetype Created Web Application springmvc class>org.springframework.web.servlet.DispatcherServlet class>contextConfigLocation classpath:dispatcher-servlet.xml springmvc /
并且在resources资源目录下创建dispatcher-servlet.xml配置文件。
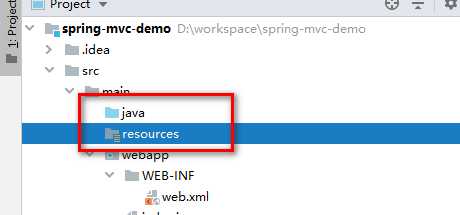
注意:
idea工具下使用maven搭建的新的web工程,默认是没有resources目录的。需要创建目录,如下所示。

然后,创建dispatcher-servlet.xml配置文件:
       xmlns:xsi="http://www.w3.org/2001/XMLSchema-instance"
       xmlns:context="http://www.springframework.org/schema/context"
       xmlns:mvc="http://www.springframework.org/schema/mvc"
       xmlns:aop="http://www.springframework.org/schema/aop"
       xsi:schemaLocation="http://www.springframework.org/schema/beans http://www.springframework.org/schema/beans/spring-beans.xsd
         http://www.springframework.org/schema/context http://www.springframework.org/schema/context/spring-context.xsd
         http://www.springframework.org/schema/mvc http://www.springframework.org/schema/context/spring-mvc.xsd
         http://www.springframework.org/schema/aop http://www.springframework.org/schema/context/spring-aop.xsd"
       default-autowire="byName">
    package="com.wf"/>
    class="org.springframework.web.servlet.view.InternalResourceViewResolver">
【3】编写controller类
package com.wf.controller;

import org.springframework.web.bind.annotation.GetMapping;
import org.springframework.web.bind.annotation.RestController;

/**
 * @ClassName HelloController
 * @Description 测试controller
 * @Author wf
 * @Date 2020/7/3 17:15
 * @Version 1.0
 */
@RestController
public class HelloController {
    @GetMapping("/test")
    public String test(){
        return "Hello World";
    }
}
【4】启动项目,发布到tomcat
需要添加一个tomcat,需要本地安装tomcat,这里为了方便,pom.xml中添加netty嵌入式容器。
3.1.3.springboot集成mybatis
3.1.4.springboot与微服务
3.1.5.spring注解驱动的发展过程
springboot重新认识
标签:source create 依赖 pid mamicode 工作 ssm 零配置 ora
原文地址:https://www.cnblogs.com/wfdespace/p/13232070.html