Windows caffe 跑mnist实例
2021-05-08 21:28
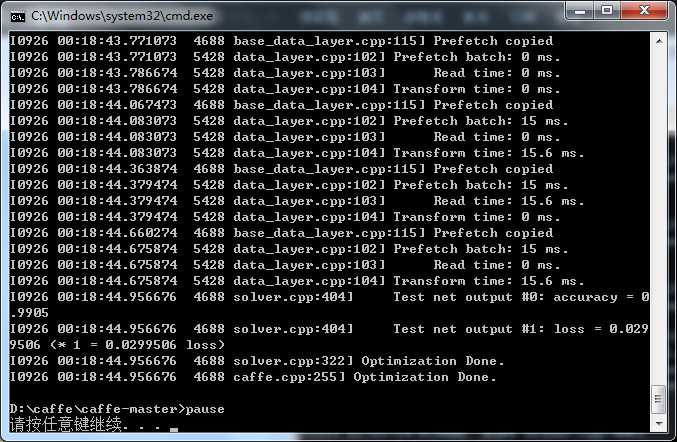
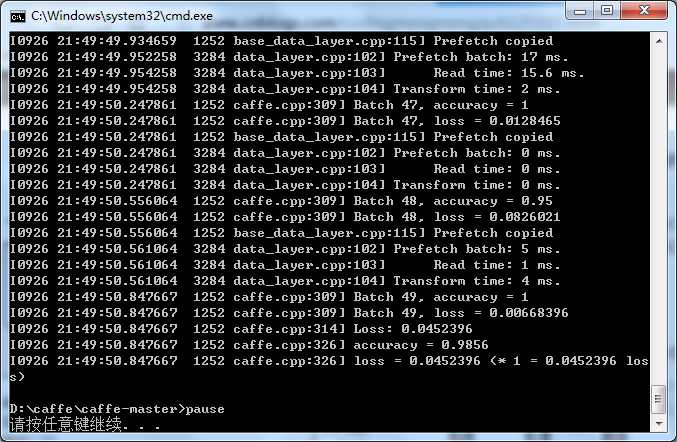
标签:mode sse fill 加载 output 注释 迭代 st表 es2017 一. 装完caffe当然要来跑跑自带的demo,在examples文件夹下。 先来试试用于手写数字识别的mnist,在 examples/mnist/ 下有需要的代码文件,但是没有图像库。 mnist库有50000个训练样本,10000个测试样本,都是手写数字图像。 caffe支持的数据格式为:LMDB LEVELDB IMDB比LEVELDB大,但是速度更快,且允许多种训练模型同时读取同一数据集。 默认情况,examples里支持的是IMDB文件,不过你可以修改为LEVELDB,后面详解。 mnist数据集建议网上搜索下载,网盘有很多,注意将文件夹放到\examples\mnist目录下,且最好命名为图中格式, 否则可能无法读取文件需手动配置。 笔者之前下的数据集命名的下划线是连接线就会报错无法读取文件,所以注意文件夹名字! Windows下最好选择LEVELDB文件,Linux则随意了。下好了LEVELDB文件就不用再使用convert_imageset函数了,省去了转换图片格式和计算均值的步骤。 二. 训练mnist模型 mnist的网络训练模型文件为: lenet_train_test.prototxt 一般修改两个DATA层的 “source”文件路径就行,上面的例子中,我已经改了,改为mnist的训练集和测试集文件夹路径。再就是注意“backend: LEVELDB”,默认的backend应该是IMDB要修改! 网络模型 lenet_train_test.prototxt修改后再修改 lenet_solver.prototxt 该文件主要是一些学习参数和策略: 带#的注释可以不管,能理解最好: 第二行的 net: 路径需改为自己的网络模型xx_train_test.prototxt路径。其他的学习率 base_lr,lr_policy等不建议修改;max_iter最大迭代次数可以稍微改小,display显示间隔也可以随意修改~最后一行,我是只有CPU模式所以设为CPU,如果可以用GPU加速可设为GPU! 到这基本设置就结束了,然后就是写命令执行测试程序了: 我选择写了批处理.bat文件执行,也可以直接在CMD环境输命令执行。 新建mnist_train.bat,内容如下: 根据自己的情况修改第二行的路径位置,Windows应该都是在Build/x64目录下,有的博客写的/bin/目录其实是Linux的并不适用于Windows环境。还要注意使用斜线“/”,不要使用“\”无法识别,Python代码多为后者要修改! 我的环境只有Debug目录,如果你有Realease目录,使用Realease目录。 运行.bat成功后,会开始训练,训练结束界面如下: 最后几行可以看到accuracy的准确率可以达到99%,也是相当准确了! 提示,caffe文件夹内会生成.caffemodel文件 使用caffemodel文件开始测试: 三.测试数据 由于测试数据集也是直接下载好了的LEVELDB文件,所以省了不少步骤 直接新建mnist_test.bat文件,类似训练mnist模型一样,对该模型进行数据测试。 类似mnits_train.bat,修改文件路径名,test表示用于测试,model指向自己的网络模型文件,最后添加权值文件.caffemodel进行测试。 运行mnist_test.bat后,成功界面如下: 最后一行还是有98%的准确率还是很不错的,说明模型生成的还不错。 总结:其实还遇到了不少零零碎碎的问题,大多都可以百度解决,主要是记得修改对自己的文件路径目录,Windows下一定要使用LEVELDB数据文件,.prototxt也记得修改,然后就是等待模型跑完看结果了,看到高准确率还是很开心的~ 四. 使用该模型 模型训练好了,数据也只是测试了,那么我们要使用该模型判断一张图片是数字几该如何做呢? 这个时候需要生成 classification.exe,然后执行相应的.bat命令来预测图片的分类结果。 mnist分类使用可以参考http://www.cnblogs.com/yixuan-xu/p/5862657.html 发现OpenCV可以加载caffe 框架模型,准备再写一篇博客进行实践介绍~ http://docs.opencv.org/3.1.0/d5/de7/tutorial_dnn_googlenet.html Windows caffe 跑mnist实例 标签:mode sse fill 加载 output 注释 迭代 st表 es2017 原文地址:http://www.cnblogs.com/chenzhefan/p/7594561.html
name: "LeNet"
layer {
  name: "mnist"
  type: "Data"
  top: "data"
  top: "label"
  include {
    phase: TRAIN
  }
  transform_param {
    scale: 0.00390625
  }
  data_param {
    source: "examples/mnist/mnist_train_leveldb"
    batch_size: 64
    backend: LEVELDB
  }
}
layer {
  name: "mnist"
  type: "Data"
  top: "data"
  top: "label"
  include {
    phase: TEST
  }
  transform_param {
    scale: 0.00390625
  }
  data_param {
    source: "examples/mnist/mnist_test_leveldb"
    batch_size: 100
    backend: LEVELDB
  }
}
layer {
  name: "conv1"
  type: "Convolution"
  bottom: "data"
  top: "conv1"
  param {
    lr_mult: 1
  }
  param {
    lr_mult: 2
  }
  convolution_param {
    num_output: 20
    kernel_size: 5
    stride: 1
    weight_filler {
      type: "xavier"
    }
    bias_filler {
      type: "constant"
    }
  }
}
layer {
  name: "pool1"
  type: "Pooling"
  bottom: "conv1"
  top: "pool1"
  pooling_param {
    pool: MAX
    kernel_size: 2
    stride: 2
  }
}
layer {
  name: "conv2"
  type: "Convolution"
  bottom: "pool1"
  top: "conv2"
  param {
    lr_mult: 1
  }
  param {
    lr_mult: 2
  }
  convolution_param {
    num_output: 50
    kernel_size: 5
    stride: 1
    weight_filler {
      type: "xavier"
    }
    bias_filler {
      type: "constant"
    }
  }
}
layer {
  name: "pool2"
  type: "Pooling"
  bottom: "conv2"
  top: "pool2"
  pooling_param {
    pool: MAX
    kernel_size: 2
    stride: 2
  }
}
layer {
  name: "ip1"
  type: "InnerProduct"
  bottom: "pool2"
  top: "ip1"
  param {
    lr_mult: 1
  }
  param {
    lr_mult: 2
  }
  inner_product_param {
    num_output: 500
    weight_filler {
      type: "xavier"
    }
    bias_filler {
      type: "constant"
    }
  }
}
layer {
  name: "relu1"
  type: "ReLU"
  bottom: "ip1"
  top: "ip1"
}
layer {
  name: "ip2"
  type: "InnerProduct"
  bottom: "ip1"
  top: "ip2"
  param {
    lr_mult: 1
  }
  param {
    lr_mult: 2
  }
  inner_product_param {
    num_output: 10
    weight_filler {
      type: "xavier"
    }
    bias_filler {
      type: "constant"
    }
  }
}
layer {
  name: "accuracy"
  type: "Accuracy"
  bottom: "ip2"
  bottom: "label"
  top: "accuracy"
  include {
    phase: TEST
  }
}
layer {
  name: "loss"
  type: "SoftmaxWithLoss"
  bottom: "ip2"
  bottom: "label"
  top: "loss"
}
 1 # The train/test net protocol buffer definition
 2 net: "examples/mnist/lenet_train_test.prototxt"
 3 # test_iter specifies how many forward passes the test should carry out.
 4 # In the case of MNIST, we have test batch size 100 and 100 test iterations,
 5 # covering the full 10,000 testing images.
 6 test_iter: 100
 7 # Carry out testing every 500 training iterations.
 8 test_interval: 500
 9 # The base learning rate, momentum and the weight decay of the network.
10 base_lr: 0.01
11 momentum: 0.9
12 weight_decay: 0.0005
13 # The learning rate policy
14 lr_policy: "inv"
15 gamma: 0.0001
16 power: 0.75
17 # Display every 100 iterations
18 display: 100
19 # The maximum number of iterations
20 max_iter: 10000
21 # snapshot intermediate results
22 snapshot: 5000
23 snapshot_prefix: "examples/mnist/lenet"
24 # solver mode: CPU or GPU
25 solver_mode: CPU
cd ../../
"Build/x64/Debug/caffe.exe" train --solver=examples/mnist/lenet_solver.prototxt
pause


cd ../../
"Build/x64/Debug/caffe.exe" test --model=examples/mnist/lenet_train_test.prototxt -weights=examples/mnist/lenet_iter_10000.caffemodel
pause

文章标题:Windows caffe 跑mnist实例
文章链接:http://soscw.com/index.php/essay/84107.html