配置httpd服务虚拟主机
2021-05-19 07:27
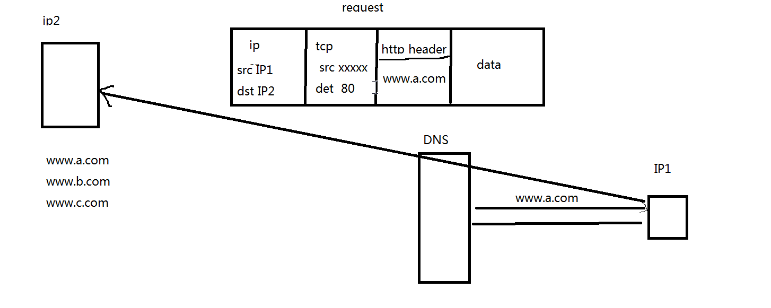
标签:虚拟主机 实验准备: 1、准备三个站点页面 2、准备三个IP地址 一、实现基于ip的虚拟主机 1、修改httpd服务的配置文件 /etc/httpd/conf/httpd.conf 2、测试连接 二、基于端口不同实现虚拟主机 实验步骤: 1、修改httpd服务的配置文件 /etc/httpd/conf/httpd.conf 2、测试连接 三、实现基于FQDN的虚拟主机 当客户端访问一个网址的时候,会经过DNS服务器的解析将主机名解析成IP地址访问。但是对于一些访问量不大的网站,可能会出现多个网站放在一台web服务器上的情况,这时候,不管输入的是哪个网站地址,DNS解析到的都是一个IP地址,为了解决这种情况,就需要使用到虚拟主机。 实验步骤: 1、模拟DNS解析 vim /etc/hosts 2、修改httpd服务的配置文件 /etc/httpd/conf/httpd.conf 3、测试连接 实验小结:基于ip地址实现虚拟主机,有多少个网址就需要多少个IP地址,这样就造成了资源的浪费,也增加了成本,而基于端口在访问的时候需要输入端口号,而一般用户并都能记住端口号,所以访问起来比较麻烦,所以目前的主流是局域FQDN实现虚拟主机。 配置httpd服务虚拟主机 标签:虚拟主机 原文地址:http://13136984.blog.51cto.com/13126984/1975435

[root@localhost ~]# curl 192.168.35.13
/app/site1/index.html
[root@localhost ~]# curl 192.168.35.14
/app/site2/index.html
[root@localhost ~]# curl 192.168.35.15
/app/site3/index.html
listen 8001
listen 8002
listen 8003
[root@localhost ~]# curl192.168.35.136:8001
/app/site1/index.html
[root@localhost ~]# curl192.168.35.136:8002
/app/site2/index.html
[root@localhost ~]# curl 192.168.35.136:8003
/app/site3/index.html

[root@centOS6 app]# vim /etc/hosts
127.0.0.1  localhost localhost.localdomain localhost4 localhost4.localdomain4
::1        localhost localhost.localdomain localhost6 localhost6.localdomain6
192.168.35.136 www.a.com www.b.comwww.c.com
NameVirtualHost *:80
[root@localhost ~]# curl www.a.com
/app/site1/index.html
[root@localhost ~]# curl www.b.com
/app/site2/index.html
[root@localhost ~]# curl www.c.com
/app/site3/index.html
上一篇:HTML5新特性之History