RabbitMQ入门(二)-- Springboot实现消息推送和消费
2021-06-03 02:02
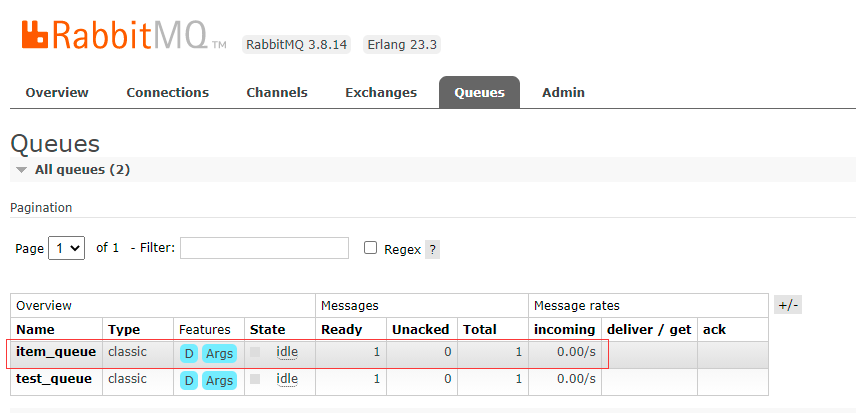
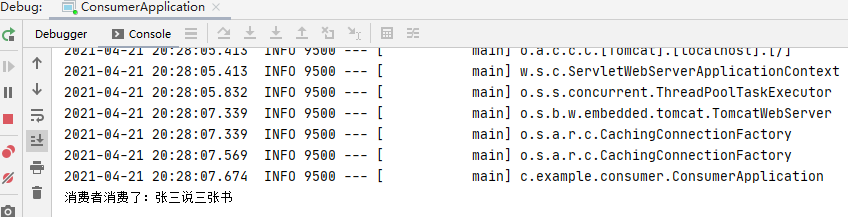
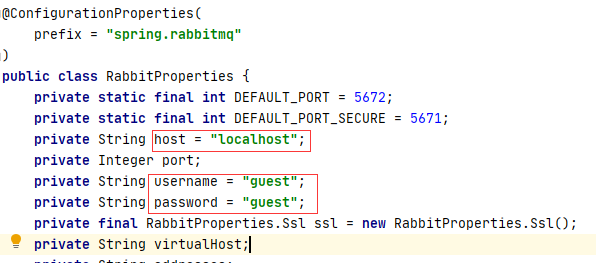
标签:rgba idea 客户端 ide cti str span static png RabbitMQ主要实现消息推送和消费 1. 新建springboot项目 通过idea,创建一个springboot默认项目,在pom.xml中添加如下依赖。 2.编写RabbitMQConfig类 3.编写SendMessageController 验证结果 启动程序,访问http://localhost:8080/sendmsg?msg=%E5%BC%A0%E4%B8%89%E8%AF%B4%E4%B9%A6&key=item.test 然后去界面客户端看下对应的queue模块下可以看到增加了一个消息,如下图: 说明消息成功发送到RabbitMQ的队列中了。接下来实现消费就可读取队列中的消息了。 1. 新建springboot项目 通过idea,创建一个springboot默认项目,在pom.xml中添加如下依赖。 2.创建监听类MyListener 3.启动服务 程序监听item_queue队列消息,并进行了消费。 注意问题: rabbitmq在properties或者在yml中配置用户名密码等参数,如在application.yml中: 这些配置是默认的,不需要配置,除非你新建了自己的用户。通过从查看源码的角度我们就可以找到答案。一般来说在applicationd的配置文件中的参数,可以找到对应的XXProperties.class文件,如rabbitmq对应的就是RabbitProperties.class文件,打开如下图所示: 默认host和用户名密码都是已经设定了的,如果是其他的用户那么就可以通过yml或者properties等配置文件进行自定义配置。 。 RabbitMQ入门(二)-- Springboot实现消息推送和消费 标签:rgba idea 客户端 ide cti str span static png 原文地址:https://www.cnblogs.com/hungs/p/14686892.html
dependency>
  groupId>org.springframework.bootgroupId>
  artifactId>spring-boot-starter-amqpartifactId>
dependency>
/**
 * RabbitMQ配置类
 */
@Configuration
public class RabbitMQConfig {
    //交换机名称
    public static final String ITEM_TOPIC_EXCHANGE = "item_topic_exchange";
    //队列名称
    public static final String ITEM_QUEUE = "item_queue";

    //声明交换机
    @Bean("itemTopicExchange")
    public Exchange topicExchange(){
        return ExchangeBuilder.topicExchange(ITEM_TOPIC_EXCHANGE).durable(true).build();
    }

    //声明队列
    @Bean("itemQueue")
    public Queue itemQueue(){
        return QueueBuilder.durable(ITEM_QUEUE).build();
    }

    //绑定队列和交换机
    @Bean
    public Binding itemQueueExchange(@Qualifier("itemQueue") Queue queue,
                                     @Qualifier("itemTopicExchange") Exchange exchange){
        return BindingBuilder.bind(queue).to(exchange).with("test.#").noargs();
    }

}
@RestController
public class SendMessageController {

    //注入RabbitMQ的模板
    @Autowired
    private RabbitTemplate rabbitTemplate;

    /**
     * 测试
     */
    @GetMapping("/sendmsg")
    public String sendMsg(@RequestParam String msg, @RequestParam String key){
        /**
         * 发送消息
         * 参数一:交换机名称
         * 参数二:路由key: item.springboot-rabbitmq,符合路由item.#规则即可
         * 参数三:发送的消息
         */
        rabbitTemplate.convertAndSend(RabbitMQConfig.ITEM_TOPIC_EXCHANGE ,key ,msg);
        //返回消息
        return "发送消息成功!";
    }
}

dependency>
    groupId>com.rabbitmqgroupId>
    artifactId>rabbitmq-clientartifactId>
    version>1.3.0version>
dependency>
@Component
@EnableRabbit
public class MyListener {

    @RabbitListener(queues = "item_queue")
    public void msg(String msg) {
        System.out.println("消费者消费了:" + msg);
    }
}
spring:
  rabbitmq:
    host: localhost
    username: guest
    password: guest
    virtual-host: /
文章标题:RabbitMQ入门(二)-- Springboot实现消息推送和消费
文章链接:http://soscw.com/index.php/essay/89951.html