使用 ASP.NET Core MVC 创建 Web API(二)
2021-06-04 08:03
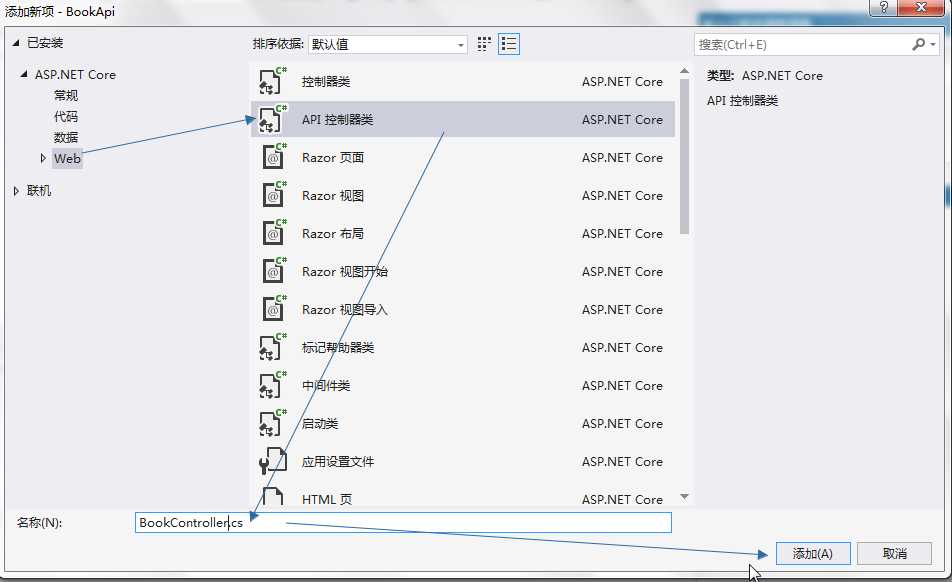
标签:右键 range art slist ica read pytho dev 模板 使用 ASP.NET Core MVC 创建 Web API 使用 ASP.NET Core MVC 创建 Web API(一) 数据库上下文是使用Entity Framework Core功能的主类。 此类由 1) 在Visual Studio 2017的“解决方案资源管理器”中,右键单击“Models”文件夹,然后选择“添加” > “类”。 将类命名为 BookContext,然后单击“添加”。 2) 在Visual Studio 2017的“解决方案资源管理器”中使用鼠标双击打开BookContext.cs文件,并输入以下代码: 在 ASP.NET Core 中,服务(如数据库上下文)必须向依赖关系注入 (DI) 容器进行注册。该容器向控制器提供服务。 在Visual Studio 2017中的“解决方案资源管理器”中找到 Startup.cs文件,双击打开之后,添加将数据库上下文注入到DI容器中的代码。代码如下。 在Visual Studio 2017中的“解决方案资源管理器”中找到 appsettings.json文件,双击打开,然后添加数据库连接字符串。文件中的配置代码如下。 1) 在Visual Studio 2017中的“解决方案资源管理器”中右键单击 Controllers 文件夹。在弹出菜单中选择 添加 > 新建项。如下图。 2) 在“添加新项-BookApi”对话框中,选择“Web”—>“API 控制器类”模板,并在“名称”输入框中输入 BookController,然后选择“添加”按钮。如下图。 3) 在Visual Studio 2017中打开BookController.cs文件中添加以下代码: 对于上面的代码的说明: 1) 定义了没有方法的 API 控制器类。 2) 使用 从 ASP.NET Core 2.1 开始,使用 [ApiController] 特性通常结合 Controller 来为控制器启用特定于 REST 行为。 通过 Controllere 可使用NotFound 和 File 等方法。 另一种方法是创建使用 [ApiController] 特性进行批注的自定义基本控制器类: 3) 使用 DI 将数据库上下文 ( 4) 如果数据库为空,则将几条书籍信息数据添加到数据库。 此代码位于构造函数中,因此在每次出现新 HTTP 请求时运行。 如果删除所有项,则构造函数会在下次调用 API 方法时再次创建。 因此删除可能看上去不起作用,不过实际上确实有效。 使用 ASP.NET Core MVC 创建 Web API(二) 标签:右键 range art slist ica read pytho dev 模板 原文地址:https://www.cnblogs.com/lonelyxmas/p/10861996.html六、添加数据库上下文
Microsoft.EntityFrameworkCore.DbContext 类派生而来。using Microsoft.EntityFrameworkCore;
using System;
using System.Collections.Generic;
using System.Linq;
using System.Threading.Tasks;
namespace BookApi.Models
{
public class BookContext: DbContext
{
public BookContext(DbContextOptions
七、注册数据库上下文
using System;
using System.Collections.Generic;
using System.Linq;
using System.Threading.Tasks;
using BookApi.Models;
using Microsoft.AspNetCore.Builder;
using Microsoft.AspNetCore.Hosting;
using Microsoft.AspNetCore.Mvc;
using Microsoft.EntityFrameworkCore;
using Microsoft.Extensions.Configuration;
using Microsoft.Extensions.DependencyInjection;
using Microsoft.Extensions.Logging;
using Microsoft.Extensions.Options;
namespace BookApi
{
public class Startup
{
public Startup(IConfiguration configuration)
{
Configuration = configuration;
}
public IConfiguration Configuration { get; }
// This method gets called by the runtime. Use this method to add services to the container.
public void ConfigureServices(IServiceCollection services)
{
services.AddDbContext
八、添加数据库连接
{
  "Logging": {
    "LogLevel": {
      "Default": "Warning"
    }
  },
  "ConnectionStrings": {
    "BookContext": "Server=.\\sqlexpress;Database=CustomDB;Trusted_Connection=True;MultipleActiveResultSets=true"
  },
  "AllowedHosts": "*"
}
九、 添加控制器


using System;
using System.Collections.Generic;
using System.Linq;
using System.Threading.Tasks;
using BookApi.Models;
using Microsoft.AspNetCore.Mvc;

// For more information on enabling Web API for empty projects, visit https://go.microsoft.com/fwlink/?LinkID=397860

namespace BookApi.Controllers
{

    [Route("api/[controller]")]
    [ApiController]
    public class BookController : Controller
    {

        private readonly BookContext _context;

        public BookController(BookContext context)
        {

            _context = context;

            if (_context.Book.Count() == 0)
            {

                context.Book.AddRange(
                 new Book
                 {

                     Name = "Python编程 从入门到实践",
                     ReleaseDate = DateTime.Parse("2018-1-12"),
                     Author = "埃里克·马瑟斯",
                     Price = 75.99M,
                     Publishing = "机械出版社"
                 },

                 new Book
                 {

                     Name = "Java编程的逻辑",
                     ReleaseDate = DateTime.Parse("2018-1-13"),
                     Author = "马俊昌",
                     Price = 48.50M,
                     Publishing = "机械出版社"
                 },

                 new Book
                 {

                     Name = "统计思维:大数据时代瞬间洞察因果的关键技能",
                     ReleaseDate = DateTime.Parse("2017-12-23"),
                     Author = "西内启",
                     Price = 39.00M,
                     Publishing = "清华出版社"
                 },

                 new Book
                 {

                     Name = "微信营销",
                     ReleaseDate = DateTime.Parse("2018-01-05"),
                     Author = "徐林海",
                     Price = 36.90M,
                     Publishing = "清华出版社"
                 },

                    new Book
                    {

                        Name = "Java 8实战",
                        ReleaseDate = DateTime.Parse("2016-04-05"),
                        Author = "厄马",
                        Price = 65.60M,
                        Publishing = "科技出版社"
                    }
             );
                _context.SaveChanges();

            }
        }

    }
}
[ApiController] 属性修饰类。 此属性指示控制器响应 Web API 请求。[ApiController] 特性修饰控制器类时,将启用操作参数绑定源推理。复杂类型参数通过请求正文自动绑定。 因此,不会使用 [FromBody] 特性对前面操作中的 Book 参数进行显示批注。在 ASP.NET Core 2.2 或更高版本中,可将 [ApiController] 特性应用于程序集。 以这种方式进行注释,会将 web API 行为应用到程序集中的所有控制器。 请注意,无法针对单个控制器执行选择退出操作。 [ApiController]
public class MyBaseController
{
}
BookContext) 注入到控制器中。 数据库上下文将在控制器中的每个 CRUD 方法中使用。
文章标题:使用 ASP.NET Core MVC 创建 Web API(二)
文章链接:http://soscw.com/index.php/essay/90307.html