爬虫开发python工具包介绍 (2)
2021-06-15 18:05
标签:exp www. line 完成 fetch loop 2.0 传递 conf 本文来自网易云社区 作者:王涛 可选参数我们一一介绍一下: tornado有两种非阻塞的httpclient的实现,一个是SimpleAsyncHTTPClient,一个是CurlAsyncHTTPClient. 你可以调用它们的基类AsyncHTTPClient,通过AsyncHTTPClient.configure方法来选择使用上面的哪一个实现,或者直接实例化上面的任意一个子类。缺省的是SimpleAsyncHTTPClient,虽然它已经能满足绝大多数用户的需求,但是我们选择有更多优点的 CurlAsyncHTTPClient . CurlAsyncHTTPClient 有更多特性支持,例如 代理设置,指定网络出接口等 对于那些与HTTP兼容不太好的网站,CurlAsyncHTTPClient也能兼容访问, CurlAsyncHTTPClient 更快 Tornado 2.0 版本之前,CurlAsyncHTTPClient是默认的。 示例代码(与前面类似): 可以看到,这个httpclient,使用起来也很方便。先创建一个HTTPRequest,然后调用HTTPClient的fetch方法来发起这个请求。 网易云免费体验馆,0成本体验20+款云产品! 更多网易研发、产品、运营经验分享请访问网易云社区。 相关文章: 爬虫开发python工具包介绍 (2) 标签:exp www. line 完成 fetch loop 2.0 传递 conf 原文地址:https://www.cnblogs.com/zyfd/p/9729524.html
参数
释义
示例
params
生成url中?号后面的查询Key=value
示例1:
>>>payload = {‘key1‘: ‘value1‘, ‘key2‘: ‘value2‘}
>>>r = requests.get("http://httpbin.org/get", params=payload)
查看结果:
>>> print(r.url)http://httpbin.org/get?key2=value2&key1=value1示例2:>>> param = ‘httpparams‘
>>> r = requests.get("http://httpbin.org/get",params=param)
>>> print r.urlhttp://httpbin.org/get?httpparams
data
支持字典、列表、字符串。
post方法中常用,模拟html中的form表单示例1:
>>> payload = {‘key1‘: ‘value1‘, ‘key2‘: ‘value2‘}
>>> r = requests.post("http://httpbin.org/post", data=payload)
>>> print(r.text)
{
...
    "form": {
    "key2": "value2",
    "key1": "value1"
    },
...
}
示例2: >>> payload = ((‘key1‘, ‘value1‘), (‘key1‘, ‘value2‘))
>>> r = requests.post(‘http://httpbin.org/post‘, data=payload)
>>> print(r.text)
{
...
"form": {
"key1": [
"value1",
"value2"
]
},
...
}
json
post时使用,传递json数据到服务端,
很多ajax请求是传递的json示例1:
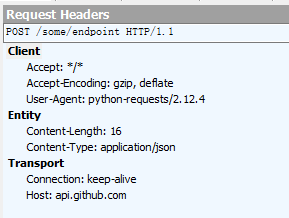
r = requests.post(url, json={"key":"value"}})抓取的报文头如下,content-type:application/json
headers
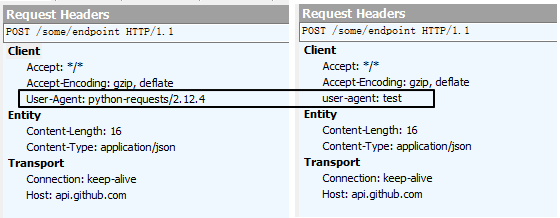
自定义http头,它会和request自己的缺省头进行合并之后作为请求的header.
注意: 所有的 header 值必须是 string、bytestring 或者 unicode。示例1:
r = requests.post(url,headers={"user-agent":"test"})

cookies
可以通过cookies访问应答里的cookie,
也可以向服务器发送自定义的cookie.
通过自定义的cookie对象,还可以指定有效域等属性示例1:获取应答中的cookie
>>> url =‘http://example.com/some/cookie/setting/url‘
>>> r = requests.get(url)
>>>r.cookies[‘example_cookie_name‘]
示例2: 向服务端发送cookie >>> jar = requests.cookies.RequestsCookieJar()
>>> jar.set(‘tasty_cookie‘, ‘yum‘, domain=‘httpbin.org‘, path=‘/cookies‘)
>>> url = ‘‘
>>> r = requests.get(url, cookies=jar)
>>> r.text
‘{"cookies": {"tasty_cookie": "yum"}}‘
files
上传多部分编码(multipart-encoded)文件
示例1 :上传一个文件
>>> url = ‘http://httpbin.org/post‘
>>> files = {‘file‘: open(‘report.xls‘, ‘rb‘)}
>>> r = requests.post(url, files=files)
示例2 : 显示地设置文件名,文件类型和请求头 >>> url = ‘http://httpbin.org/post‘
>>> files = {‘file‘: (‘report.xls‘, open(‘report.xls‘, ‘rb‘),
‘application/vnd.ms-excel‘, {‘Expires‘: ‘0‘})}
>>> r = requests.post(url, files=files)
auth
支持多 HTTPBasicAuth/HTTPDigestAuth/HTTPProxyAuth 种认证
示例1
>>>url = ‘http://httpbin.org/digest-auth/auth/user/pass‘
>>>requests.get(url, auth=HTTPDigestAuth(‘user‘, ‘pass‘))
抓包后,http头如下: GET http://httpbin.org/digest-auth/auth/user/pass HTTP/1.1
Host:httpbin.org
Connection: keep-alive
Accept-Encoding: gzip, deflate
Accept: /User-Agent: python-requests/2.12.4Authorization: Basic dXNlcjpwYXNz
timeout
1 float:连接等待时间,只针对socket连接过程有效。 2 tuple:(connect timeout, read timeout)
示例1:
>>> requests.get(‘http://github.com‘, timeout=0.001)
Traceback (most recent call last):
    File "", line 1, inrequests.exceptions.Timeout:
    HTTPConnectionPool(host=‘github.com‘, port=80):
        Request timed out. (timeout=0.001)
allow_redirects
如果你使用的是GET、OPTIONS、POST、PUT、PATCH 或者 DELETE,
那么你可以通过 allow_redirects 参数禁用重定向处理.
注:在爬虫过程中,我们有些场景需要禁用跳转,置为False,
默认True示例1 收到3xx时,会主动跳转访问:
>>>r = requests.get(‘http://github.com‘, allow_redirects=False)
>>> r.status_code
    301
>>> r.history
    []
proxies
配置代理信息,没啥好讲的.根据实际情况配置http,https代理
示例1:
>>>proxies = {
    "http": "http://127.0.0.1:8888",
    "https": "https://127.0.0.1:8888",
}
>>>r=requests.get(url, headers=headers,proxies=proxies)
stream
如果应答是流式的时候,需要把stream设置成true.注:需要调用主动关闭,否则连接不会释放
示例 1:下载百度图片:
 import requests
from contextlib import closing
def download_image_improve():
    url = (‘‘
    ‘image&quality=80&size=b9999_10000‘
    ‘&sec=1504068152047&di=8b53bf6b8e5deb64c8ac726e260091aa&imgtype=0‘
    ‘&src=http%3A%2F%2Fpic.baike.soso.com%2Fp%2F‘
    ‘20140415%2Fbki-20140415104220-671149140.jpg‘)
    with closing(requests.get(url, stream=True,verify=False)) as response:
    # 这里打开一个空的png文件,相当于创建一个空的txt文件,
    # wb表示写文件
        with open(‘selenium1.png‘, ‘wb‘) as file:
        #文件,这个文件最后写入完成就是,selenium.png
            file.write(data)
verify
默认值为True,即校验服务端证书。 如果是字符串,则为CA_BUNDLE的路径,即证书路径。如果找不到证书, 可以用示例2中的Fiddler中的PEM替代,也可以安装certifi包(自带了一套requests信任的根证书) 个人理解:即浏览器访问Https网站有时会提示需要信任证书的功能一样。
示例1:关闭证书验证(推荐)
r=requests.get(url, verify=False)
示例2 :借用Fiddler转换之后的PEM证书去访问 中亚. FiddlerRoot.zip 下载地址:
http://nos.netease.com/knowledge/
2b99aacb-e9bf-42f7-8edf-0f8ca0326533?download=FiddlerRoot.zip
注: 证书中包含cer和pem两种格式,建议先安装信息cer证书。
当然你也可以自己安装Fiddler,把Fiddler证书信任后,
导出cer格式,再使用
openssl x509 -inform der -in FiddlerRoot.cer -out FiddlerRoot.pem 转换证书格式 headers = {
"Host": "www.amazon.com",
"Connection": "keep-alive",
"Cache-Control": "max-age=0",
"Upgrade-Insecure-Requests": "1",
"User-Agent": ("Mozilla/5.0 (Windows NT 10.0; Win64; x64) "
"AppleWebKit/537.36 (KHTML, like Gecko) "
"Chrome/68.0.3440.106 Safari/537.36"),
"Accept": ("text/html,application/xhtml+xml,"
"application/xml;q=0.9,image/webp,image/apng,/;q=0.8"),
"Accept-Encoding": "gzip, deflate, br",
"Accept-Language": "zh-CN,zh;q=0.9,en;q=0.8"
}
print requests.get(‘https://www.amazon.com/‘,
verify=r"FiddlerRoot.pem", headers=headers).content
cert
类型: 字符串:代表ssl客户端的cert文件(.pem)文件路径 元组:(‘cert‘,‘key‘),verify给定的服务端证书, cert给定的是客户端的证书(对于https双向认证的情况)
暂未测试过,暂未遇到过需要用这个字段的情况。感兴趣的可以研究一下
三、tornado中的关键函数及参数
1 tornado 非阻塞的httpclient
2 tornado 关键函数、参数介绍
@gen.coroutinedef fetch_url(url):
    """抓取url"""
    try:
        c = CurlAsyncHTTPClient()  # 定义一个httpclient
        req = HTTPRequest(url=url)  # 定义一个请求
        response = yield c.fetch(req)  # 发起请求
        print response.body
        IOLoop.current().stop()  # 停止ioloop线程
    except:        print traceback.format_exc()
此处我们就看一下HTTPRequest的定义,看看有哪些关键参数是我们需要了解的。class HTTPRequest(object):
"""HTTP client request object."""
# Default values for HTTPRequest parameters.
# Merged with the values on the request object by AsyncHTTPClient
# implementations.
_DEFAULTS = dict(
connect_timeout=20.0,
request_timeout=20.0,
follow_redirects=True,
max_redirects=5,
decompress_response=True,
proxy_password=‘‘,
allow_nonstandard_methods=False,
validate_cert=True)
def __init__(self, url, method="GET", headers=None, body=None,
auth_username=None, auth_password=None, auth_mode=None,
connect_timeout=None, request_timeout=None,
if_modified_since=None, follow_redirects=None,
max_redirects=None, user_agent=None, use_gzip=None,
network_interface=None, streaming_callback=None,
header_callback=None, prepare_curl_callback=None,
proxy_host=None, proxy_port=None, proxy_username=None,
proxy_password=None, proxy_auth_mode=None,
allow_nonstandard_methods=None, validate_cert=None,
ca_certs=None, allow_ipv6=None, client_key=None,
client_cert=None, body_producer=None,
expect_100_continue=False, decompress_response=None,
ssl_options=None):
r"""All parameters except ``url`` are optional.
【推荐】 云计算交互设计师的正确出装姿势
【推荐】 从细节处谈Android冷启动优化
文章标题:爬虫开发python工具包介绍 (2)
文章链接:http://soscw.com/index.php/essay/94240.html