Web APi之认证(Authentication)两种实现方式【二】(十三)
2021-02-20 23:16
前言
上一节我们详细讲解了认证及其基本信息,这一节我们通过两种不同方式来实现认证,并且分析如何合理的利用这两种方式,文中涉及到的基础知识,请参看上一篇文中,就不再叙述废话。
序言
对于所谓的认证说到底就是安全问题,在Web API中有多种方式来实现安全,【accepted】方式来处理基于IIS的安全(通过上节提到的WindowsIdentity依赖于HttpContext和IIS认证)或者在Web API里通过使用Web API中的消息处理机制,但是如果我们想应用程序运行在IIS之外此时Windows Idenitity这一方式似乎就不太可能了,同时在Web API中本身就未提供如何处理认证的直接方式,我们不得不自定义来实现认证功能,同时这也是我们所推荐的方式,自己动手,丰衣足食。
温馨提示:下面实现方法皆基于基础认证,若不熟悉Http协议中的Basic基础认证,请先参看此篇文章【园友海鸟-介绍Basic基础认证和Digest摘要认证】。
无论何种方式,对于我们的应用程序我们都需要在业务层使用基于凭证的用户认证,因为是客户端一方的需求,所以客户端需要明确基础验证,基础认证(Basic)非常简单并且支持任何Web客户端,但是基础验证的缺点是不安全,通过使用SSL则可以进行加密就可以在一定程度上保证了安全,如果是对于一般的应用程序通过基础认证只是进行编码而未加密也可以说是安全的。我们还是看看上一节所给图片

通过上述图片的粗略信息我们可以看出在请求到Action方法之间要经过Web API消息处理管道,在请求到目标元素之前要经过HttpMessageHandler和认证过滤器,所以我们可以通过这两者来自定义实现认证。下面我们一一来看。
基于Web API的认证过滤器(AuthorizationFilterAttribute)实现认证
第一步
我们自定义一个认证身份(用户名和密码)的类,那么此类必须也就要继承于 GenericIdentity ,既然是基于基础验证,那么类型当然也就是Basic了。
    public class BasicAuthenticationIdentity : GenericIdentity
    {
        public string Password { get; set; }
        public BasicAuthenticationIdentity(string name, string password)
            : base(name, "Basic")
        {
            this.Password = password;
        }
    }
第二步
我们要自定义一个认证过滤器特性,并继承 AuthorizationFilterAttribute ,此时会变成如下:
    public class BasicAuthenticationFilter : AuthorizationFilterAttribute
    {
        public override void OnAuthorization(HttpActionContext actionContext)
        {}
    }
那么在这个重写的方法我们应该写什么呢?我们慢慢来分析!请往下看。
-
解析请求报文头
首先对于客户端发送过来的请求我们肯定是需要获得请求报头,然后解析请求报头中的Authorization,若此时其参数为空,我们将返回到客户端,并发起质询。
            string authParameter = null;

            var authValue = actionContext.Request.Headers.Authorization;  //actionContext:Action方法请求上下文
            if (authValue != null && authValue.Scheme == "Basic")
                authParameter = authValue.Parameter;  //authparameter:获取请求中经过Base64编码的(用户:密码)

            if (string.IsNullOrEmpty(authParameter))

                return null;
次之,若此时认证中的参数不为空并开始对其进行解码,并返回一个BasicAuthenticationIdentity对象,若此时对象为空,则同样返回到客户端,并发起质询
           authParameter = Encoding.Default.GetString(Convert.FromBase64String(authParameter)); //对编码的参数进行解码

            var authToken = authParameter.Split(‘:‘);  //解码后的参数格式为(用户名:密码)将其进行分割
            if (authToken.Length 2)
                return null;

            return new BasicAuthenticationIdentity(authToken[0], authToken[1]); //将分割的用户名和密码传递给此类构造函数进行初始化
最后,我们将上述两者封装为一个ParseHeader方法以便进行调用
        public virtual BasicAuthenticationIdentity ParseHeader(HttpActionContext actionContext)
        {
            string authParameter = null;

            var authValue = actionContext.Request.Headers.Authorization;
            if (authValue != null && authValue.Scheme == "Basic")
                authParameter = authValue.Parameter;

            if (string.IsNullOrEmpty(authParameter))

                return null;

            authParameter = Encoding.Default.GetString(Convert.FromBase64String(authParameter));

            var authToken = authParameter.Split(‘:‘);
            if (authToken.Length 2)
                return null;

            return new BasicAuthenticationIdentity(authToken[0], authToken[1]);
        }
-
接下来我们将认证未通过而需要发起认证质询,我们将其封装为一个方法Challenge
        void Challenge(HttpActionContext actionContext)
        {
            var host = actionContext.Request.RequestUri.DnsSafeHost;
            actionContext.Response = actionContext.Request.CreateResponse(HttpStatusCode.Unauthorized);
            actionContext.Response.Headers.Add("WWW-Authenticate", string.Format("Basic realm=\"{0}\"", host));

        }
-
定义一个方法便于对用户名和密码进行校验,并将其修饰为虚方法,以免后续要添加其他有关用户数据
        public virtual bool OnAuthorize(string userName, string userPassword, HttpActionContext actionContext)
        {
            if (string.IsNullOrEmpty(userName) || string.IsNullOrEmpty(userPassword))

                return false;
            else
                return true;

        }
-
在认证成功后将认证身份设置给当前线程中Principal属性
           var principal = new GenericPrincipal(identity, null);

            Thread.CurrentPrincipal = principal;

            //下面是针对ASP.NET而设置
            //if (HttpContext.Current != null)
            //    HttpContext.Current.User = principal;
第三步
一切已经就绪,此时在重写方法中进行相应的调用即可,如下:
    [AttributeUsage(AttributeTargets.Class | AttributeTargets.Method, AllowMultiple = false)]
    public class BasicAuthenticationFilter : AuthorizationFilterAttribute
    {
        public override void OnAuthorization(HttpActionContext actionContext)
        {
            var userIdentity = ParseHeader(actionContext);
            if (userIdentity == null)
            {
                Challenge(actionContext);
                return;
            }

            if (!OnAuthorize(userIdentity.Name, userIdentity.Password, actionContext))
            {
                Challenge(actionContext);
                return;
            }

            var principal = new GenericPrincipal(userIdentity, null);

            Thread.CurrentPrincipal = principal;

            base.OnAuthorization(actionContext);
        }
第四步
自定义 CustomBasicAuthenticationFilter 并继承于 BasicAuthenticationFilter ,重写其虚方法。
    public class CustomBasicAuthenticationFilter : BasicAuthenticationFilter
    {
        public override bool OnAuthorize(string userName, string userPassword, HttpActionContext actionContext)
        {
            if (userName == "xpy0928" && userPassword == "cnblogs")

                return true;
            else
                return false;

        }
    }
最后一步
注册自定义认证特性并进行调用
    config.Filters.Add(new CustomBasicAuthenticationFilter());

    [CustomBasicAuthenticationFilter]
    public class ProductController : ApiController
    {....}
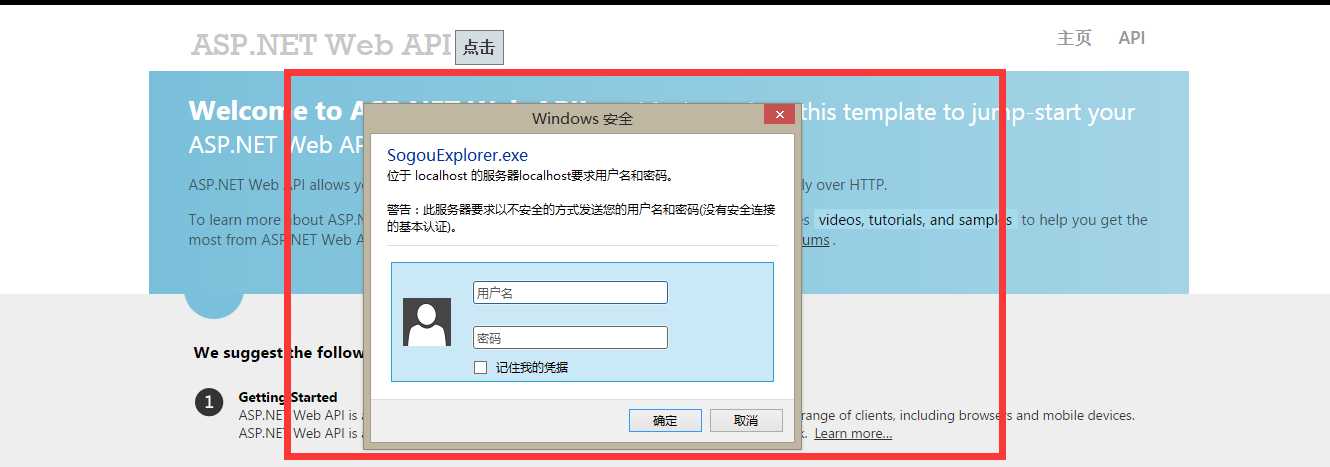
至此对于其认证方式就已经完全实现,接下来我们通过【搜狗浏览器】来验收我们的成果。
看到如下认证其用户名和密码的图片,我们知道我们成功了一半

我们点击取消,观察是否返回401并添加质询头即WWW-Authenticate,如我们所料

我们输入正确的用户名和密码再试试看,结果认证成功,如下:

基于Web API的消息处理管道(HttpMessageHandler)实现认证
我们知道HttpMessageHandler是Web API中请求-响应中的消息处理管道的重要角色,但是真正实现管道串联的是DelegatingHandler,若你不懂Web API消息管道,请参考前面系列文章,所以我们可以自定义管道来进行拦截通过继承DelegatingHandler。下面我们一步步来实现基于此管道的认证。
第一步
和第一种方法一致不再叙述。
第二步
这一步当然是自定义管道进行处理并继承DelegatingHandler,重载在此类中的SendAsync方法,通过获得其请求并处理从而进行响应,若不懂此类中的具体实现,请参看前面系列文章。
-
同样是我们需要根据请求来解析请求报头,我们依然需要解析报头方法,但是需要稍作修改
        public virtual BasicAuthenticationIdentity ParseHeader(HttpRequestMessage requestMessage)
        {
            string authParameter = null;

            var authValue = requestMessage.Headers.Authorization;
            if (authValue != null && authValue.Scheme == "Basic")
                authParameter = authValue.Parameter;

            if (string.IsNullOrEmpty(authParameter))

                return null;

            authParameter = Encoding.Default.GetString(Convert.FromBase64String(authParameter));

            var authToken = authParameter.Split(‘:‘);
            if (authToken.Length 2)
                return null;

            return new BasicAuthenticationIdentity(authToken[0], authToken[1]);
        }
-
此时质询也得作相应的修改,因为此时不再是依赖于Action请求上下文,而是请求(HttpRequestMessage)和响应(HttpResponseMessage)
        void Challenge(HttpRequestMessage request,HttpResponseMessage response)
        {
            var host = request.RequestUri.DnsSafeHost;

            response.Headers.Add(authenticationHeader, string.Format("Basic realm=\"{0}\"", host));

        }
-
最终继承自DelegatingHandler的代码如下
public class BasicAuthenticationHandler : DelegatingHandler { private const string authenticationHeader = "WWW-Authenticate"; protected override TaskSendAsync(HttpRequestMessage request, CancellationToken cancellationToken) { var crendentials = ParseHeader(request); if (crendentials != null) { var identity = new BasicAuthenticationIdentity(crendentials.Name, crendentials.Password); var principal = new GenericPrincipal(identity, null); Thread.CurrentPrincipal = principal; //针对于ASP.NET设置 //if (HttpContext.Current != null) // HttpContext.Current.User = principal; } return base.SendAsync(request, cancellationToken).ContinueWith(task => { var response = task.Result; if (crendentials == null && response.StatusCode == HttpStatusCode.Unauthorized) { Challenge(request, response); } return response; }); } void Challenge(HttpRequestMessage request,HttpResponseMessage response) { var host = request.RequestUri.DnsSafeHost; response.Headers.Add(authenticationHeader, string.Format("Basic realm=\"{0}\"", host)); } public virtual BasicAuthenticationIdentity ParseHeader(HttpRequestMessage requestMessage) { string authParameter = null; var authValue = requestMessage.Headers.Authorization; if (authValue != null && authValue.Scheme == "Basic") authParameter = authValue.Parameter; if (string.IsNullOrEmpty(authParameter)) return null; authParameter = Encoding.Default.GetString(Convert.FromBase64String(authParameter)); var authToken = authParameter.Split(‘:‘); if (authToken.Length 2) return null; return new BasicAuthenticationIdentity(authToken[0], authToken[1]); } }
第三步
上述我们自定义的BasicAuthenticationFilter此时就得继承 AuthorizeAttribute 该特性也是继承于上述的 AuthorizationFilterAttribute ,我们需要利用AuthorizeAttribute中的 IsAuthorized 方法来验证当前线程中的Principal是否已经被授权。
    public class BasicAuthenticationFilter : AuthorizeAttribute
    {
        protected override bool IsAuthorized(HttpActionContext actionContext)
        {

            var identity = Thread.CurrentPrincipal.Identity;
            if (identity != null && HttpContext.Current != null)
                identity = HttpContext.Current.User.Identity;

            if (identity != null && identity.IsAuthenticated)
            {

                var basicAuthIdentity = identity as BasicAuthenticationIdentity;

 //可以添加其他需要的业务逻辑验证代码
                if (basicAuthIdentity.Name == "xpy0928" && basicAuthIdentity.Password == "cnblogs")
                {
                    return true;
                }
            }

            return false;

        }
  }
通过 IsAuthorized 方法返回值来看,若为false,则返回401状态码,此时会触发 BasicAuthenticationHandler 中的质询,并且此方法里面主要是我们需要添加认证用户的业务逻辑代码。同时我们也说过我们第一种方法自定义实现的过滤器特性是 AuthorizationFilterAttribute (如果我们有更多逻辑使用这个特性是个不错的选择),而在这里是 AuthorizeAttribute (对于验证用户并且返回bool值使用此过滤器特性是个不错的选择)。
第四步
注册自定义管道以及认证过滤器特性
            config.MessageHandlers.Add(new BasicAuthenticationHandler());
            config.Filters.Add(new BasicAuthenticationFilter());
最后一步
    [BasicAuthenticationFilter]
    public class ProductController : ApiController
    {.....}
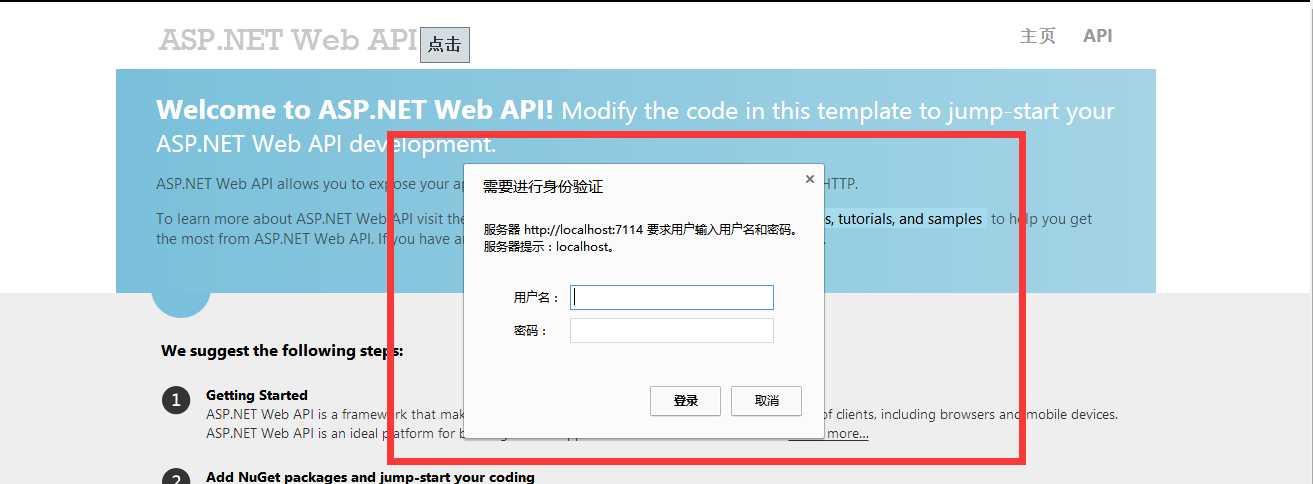
下面我们通过【360极速浏览器】来验收成果。点击按钮直接请求控制器

接下来取消,是否返回401

至此完美结束。
总结
用认证特性(AuthorizationFilterAttribute)还是HttpMessageHandler实现认证,这是一个问题?
通过比较这二者的实现操作在实现方式上明显有极大的不同,个人觉得用AuthorizationFilterAttribute来实现认证是更加简单并且紧凑,因为实现的每一处都在每一个地方,在大多数实现自定义登陆的场景下,对于用过滤器如此紧凑的业务逻辑用这个更加高效, 用HttpMessageHandler的优点是全局应用且是Web API消息处理管道的一部分,如果对于不同的部分要用不同的认证那么用HttpMessageHandler效果更好,但是此时你需要自定义一个过滤器,尤其是当MessageHandler对于一个认证需要一个过滤器的时候。所以综上所述,根据不同的应用场景我们应该选择对应的方式来实现认证。
源代码链接
WebAPi之认证.7z
文章标题:Web APi之认证(Authentication)两种实现方式【二】(十三)
文章链接:http://soscw.com/essay/58184.html