lettuce webdriver 自动化测试---玩转BDD
2020-12-13 02:02
标签:style blog class code java ext 行为驱动开发(BDD),依然高大上的矗立在远方,很少被人问津,一方面是BDD的思想不太容易理解,别一方面BDD的资料并不多。中文的资料就更少了。 之前增写过一篇《python BDD 框架之lettuce》 来介绍BDD ,本文将在此基础上通过lettuce 和webdriver来实现自动化测试,感兴趣的测试同学跟我一起装X吧! 下面向读者介绍如何通过lettuce 和 webdriver 结合来编写自动化脚本。 环境配置: ------------------------------------------ 前提:有python载发环境,并且安装了pip ,强烈建议在linux下操作。 第一步,安装lettuce root@machine:~$ [sudo] pip install lettuce 第二步,安装lettuce_webdriver https://pypi.python.org/pypi/lettuce_webdriver root@machine:~$ [sudo] pip install lettuce_webdriver 第三步,安装nose nose继承自unittest,属于第三方的python单元测试框架,且更容易使用,lettuce_webdriver包的运行依赖于nose模块 https://pypi.python.org/pypi/nose/ root@machine:~$ [sudo] pip install nose --------------------------------- 下面以为百度搜索为例,好吧!谁让这个例子能简单明了的讲解问题呢。所以,我们再次以百度搜索为例。 一般的百度搜索自动化脚本是这样的: 下面看看BDD是怎么玩的: 创建目录结构如下: .../test/features/baidu.feature
/step_definitions/setps.py
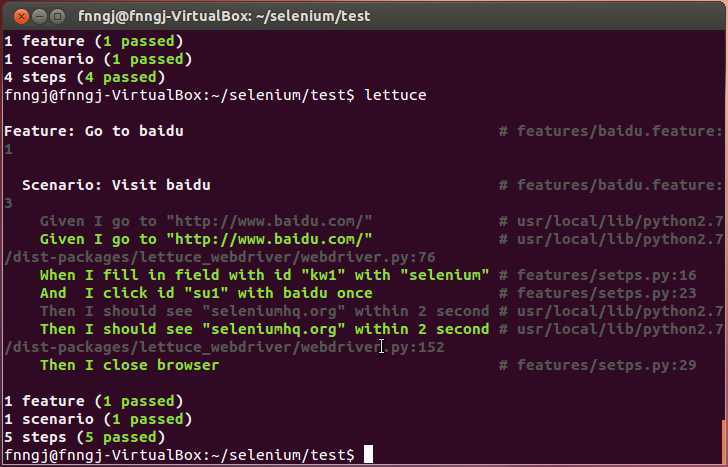
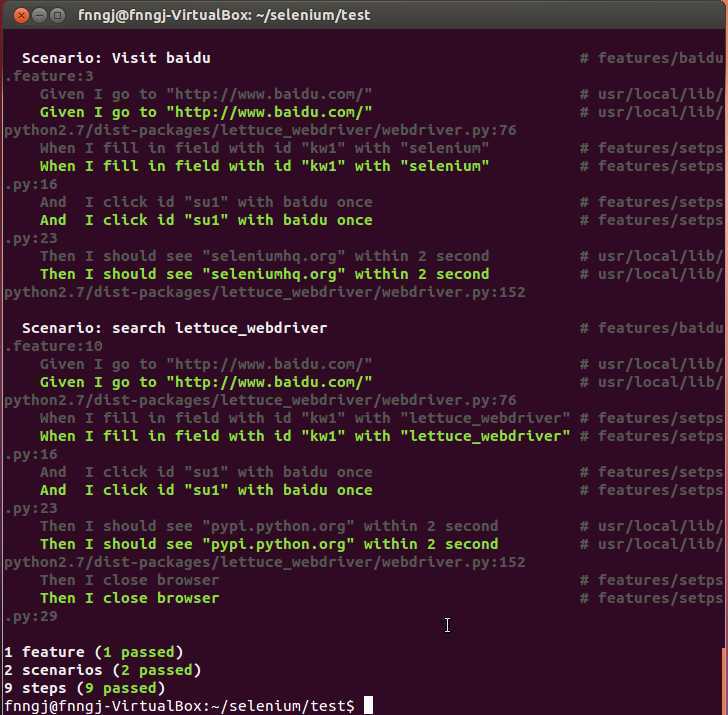
/support/terrain.py 先来回顾一下我们去写百度搜索脚本的过程: OK,确定了我们要做事情的过程,下面将其转换成BDD 的描述文件。 baidu.feature setps.py 注意:@step (‘xxx’)读取了baidu.feature 里有关键字,用正则表达式匹配的。 这是BDD的核心点。理解了这一点,就知道BDD是怎么玩的了。 terrain.py terrain文件配置浏览器驱动,可以作用于所有测试用例。 在.../test/目录下输入lettuce命令,运行结果如下图 对于当前测试用例来说,添加新的测试场景也非常简单,我们只用修改baidu.feature即可: 运行结果如下: 通过lettuce 来编写自动化脚本将是一件非常有趣的事儿。 lettuce webdriver 自动化测试---玩转BDD,搜素材,soscw.com lettuce webdriver 自动化测试---玩转BDD 标签:style blog class code java ext 原文地址:http://www.cnblogs.com/fnng/p/3714394.html
# coding = utf-8
from selenium import webdriver

browser = webdriver.Firefox()
browser.get("http://www.baidu.com")
browser.find_element_by_id("kw1").send_keys("selenium")
browser.find_element_by_id("su1").click()
browser.quit()


功能:访问百度

   场景:搜索selenium
     我去访问百度的“http://www.badiu.com”
     通过id 为“kw1”找到输入框并输入“selenium”关键字
     点击 id为“su1” 按钮
     然后,我在搜索结果上找到了“seleniumhq.com”的网址
     最后,我关闭了浏览器


Feature: Go to baidu

Scenario: search selenium
  Given I go to "http://www.baidu.com/"
     When I fill in field with id "kw1" with "selenium"
     And  I click id "su1" with baidu once
     Then I should see "seleniumhq.org" within 2 second
     Then I close browser


from lettuce import *
from lettuce_webdriver.util import assert_false
from lettuce_webdriver.util import AssertContextManager

def input_frame(browser, attribute):
    xpath = "//input[@id=‘%s‘]" % attribute
    elems = browser.find_elements_by_xpath(xpath)
    return elems[0] if elems else False

def click_button(browser,attribute):
    xpath = "//input[@id=‘%s‘]" % attribute
    elems = browser.find_elements_by_xpath(xpath)
    return elems[0] if elems else False

#定位输入框输入关键字
@step(‘I fill in field with id "(.*?)" with "(.*?)"‘)
def baidu_text(step,field_name,value):
    with AssertContextManager(step):
        text_field = input_frame(world.browser, field_name)
        text_field.clear()
        text_field.send_keys(value)

#点击“百度一下”按钮
@step(‘I click id "(.*?)" with baidu once‘)
def baidu_click(step,field_name):
    with AssertContextManager(step):
        click_field = click_button(world.browser,field_name)
        click_field.click()

#关闭浏览器
@step(‘I close browser‘)
def close_browser(step):
    world.browser.quit()


from lettuce import before, world
from selenium import webdriver
import lettuce_webdriver.webdriver

@before.all
def setup_browser():
    world.browser = webdriver.Friefox()


Feature: Go to baidu

Scenario: search selenium
  Given I go to "http://www.baidu.com/"
     When I fill in field with id "kw1" with "selenium"
     And  I click id "su1" with baidu once
     Then I should see "seleniumhq.org" within 2 second

Scenario: search lettuce_webdriver
  Given I go to "http://www.baidu.com/"
     When I fill in field with id "kw1" with "lettuce_webdriver"
     And  I click id "su1" with baidu once
     Then I should see "pypi.python.org" within 2 second
     Then I close browser


上一篇:java反射机制
文章标题:lettuce webdriver 自动化测试---玩转BDD
文章链接:http://soscw.com/essay/24735.html