Spring Cloud(二):服务治理——Spring Cloud Eureka
2020-12-13 02:22
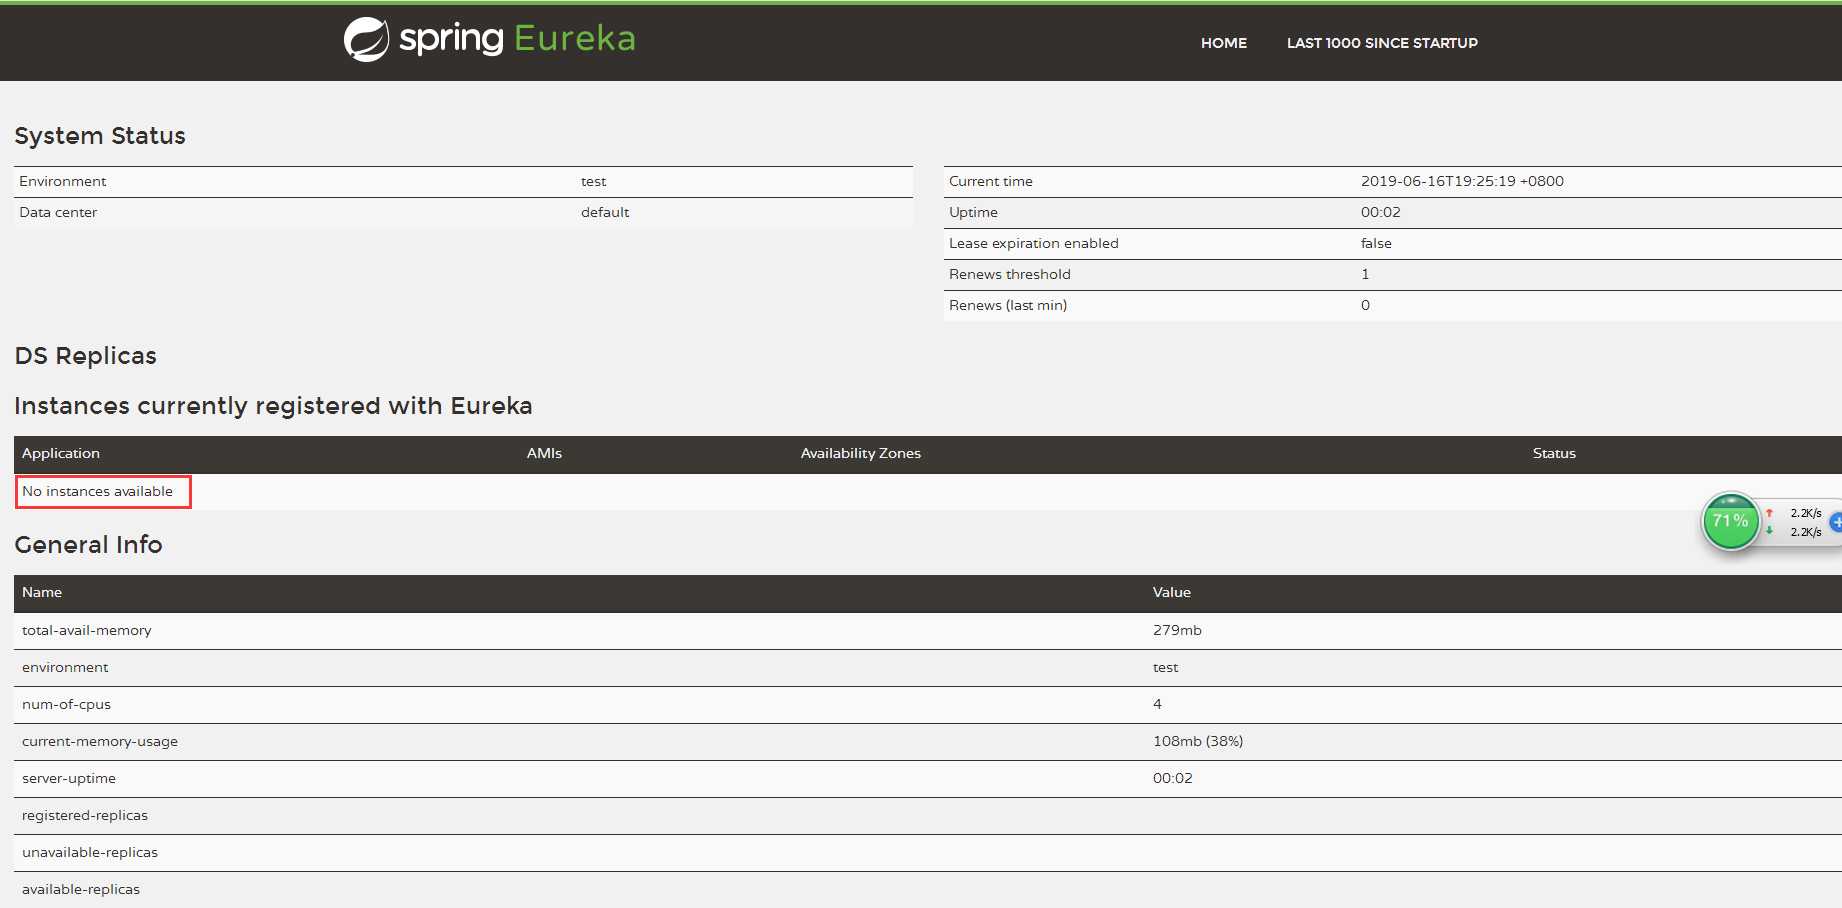
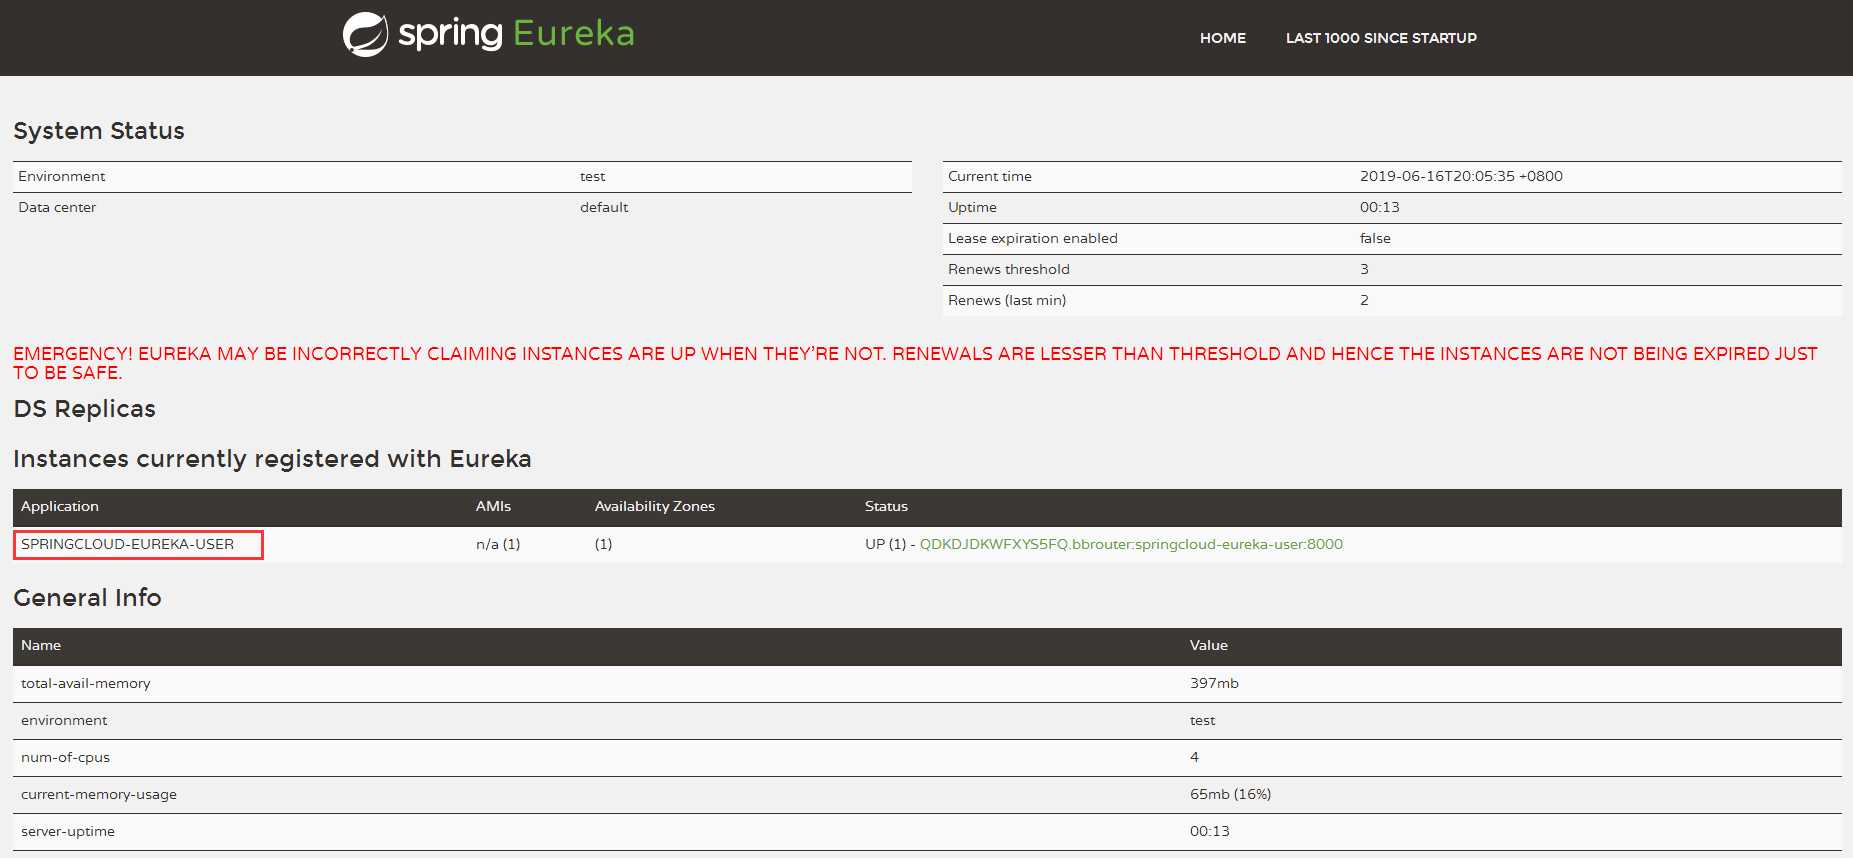
标签:The sse tap nap tor rgs 实体类 conf height 服务治理是微服务架构中最为核心和基础的模块,主要作用是实现各个微服务实例的自动化注册和发现。Spring Cloud Eureka是Spring Cloud Netflix微服务套件中的一部分,基于Netflix EureKa做了二次封装,主要负责微服务架构中的服务治理功能。 Eureka的服务发现包含两大组件,服务端发现组件(Eureka Server)和客户端发现组件(Eureka Client)。服务端发现组件也被称为服务注册中心,主要提供了服务的注册功能,客户端发现组件主要用于处理服务的注册与发现。按照角色分类,在Eureka中,服务发现机制包含3个角色:服务注册中心,服务提供者以及服务消费者。 一、使用Eureka注册服务 1. 创建maven父工程 创建一个maven父工程,命名为 springcloud-eureka-parent ,并在工程的pom.xml中添加Spring Cloud的版本依赖信息: 2. 搭建服务注册中心 在父工程 springcloud-eureka-parent 中,创建Maven子模块 springcloud-eureka-server 作为服务注册中心(服务端工程),在pom.xml中添加依赖: 创建配置文件application.yml,在配置文件中增加端口号等配置信息,内容如下: 以上配置表示eureka注册中心的端口号为8761,所有服务的实例都要向此端口注册。 eureka.instance.hostname 表示该eureka注册中心的实例名称为localhost, register-with-eureka:false 表示该Spring Boot应用为注册中心,不需要注册中心注册自己。 fetch-registry: false 的配置是因为注册中心的职责是维护服务实例,并不需要去检索服务。而 defaultZone 的地址是注册中心的地址。 接着,创建项目启动类,并添加 @EnableEurekaServer 注解,用于声明该标注类是一个Erueka Server: 启动 springcloud-eureka-server 模块,在浏览器访问:http://localhost:8761/ 可以看到Eureka的信息面板: 此时“Instances currently registered with Eureka”中显示当前已经注册到Eureka的服务实例为空。 3.搭建客户端工程 在父工程 springcloud-eureka-parent 中,创建Maven子模块 springcloud-eureka-user 作为客户端工程,在pom.xml中添加依赖: 创建application.yml配置文件,在配置文件中配置Eureka服务实例的端口号,服务端地址等信息,如下: 创建客户端引导类 EurekaUserMain ,并添加 @EnableEurekaClient 注解用于声明标注类是一个Eureka客户端组件。具体内容如下: 启动 springcloud-eureka-server 模块之后,启动 springcloud-eureka-user 模块,再次访问http://localhost:8761/ ,可以看到在“Instances currently registered with Eureka”中出现了刚才创建的 SPRINGCLOUD-EUREKA-USER 实例: 同时,可以看到该页面有红色的字体提示“EMERGENCY! EUREKA MAY BE INCORRECTLY CLAIMING INSTANCES ARE UP WHEN THEY‘RE NOT. RENEWALS ARE LESSER THAN THRESHOLD AND HENCE THE INSTANCES ARE NOT BEING EXPIRED JUST TO BE SAFE.”,这是因为本地调试时触发了Eureka Server的自我保护机制,该机制会使注册中心维护的实例不是很准确。在本地开发时候,可以在服务注册中心中配置 eureka.server.enable-self-preservation=false 参数来关闭保护机制。 二、使用Eureka实现服务间的调用 在上一步中,已经将用户服务 springcloud-eureka-user 注册到了服务注册中心,接下来将创建一个订单服务,并实现用户服务和订单服务之间的调用。 1. 搭建订单服务工程 在父工程 springcloud-eureka-parent 中,创建子模块 springcloud-eureka-order ,pom.xml文件和 springcloud-eureka-user 的类似,具体内容如下: 创建配置文件 application.yml ,配置Eureka服务实例的端口号,服务注册中心地址等信息,具体内容如下: 创建客户端引导类 EurekaOrderMain : 创建订单实体类: 创建订单Controller,内容如下: 2. 编写用户服务功能 在 springcloud-eureka-user 实例工程的引导类中,创建 RestTemplate 的Spring实例,代码如下: 创建用户Controller,调用订单Controller接口,查询订单信息,具体代码如下: 3.启动各Eureka实例进行测试 依次启动服务注册中心, springcloud-eureka-order 以及 springcloud-eureka-user 实例,访问注册中心管理界面 http://localhost:8761/ 确认两个服务实例已经注册成功: 访问 springcloud-eureka-user 实例的接口接口 http://localhost:8000/findOrderByUser/123,可以看到有数据正常返回: 表示使用Eureka进行服务间接口调用成功。 Spring Cloud(二):服务治理——Spring Cloud Eureka 标签:The sse tap nap tor rgs 实体类 conf height 原文地址:https://www.cnblogs.com/fengweiweicoder/p/11032930.html"1.0" encoding="UTF-8"?>
"1.0" encoding="UTF-8"?>
server:
  port: 8761
eureka:
  instance:
    hostname: localhost
  client:
    register-with-eureka: false
    fetch-registry: false
    service-url:
      defaultZone:
        http://${eureka.instance.hostname}:${server.port}/eureka/
package com.fix.springcloud.eureka;

import org.springframework.boot.SpringApplication;
import org.springframework.boot.autoconfigure.SpringBootApplication;
import org.springframework.cloud.netflix.eureka.server.EnableEurekaServer;

@SpringBootApplication
@EnableEurekaServer
public class EurekaServerMain {
    public static void main(String [] args){
        SpringApplication.run(EurekaServerMain.class,args);
    }
}

xsi:schemaLocation="http://maven.apache.org/POM/4.0.0 http://maven.apache.org/xsd/maven-4.0.0.xsd">
springcloud-eureka-parent
springcloud-eureka-user
spring-boot-starter-web
spring-cloud-starter-netflix-eureka-client
server:
  port: 8000
eureka:
  instance:
    prefer-ip-address: true     #是否显示主机的Ip
  client:
    service-url:
      defaultZone: http://localhost:8761/eureka/     #指定eureka服务端地址
spring:
  application:
name: springcloud-eureka-user@SpringBootApplication
@EnableEurekaClient
public class EurekaUserMain {
public static void main(String[] args) {
SpringApplication.run(EurekaUserMain.class, args);
}
}

"1.0" encoding="UTF-8"?>
server:
  port: 7900
eureka:
  instance:
    prefer-ip-address: true     #是否显示主机的Ip
  client:
    service-url:
      defaultZone: http://localhost:8761/eureka/     #指定eureka服务端地址
spring:
  application:
    name: springcloud-eureka-order    #指定应用名称
@SpringBootApplication
@EnableEurekaClient
public class EurekaOrderMain {
    public static void main(String[] args) {
        SpringApplication.run(EurekaOrderMain.class, args);
    }
}
package com.fix.springcloud.eureka.pojo;

public class Order {
    private String id;
    private Double price;
    private String receiverName;
    private String receiverAddress;
    private String receiverPhone;

    public String getId() {
        return id;
    }

    public void setId(String id) {
        this.id = id;
    }

    public Double getPrice() {
        return price;
    }

    public void setPrice(Double price) {
        this.price = price;
    }

    public String getReceiverName() {
        return receiverName;
    }

    public void setReceiverName(String receiverName) {
        this.receiverName = receiverName;
    }

    public String getReceiverAddress() {
        return receiverAddress;
    }

    public void setReceiverAddress(String receiverAddress) {
        this.receiverAddress = receiverAddress;
    }

    public String getReceiverPhone() {
        return receiverPhone;
    }

    public void setReceiverPhone(String receiverPhone) {
        this.receiverPhone = receiverPhone;
    }

    @Override
    public String toString() {
        return "Order{" +
                "id=‘" + id + ‘\‘‘ +
                ", price=" + price +
                ", receiverName=‘" + receiverName + ‘\‘‘ +
                ", receiverAddress=‘" + receiverAddress + ‘\‘‘ +
                ", receiverPhone=‘" + receiverPhone + ‘\‘‘ +
                ‘}‘;
    }
}
package com.fix.springcloud.eureka.controller;

import com.fix.springcloud.eureka.pojo.Order;
import org.springframework.web.bind.annotation.GetMapping;
import org.springframework.web.bind.annotation.PathVariable;
import org.springframework.web.bind.annotation.RestController;

@RestController
public class OrderController {
    /**
     * 通过订单id查询订单信息
     * @param id 订单id
     * @return 订单详情
     */
    @GetMapping("/order/{id}")
    public String findOrderById(@PathVariable String id){
        Order order =new Order();
        order.setId("123");
        order.setPrice(200.50);
        order.setReceiverName("张三");
        order.setReceiverAddress("陕西西安");
        order.setReceiverPhone("123456799");
        return order.toString();
    }
}
@SpringBootApplication
@EnableEurekaClient
public class EurekaUserMain {
    public static void main(String[] args) {
        SpringApplication.run(EurekaUserMain.class, args);
    }

    @Bean
    public RestTemplate initRestTemplate(){
        return new RestTemplate();
    }
}
package com.fix.springcloud.eureka.controller;

import org.springframework.beans.factory.annotation.Autowired;
import org.springframework.web.bind.annotation.GetMapping;
import org.springframework.web.bind.annotation.PathVariable;
import org.springframework.web.bind.annotation.RestController;
import org.springframework.web.client.RestTemplate;

@RestController
public class UserController {
    @Autowired
    private RestTemplate restTemplate;

    @GetMapping("/findOrderByUser/{id}")
    public String findOrderByUser(@PathVariable String id) {
        int orderId = 123;
        return this.restTemplate.getForObject("http://localhost:7900/order/" + orderId, String.class);
    }
}


文章标题:Spring Cloud(二):服务治理——Spring Cloud Eureka
文章链接:http://soscw.com/essay/25462.html