使用Windows GDI 做一个3D”软引擎“-Part1
2020-12-13 03:19
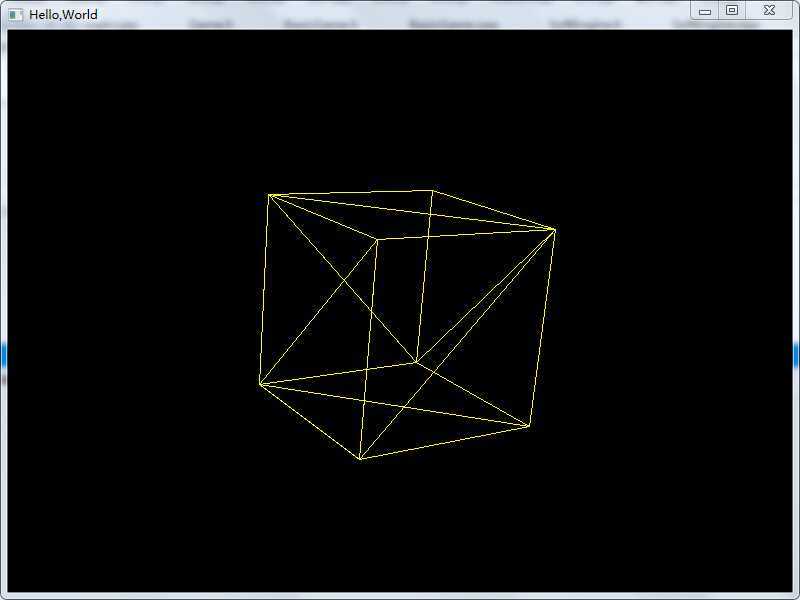
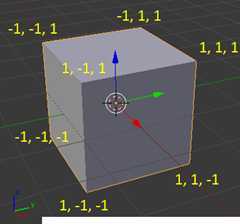
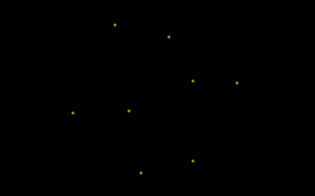
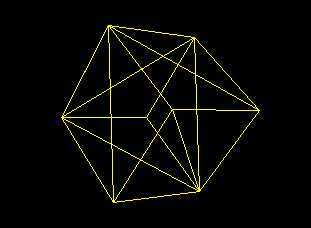
标签:des style class blog code java 前: 最近几天一个很虎比的教程吸引了我的视线,原作者使用c# / JavaScript逐步实现了一个基本的3D软引擎。 我不懂上面提到的语言,所以,准备用我熟悉的C++和Win32实现重造这个轮子。:) 注意: 正文: 本文将实现下面这个小玩意(仅仅使用Win32中的SetPixel()函数): 源码下载:链接: http://pan.baidu.com/s/1kTidLYn 密码: 5qul (注:源码中使用了一点C++11的特性,请使用支持C++11的编译器编译) 1.创建窗口. 要绘制东西,首先要有一个窗口,为此我们设计一个BasicGame类: BasicGame.h BasicGame.cpp BasicGame简单的对窗口创建进行了封装,其中 是为了后面实现游戏循环预留的接口,我们要创建窗口,只需要继承BasicGame就可以了。 2.游戏循环。 利用上面的类,我们便可以这样写WinMain()函数: 换成 然后再NewGame类中实现init(),render(),quit(),update(float)四个函数即可。 GetTickCount()函数返回系统启动到现在经过的时间(毫秒),能存储的最大值约为49.71天,超过这个期限,就会归零,我们认为是无穷大即可。 我们用TimeSinceLastUpdate变量表示自从上一次执行update函数所经过的时间。 每次执行update函数,我们便减去一个TimePerFrame(每帧所耗费的时间)。 上面的示例中,TimePerFrame = 1.0f / 60.0f ,则update()函数每秒将被执行60次,无论你的电脑性能如何。这个特性对于视频游戏来说是非常非常重要的。 3.数学基础。 本文不是讨论3D数学的,所以直接使用了开源的数学库(GLM),关于这个库的用法请看这篇博文。 4.Camera & Mesh。 现在可以开始我们的软引擎的编码了。:) 首先,我们需要定义Camera和Mesh两个结构体,其中Mesh用来表示3D空间中的一个物体。 代码如下: 举例来说,如果你用Mesh来描述一个立方体: 通常只需要这样做: 5.Device. 有了Mesh,如何显示它呢? 我们知道,屏幕是二维的,而Mesh中的点是3维的,所以,如何把3维世界中的点画到二维的世界中是关键所在。 我们创建Device类,完成这项工作。 由第三部分提到的那篇博文,我们知道,最重要的部分在于下面的等式: 我们的Device类如下所示: 类的定义: 为了显示物体,我们创建自己的Game类: 类的定义: 好了,现在运行程序,可以看到立方体的8个顶点在屏幕中央开心的旋转 X) 我们现在要做的是在8个点之间连上线,使其看起来更舒服一些。 那么怎么画线呢?请看这里。 我们编写画线函数: 有3D基础的人都知道,3D里面最基本的元素就是三角形,如果能画三角形,我们就能画任何物体。 我们称一个三角形为一个“Face”,下面编写我们的Face类: 改写Mesh类: 现在,要显示一个四边形,我们只需要如下代码: 下面我们为此编写相应的代码: 现在我们只需要定义立方体的8个顶点和12个面,立方体就能正确地显示了: 现在我们的程序看起来象下面这样: 很神奇对吗?我们只用了一个画点的函数,就画出了这么好玩的东西,Awesome! ksco 2014.6.24 转载请注明出处。 使用Windows GDI 做一个3D”软引擎“-Part1,搜素材,soscw.com 使用Windows GDI 做一个3D”软引擎“-Part1 标签:des style class blog code java 原文地址:http://www.cnblogs.com/ksco/p/3D_SoftRender_Part1.html

1 #ifndef _BASIC_GAME_
2 #define _BASIC_GAME_
3
4 #include
 1 #include "BasicGame.h"
 2
 3 BasicGame::BasicGame()
 4 {
 5     width_ = 800;
 6     height_ = 600;
 7 }
 8
 9 bool BasicGame::create(HINSTANCE instance, int cmdShow)
10 {
11     registerClass(instance);
12
13     if(!windowInit(instance, cmdShow))
14     {
15         return false;
16     }
17
18     return true;
19 }
20
21 WORD BasicGame::registerClass(HINSTANCE instance)
22 {
23     WNDCLASSEX wcex;
24
25     wcex.cbSize = sizeof(WNDCLASSEX);
26
27     wcex.style            = CS_HREDRAW | CS_VREDRAW;
28     wcex.lpfnWndProc    = (WNDPROC)BasicGame::WndProc;
29     wcex.cbClsExtra        = 0;
30     wcex.cbWndExtra        = 0;
31     wcex.hInstance        = instance;
32     wcex.hIcon            = NULL;
33     wcex.hCursor        = LoadCursor(NULL, IDC_ARROW);
34     wcex.hbrBackground    = (HBRUSH)(COLOR_WINDOW+1);
35     wcex.lpszMenuName    = NULL;
36     wcex.lpszClassName    = "BasicGame";
37     wcex.hIconSm        = NULL;
38
39     return RegisterClassEx(&wcex);
40 }
41
42 bool BasicGame::windowInit(HINSTANCE instance, int cmdShow)
43 {
44     hwnd_ = CreateWindow(
45         "BasicGame",
46         caption_.c_str(),
47         WS_OVERLAPPEDWINDOW,
48         CW_USEDEFAULT,
49         0,
50         CW_USEDEFAULT,
51         0,
52         NULL,
53         NULL,
54         instance,
55         NULL);
56
57     if (!hwnd_)
58         return false;
59
60     MoveWindow(hwnd_,0,0,width_,height_,true);
61     ShowWindow(hwnd_, cmdShow);
62     UpdateWindow(hwnd_);
63
64     return true;
65 }
66
67 LRESULT CALLBACK  BasicGame::WndProc(HWND hWnd, UINT msg, WPARAM wParam, LPARAM lParam)
68 {
69     switch (msg)
70     {
71     case WM_DESTROY:
72         PostQuitMessage(0);
73         break;
74     }
75     return DefWindowProc(hWnd, msg, wParam, lParam);
76 }


1 virtual bool init(){return true;}
2 virtual void render(){}
3 virtual void quit(){}
4 virtual void update(float deltaTime){};
1 #include "BasicGame.h"
2 #include
1 std::unique_ptr
1 std::unique_ptr
1 #define GLM_FORCE_RADIANS
2 #include

 1 SoftEngine::Mesh mesh("Cube", 8);
 2
 3 mesh.vertices_[0] = glm::vec4(-1.f, 1.f, 1.f, 1.f);
 4 mesh.vertices_[1] = glm::vec4( 1.f, 1.f, 1.f, 1.f);
 5 mesh.vertices_[2] = glm::vec4(-1.f,-1.f, 1.f, 1.f);
 6 mesh.vertices_[3] = glm::vec4( 1.f,-1.f, 1.f, 1.f);
 7 mesh.vertices_[4] = glm::vec4(-1.f, 1.f,-1.f, 1.f);
 8 mesh.vertices_[5] = glm::vec4( 1.f, 1.f,-1.f, 1.f);
 9 mesh.vertices_[6] = glm::vec4( 1.f,-1.f,-1.f, 1.f);
10 mesh.vertices_[7] = glm::vec4(-1.f,-1.f,-1.f, 1.f);
1 auto transformMatrix = projectionMatrix * viewMatrix * worldMatrix;
 1 namespace SoftEngine
 2 {
 3     class Device
 4     {
 5     public:
 6
 7         Device(HWND hWnd);
 8
 9         ~Device();
10
11         void present();
12
13         void render(Camera camera, Mesh *meshes, int length);
14
15     private:
16
17         glm::vec2 TransformCoordinates(glm::vec4 vector, glm::mat4 transformation);
18
19         void putPixel(int x, int y, COLORREF color);
20
21         void drawPoint(glm::vec2 point);
22
23         glm::vec2 project(glm::vec4 coord, glm::mat4 transMat);
24     private:
25
26         byte *backBuffer_;
27         HWND hWnd_;
28         HDC hDc_;
29         HDC mDc_;
30         float width_;
31         float height_;
32         HBITMAP bmp_;
33
34     };
35 }
1 #include "SoftEngine.h"
2 #include
 1 #ifndef _GAME_
 2 #define _GAME_
 3
 4 #include "BasicGame.h"
 5 #include "SoftEngine.h"
 6 using namespace SoftEngine;
 7
 8 class Game : public BasicGame
 9 {
10 public:
11     Game();
12     virtual bool init();
13     virtual void render();
14     virtual void quit();
15     virtual void update(float deltaTime);
16
17 private:
18     Device device_;
19     Mesh mesh_;
20     Camera camera_;
21 };
22
23 #endif //_GAME_
 1 #include "Game.h"
 2
 3 Game::Game()
 4     :device_()
 5     ,mesh_("Cube", 8)
 6     ,camera_()
 7 {}
 8
 9 bool Game::init()
10 {
11     device_.init(getHwnd());
12
13     mesh_.vertices_[0] = glm::vec4(-1.f, 1.f, 1.f, 1.f);
14     mesh_.vertices_[1] = glm::vec4( 1.f, 1.f, 1.f, 1.f);
15     mesh_.vertices_[2] = glm::vec4(-1.f,-1.f, 1.f, 1.f);
16     mesh_.vertices_[3] = glm::vec4( 1.f,-1.f, 1.f, 1.f);
17     mesh_.vertices_[4] = glm::vec4(-1.f, 1.f,-1.f, 1.f);
18     mesh_.vertices_[5] = glm::vec4( 1.f, 1.f,-1.f, 1.f);
19     mesh_.vertices_[6] = glm::vec4( 1.f,-1.f,-1.f, 1.f);
20     mesh_.vertices_[7] = glm::vec4(-1.f,-1.f,-1.f, 1.f);
21
22     mesh_.position_ = glm::vec3(0.5f, 1.0f, 0.0f);
23
24     mesh_.rotation_ = 0.f;
25
26     camera_.position_ =  glm::vec3(0, 0, 10.f);
27     camera_.target_ = glm::vec3(0.f);
28
29     return true;
30 }
31
32 void Game::render()
33 {
34     device_.render(camera_, &mesh_, 1);
35
36     device_.present();
37 }
38
39 void Game::quit()
40 {
41
42 }
43
44 void Game::update(float deltaTime)
45 {
46     mesh_.rotation_ += 0.4f * deltaTime;
47     if(mesh_.rotation_ > 360.f)
48         mesh_.rotation_ = 0.f;
49 }

 1 void Device::drawBresenhamLine(glm::vec2 point0, glm::vec2 point1)
 2 {
 3     int x0 = (int)point0.x;
 4     int y0 = (int)point0.y;
 5     int x1 = (int)point1.x;
 6     int y1 = (int)point1.y;
 7
 8     auto dx = abs(x1 - x0);
 9     auto dy = abs(y1 - y0);
10     auto sx = (x0 1 : -1;
11     auto sy = (y0 1 : -1;
12     auto err = dx - dy;
13
14     while (true)
15     {
16         drawPoint(glm::vec2(x0, y0));
17
18         if ((x0 == x1) && (y0 == y1)) break;
19         auto e2 = 2 * err;
20         if (e2 > -dy) { err -= dy; x0 += sx; }
21         if (e2  sy; }
22     }
23 }
 1 struct Face
 2 {
 3     int a_;
 4     int b_;
 5     int c_;
 6
 7     void set(int a, int b, int c)
 8     {
 9         a_ = a;
10         b_ = b;
11         c_ = c;
12     }
13 };
 1 struct Mesh
 2 {
 3     std::string name_;
 4     glm::vec3 position_;
 5     float rotation_;
 6     glm::vec4 *vertices_;
 7     int verticesCount_;
 8     Face *faces_;
 9     int facesCount_;
10
11     Mesh(std::string name, int verticesCount, int facesCount)
12     {
13         verticesCount_ = verticesCount;
14         vertices_ = new glm::vec4 [verticesCount_];
15         facesCount_ = facesCount;
16         faces_ = new Face [facesCount_];
17
18         name_ = name;
19     }
20     ~Mesh()
21     {
22         delete vertices_;
23         delete faces_;
24     }
25 };
1 mesh_.vertices_[0] = glm::vec4(-1.f, 1.f, 1.f, 1.f);
2 mesh_.vertices_[1] = glm::vec4( 1.f, 1.f, 1.f, 1.f);
3 mesh_.vertices_[2] = glm::vec4(-1.f,-1.f, 1.f, 1.f);
4 mesh_.vertices_[3] = glm::vec4( 1.f,-1.f, 1.f, 1.f);
5
6 mesh_.faces_[0 ].set(0, 1, 2);
7 mesh_.faces_[1 ].set(1, 2, 3);
 1 auto &curMesh = meshes[i];
 2
 3 for(int j = 0; j )
 4 {
 5     auto &face = curMesh.faces_[j];
 6
 7     auto vertexA = curMesh.vertices_[face.a_];
 8     auto vertexB = curMesh.vertices_[face.b_];
 9     auto vertexC = curMesh.vertices_[face.c_];
10
11     auto pixelA = project(vertexA, transformMatrix);
12     auto pixelB = project(vertexB, transformMatrix);
13     auto pixelC = project(vertexC, transformMatrix);
14
15     drawBresenhamLine(pixelA, pixelB);
16     drawBresenhamLine(pixelB, pixelC);
17     drawBresenhamLine(pixelC, pixelA);
18 }
 1 mesh_.vertices_[0] = glm::vec4(-1.f, 1.f, 1.f, 1.f);
 2 mesh_.vertices_[1] = glm::vec4( 1.f, 1.f, 1.f, 1.f);
 3 mesh_.vertices_[2] = glm::vec4(-1.f,-1.f, 1.f, 1.f);
 4 mesh_.vertices_[3] = glm::vec4( 1.f,-1.f, 1.f, 1.f);
 5 mesh_.vertices_[4] = glm::vec4(-1.f, 1.f,-1.f, 1.f);
 6 mesh_.vertices_[5] = glm::vec4( 1.f, 1.f,-1.f, 1.f);
 7 mesh_.vertices_[6] = glm::vec4( 1.f,-1.f,-1.f, 1.f);
 8 mesh_.vertices_[7] = glm::vec4(-1.f,-1.f,-1.f, 1.f);
 9
10 mesh_.faces_[0 ].set(0, 1, 2);
11 mesh_.faces_[1 ].set(1, 2, 3);
12 mesh_.faces_[2 ].set(1, 3, 6);
13 mesh_.faces_[3 ].set(1, 5, 6);
14 mesh_.faces_[4 ].set(0, 1, 4);
15 mesh_.faces_[5 ].set(1, 4, 5);
16
17 mesh_.faces_[6 ].set(2, 3, 7);
18 mesh_.faces_[7 ].set(3, 6, 7);
19 mesh_.faces_[8 ].set(0, 2, 7);
20 mesh_.faces_[9 ].set(0, 4, 7);
21 mesh_.faces_[10].set(4, 5, 6);
22 mesh_.faces_[11].set(4, 6, 7);

文章标题:使用Windows GDI 做一个3D”软引擎“-Part1
文章链接:http://soscw.com/essay/27422.html