Spring学习
2020-12-13 03:27
标签:测试的 产生 下载地址 自动注入 eth 可重复 ssr 维护 Servle Spring是一个开源框架,Spring是于2003 年兴起的一个轻量级的Java 开发框架,由Rod Johnson 在其著作Expert One-On-One J2EE Development and Design中阐述的部分理念和原型衍生而来。它是为了解决企业应用开发的复杂性而创建的。框架的主要优势之一就是其分层架构,分层架构允许使用者选择使用哪一个组件,同时为 J2EE 应用程序开发提供集成的框架。Spring使用基本的JavaBean来完成以前只可能由EJB完成的事情。然而,Spring的用途不仅限于服务器端的开发。从简单性、可测试性和松耦合的角度而言,任何Java应用都可以从Spring中受益。Spring的核心是控制反转(IoC)和面向切面(AOP)。简单来说,Spring是一个分层的JavaSE/EE full-stack(一站式) 轻量级开源框架。 ◆JAVA EE应该更加容易使用。 ◆面向对象的设计比任何实现技术(比如JAVA EE)都重要。 ◆面向接口编程,而不是针对类编程。Spring将使用接口的复杂度降低到零。(面向接口编程有哪些复杂度?) ◆代码应该易于测试。Spring框架会帮助你,使代码的测试更加简单。 ◆JavaBean提供了应用程序配置的最好方法。 ◆在Java中,已检查异常(Checked exception)被过度使用。框架不应该迫使你捕获不能恢复的异常。 控制反转(Inversion of Control,缩写为IoC),是面向对象编程中的一种设计原则,可以用来减低计算机代码之间的耦合度。其中最常见的方式叫做依赖注入(Dependency Injection,简称DI),还有一种方式叫“依赖查找”(Dependency Lookup)。通过控制反转,对象在被创建的时候,由一个调控系统内所有对象的外界实体将其所依赖的对象的引用传递给它。也可以说,依赖被注入到对象中。 ◆ IOC 就是把创建对象的控制权交给Spring来管理,我们只要向容器提出需求,容器就会按需求提供相应的对象,这就叫"控制反转" ◆ DI(依赖注入) 多个对象之间会存在相应关系,我们把其它对象作为属性值传递给其它的对象做为其内部的一部分.(设置对象之间的关联关系) 3.1 什么是耦合? 对象之间产生的一种关联关系 ◆ 强耦合:就是在编译器就产生了关联关系 ◆ 硬编码 下载地址:https://spring.io/ 1. 导入Spring jar包 2. 配置Spring核心配置文件(applicationContext.xml) (bean标签配置需要创建的对象) 3. 编写测试类 5.1 Spring 构建Bean对象的方式 ◆ 使用反射去创建对象,默认会调用无参构造函数(重点) ◆ 使用普通工厂来创建对象 ◆ 使用静态工厂来创建bean对象 6.XML注入方式 1. 构造器注入(会用) 2. set注入方式(重点) ◆ 基本类型数据的注入使用value属性来注入,自定义的引用数据类型使用ref来给属性注入 ◆ set注入必须要有五参数构造函数,内部通过反射机制调用无参构造函数来创建对象的. 3. P命名空间注入方式(Spring2.5以后才有) ◆ 引入P命名空间 ◆ 编写注入语法 4.spel(Spring Expression Language)注入方式 5.复杂类型数据的注入 java实体类 配置spring配置文件 ◆ 单例(singon)时对象的生命周期 ◆ BeanFactory 是ApplicationContext接口的父接口,ApplicationContext功能更强大 ◆ ApplicationContext 容器在创建的时候就会对配置文件的scope为singleton的对象进行统一创建,而BeanFactory容器在创建的时候不会对作用范围为singleton的对象进行统一创建,而是在获取对象的时候在创建. ◆ @Component 基本注释 ◆ @Service 注释业务层 ◆ @Controller 注释控制层 ◆ @Resposity 注释持久层(dao层) 以上的功能完全一样,只是注解名字不同,在分层架构中可读性更好 ◆ @AutoWired 自动注入,默认是根据类型来注入的,也就是说它会从容器中找唯一相关类型的对象注入进来 ◆ @Primary 当有两个相同类型对象的时候,以@Primary修饰的对象来进行注入 ◆ @Quali?er 往往 配合@AutoWired 来使用,先以类型来注入,当类型相同的时候再按@Quali?er指定的名字来注入,不能单独使用的 ◆ @Resource 等同于@Autowired 和 @Quali?er的组合,假设不给name属性,默认按类型来注入,给name属性值,那就按名字来注入 ◆ @Scope("prototype") 注解 来声明对象在容器中作用范围,主要值sigleton和prototype db.properties 连接数据库的配置 11.1 Spring 整合 DBUtils 和 C3P0 11.2.Spring 整合 JDBCTemplate 和 DRUID 11.3.Spring 整合junit (让测试类代码更简单) ◆ 我们一般通过main方法来运行程序 首先导入Spring-test jar包 测试类写法1.概念
2.Spring优点
3.IOC
◆ 不利于维护和扩展
◆ 低耦合:就是在运行期间让对象之间产生关联
◆ 使用反射来创建对来
◆ 对象的完整限定名放到配置文件中
◆ 解决了硬编码问题,有利于程序后期的维护和扩展
Spring IOC 容器就能帮们解决以上的问题4.Spring下载
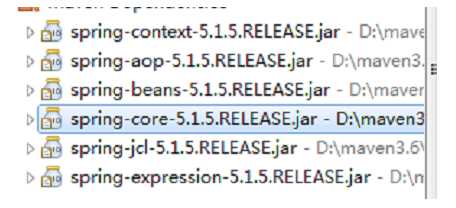
5.开发第一个Spring程序

1
2
package com.hwua.test;
import org.junit.Test;
import org.springframework.context.ApplicationContext;
import org.springframework.context.support.ClassPathXmlApplicationContext;
import com.hwua.entity.Student;
public class SpringTest {
    @Test
    public void test() {
      //创建一个工厂,根据配置文件来创建对象放到容器中,通过工厂可以从容器中获取对象
        //初始化IOC容器
        ApplicationContext context = new ClassPathXmlApplicationContext("applicationContext.xml");
        Student student = (Student)context.getBean("student");
        System.out.println(student);
    }
}
1
 1 package com.hwua.factory;
 2 import com.hwua.dao.UserDao;
 3 import com.hwua.dao.impl.UserDaoJDBCImpl;
 4 /**
 5  * 普通工厂类
 6  *
 7  * @author Administrator
 8  *
 9  */
10 public class BeanFactroy1 {
11     public UserDao createUserDao() {
12     return new UserDaoJDBCImpl();
13     }
14 }
   package com.hwua.factory;
    import com.hwua.dao.UserDao;
    import com.hwua.dao.impl.UserDaoJDBCImpl;
    import com.hwua.dao.impl.UserDaoMyBatisImpl;

    /**
     * 静态工厂类
     *
     * @author Administrator
     *
     */
public class BeanFactroy2 {
        public static UserDao createUserDao() {
        return new UserDaoMyBatisImpl();
        }
}

然后在spring的配置文件中 配置 userDaoMyBatis对象,条用静态工厂中的createUserDao方法
 1
 2  constructor-arg value="1">constructor-arg>
 3  constructor-arg value="陈豪">constructor-arg>
 4  constructor-arg value="20">constructor-arg>
 5  6
 7  constructor-arg value="陈豪" index="1">constructor-arg>
 8  constructor-arg value="1" index="0">constructor-arg>
 9  constructor-arg value="20" index="2">constructor-arg>
10
11 constructor-arg value="20" type="java.lang.Integer" index="2">constructor-arg>
13 constructor-arg value="陈豪" type="java.lang.String">constructor-arg>
15 constructor-arg value="1" type="java.lang.Integer" name="age">constructor-arg>
17 记住只要记住使用name,根据参数的名来来进行赋值
18 constructor-arg value="1"  name="age">constructor-arg>
◆ 属性必须要有对象的get和set方法 1
2 bean id="student" class="com.hwua.entity.Student">
3 property name="id" value="1">property>
4 property name="name" value="zhangsan">property>
5 property name="age" value="30">property>
6 property name="car" ref="car">property>
7
8 bean>
9
10 bean id="car" class="com.hwua.entity.Car">
11 property name="brand" value="奔驰">property>
12 property name="price" value="300000">property>
13 bean>
1          xmlns:p="http://www.springframework.org/schema/p"
2          xmlns:c="http://www.springframework.org/schema/c"
 1
 2 bean id="student" class="com.hwua.entity.Student" c:_0="1" c:_1="张三" c:_2="30" c:_3-ref="car">bean>
 3 bean id="car" class="com.hwua.entity.Car" c:_0="奔驰" c:_1="300000">bean>
 4
 5 bean id="car" class="com.hwua.entity.Car" p:brand="奔驰" p:price="300000">bean>
 6 bean id="student" class="com.hwua.entity.Student" p:id="1" p:name="张三" p:age="30" p:car-ref="car">bean>
 1  bean id="car" class="com.hwua.entity.Car">
 2       property name="brand" value="#{‘奔驰‘}">property>
 3        property name="price" value="#{300000}">property>
 4   bean>
 6   bean id="student" class="com.hwua.entity.Student">
 7         property name="id" value="#{1+1}">property>
 8         property name="name" value="#{‘zhangsan‘}">property>
 9         property name="age" value="#{30}">property>
10         property name="car" value="#{car}">property>
11    bean>
1 package com.hwua.entity;
2
3 import java.util.List;
4 import java.util.Map;
5 import java.util.Properties;
6 import java.util.Set;
7
8 public class ComplexData {
9 private List
 1 xml version="1.0" encoding="UTF-8"?>
 2 beans xmlns="http://www.springframework.org/schema/beans"
 3     xmlns:xsi="http://www.w3.org/2001/XMLSchema-instance"
 4     xmlns:p="http://www.springframework.org/schema/p"
 5     xmlns:c="http://www.springframework.org/schema/c"
 6     xsi:schemaLocation="http://www.springframework.org/schema/beans
 7 http://www.springframework.org/schema/beans/spring-beans-4.3.xsd">
 8     bean id="car1" class="com.hwua.entity.Car">
 9       property name="brand">
10
11        null/>
12       property>
13       property name="price" value="40000">property>
14     bean>
15 bean id="car2" class="com.hwua.entity.Car">
16       property name="brand" value="宝马">property>
17       property name="price" value="30000">property>
18  bean>
19     bean id="car3" class="com.hwua.entity.Car">
20       property name="brand" value="奥迪">property>
21       property name="price" value="25000">property>
22     bean>
23
24     bean id="data" class="com.hwua.entity.ComplexData">
25
26       property name="list">
27          list>
28             --引用数据类型的放入-->
29             ref bean="放入的对象引用"/>
30             --j基本数据类型的放入-->
31             value>chenhao1value>
32             value>chenhao2value>
33             value>chenhao3value>
34             value>chenhao4value>
35          list>
36       property>
37
38
39       property name="set">
40          set>
41             value>chenhao4value>
42             value>chenhao5value>
43             value>chenhao6value>
44             value>chenhao7value>
45          set>
46       property>
47
48
49       property name="map">
50          map>
51            entry key="jack" value="老王">entry>
52            entry key="frank" value="老陈">entry>
53            entry key="mary" value="老李">entry>
54          map>
55       property>
56
57
58       property name="properties">
59          props>
60            prop key="frank">老王prop>
61            prop key="jack">老陈prop>
62            prop key="mary">老李prop>
63          props>
64       property>
65
66
67       property name="arr">
68          array>
69            ref bean="car1"/>
70            ref bean="car2"/>
71            ref bean="car3"/>
72          array>
73       property>
74  bean>
75 beans>
6.ApplicationContext接口的三个实现类区别
1 - ClassPathXmlApplicationContext :加载类路径下的spring配置文件,相对定位
2 - FileSystemXmlApplicationContext:加载文件系统路径下的Spring配置文件,绝对定位(不推荐)
3 - AnnotationConfigApplicationContext:加载注解配置类,也就是说以后的配置信息写到一个配置类中,不用xml文件来作为配置文件(后续会讲)
7.Bean的作用范围(scope)
1 -  singleton   在容器中始终只产生一个对象
2 -  prototype 在向容器获取多次bean的时候,会产生多个bean对象
3 -  request 在request作用域中存入一个bean对象
4 -  session 在session作用域中存入一个bean对象
8.Bean的生命周期
◆ 创建时机: 容器创建的时候对象创建
◆ 销毁时机: 容器关闭的时候对象就销毁
◆ 多例(prototype)时对象的生命周期
◆ 创建时机: 当要从容器中获取指定对象的时候,就会由Spring来创建一个对象,延迟创建
◆ 销毁时机:当对象长时间不被使用,或对象的引用为null的时候,有JVM的垃圾回收器来执行回收9.ApplicationContext容器和BeanFactory容器有什么区别?
10.IOC中常用的注解
1 @Autowired
2 @Qualifier("userDaoMyBatis")
◆ 以上几个注解都只能注入bean数据类型的数据,基础类型的数据(8大基本数据类型和String),是不能用上述注解来注入的
◆ @PostConstruct 修饰的方法就是对象创建时要执行的方法
◆ @PreDestroy 修饰的方法是在对象销毁的时候要执行的方法
◆ @Value 注解给属性赋值基本类型的数据 11. 案例的使用,使用XML的方式来实现增删改查的操作 (spring的配置文件)
1 jdbc.driver=com.mysql.cj.jdbc.Driver
2 jdbc.url=jdbc:mysql://localhost:7766/mybatisdb
3 jdbc.username=root
4 jdbc.password=12345678
xml version="1.0" encoding="UTF-8"?>
beans xmlns="http://www.springframework.org/schema/beans"
    xmlns:xsi="http://www.w3.org/2001/XMLSchema-instance"
    xmlns:context="http://www.springframework.org/schema/context"
    xsi:schemaLocation="http://www.springframework.org/schema/beans
              http://www.springframework.org/schema/beans/spring-beans.xsd
                  http://www.springframework.org/schema/context
                http://www.springframework.org/schema/context/spring-context-4.3.xsd">


    context:property-placeholder location="classpath:db.properties"/>

    bean id="userService" class="com.hwua.service.impl.UserServiceImpl">
      property name="userDao" ref="userDao">property>
    bean>

    bean id="userDao" class="com.hwua.dao.impl.UserDaoImpl">
      property name="qr" ref="runner">property>
    bean>

    bean id="runner" class="org.apache.commons.dbutils.QueryRunner" scope="prototype">
       constructor-arg name="ds" ref="dataSource">constructor-arg>
    bean>

    bean id="dataSource" class="com.mchange.v2.c3p0.ComboPooledDataSource">
       property name="driverClass" value="${jdbc.driver}">property>
       property name="jdbcUrl" value="${jdbc.url}">property>
       property name="user" value="${jdbc.username}">property>
       property name="password" value="${jdbc.password}">property>
    bean>
beans> 1 xml version="1.0" encoding="UTF-8"?>
2 beans xmlns="http://www.springframework.org/schema/beans"
3 xmlns:xsi="http://www.w3.org/2001/XMLSchema-instance"
4 xmlns:context="http://www.springframework.org/schema/context"
5 xsi:schemaLocation="http://www.springframework.org/schema/beans
6 http://www.springframework.org/schema/beans/spring-beans.xsd
7 http://www.springframework.org/schema/context
8 http://www.springframework.org/schema/context/spring-context-4.3.xsd">
9
10 context:property-placeholder location="classpath:db.properties"/>
11
12
13 bean id="userService" class="com.hwua.service.impl.UserServiceImpl">
14 property name="userDao" ref="userDao">property>
15 bean>
16
17
18 bean id="userDao" class="com.hwua.dao.impl.UserDaoImpl">
19 property name="jTemplate" ref="jdbcTemplate">property>
20 bean>
21
22 bean id="jdbcTemplate" class="org.springframework.jdbc.core.JdbcTemplate">
23 property name="dataSource" ref="dataSource">property>
24 bean>
25
26 bean id="dataSource" class="com.alibaba.druid.pool.DruidDataSource">
27 property name="driverClassName" value="${jdbc.driver}">property>
28 property name="url" value="${jdbc.url}">property>
29 property name="username" value="${jdbc.username}">property>
30 property name="password" value="${jdbc.password}">property>
31 bean>
32 beans>
◆ 单元测试类其实它底层继承了一个main方法,当运行的时候会调用运行那些有@Test修饰的方法
◆ 我们可以使用Spring整合Junit来简化单元测试的复杂度 1 package com.hwua.test;
2
3 import org.junit.Test;
4 import org.junit.runner.RunWith;
5 import org.springframework.beans.factory.annotation.Autowired;
6 import org.springframework.beans.factory.annotation.Qualifier;
7 import org.springframework.context.ApplicationContext;
8 import org.springframework.context.support.ClassPathXmlApplicationContext;
9 import org.springframework.test.context.ContextConfiguration;
10 import org.springframework.test.context.junit4.SpringJUnit4ClassRunner;
11 import com.hwua.service.AccountService;
12
13 @RunWith(SpringJUnit4ClassRunner.class)
14 @ContextConfiguration("classpath:beans.xml")
15 public class AccountTest {
16 @Autowired
17 private AccountService accountService=null;
18 @Test
19 public