【Spring】基于@Aspect的AOP配置
2020-12-13 06:04
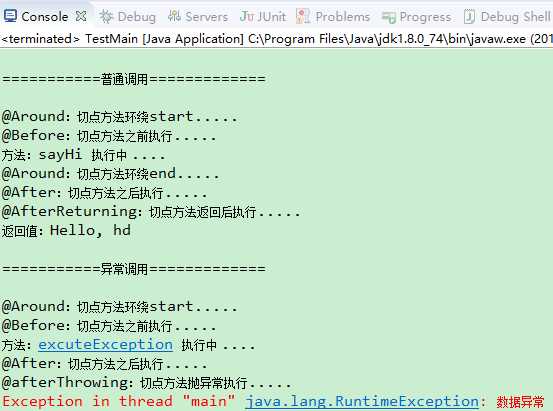
标签:around 否则 sys target 方法返回值 访问 ESS alt 引入 Spring AOP面向切面编程,可以用来配置事务、做日志、权限验证、在用户请求时做一些处理等等。用@Aspect做一个切面,就可以直接实现。 · 本例演示一个基于@Aspect的小demo 1、新建一个Maven工程 2、引入相关maven依赖 3、新建一个SimpleAspect.java类,如下: 4、新建一个AspectService.java类,如下: 5、新建一个spring配置文件applicationContext.xml,如下: 6、新建一个测试类,如下: 7、运行测试类,结果如下: 【Spring】基于@Aspect的AOP配置 标签:around 否则 sys target 方法返回值 访问 ESS alt 引入 原文地址:https://www.cnblogs.com/h--d/p/11165240.html

 1 project xmlns="http://maven.apache.org/POM/4.0.0"
 2     xmlns:xsi="http://www.w3.org/2001/XMLSchema-instance"
 3     xsi:schemaLocation="http://maven.apache.org/POM/4.0.0 http://maven.apache.org/xsd/maven-4.0.0.xsd">
 4     modelVersion>4.0.0modelVersion>
 5     groupId>com.testgroupId>
 6     artifactId>test-spring-aopartifactId>
 7     version>0.0.1-SNAPSHOTversion>
 8
 9
10     properties>
11
12         spring.version>5.1.4.RELEASEspring.version>
13     properties>
14
15     dependencies>
16
17         dependency>
18             groupId>org.springframeworkgroupId>
19             artifactId>spring-coreartifactId>
20             version>${spring.version}version>
21         dependency>
22
23         dependency>
24             groupId>org.springframeworkgroupId>
25             artifactId>spring-beansartifactId>
26             version>${spring.version}version>
27         dependency>
28
29         dependency>
30             groupId>org.springframeworkgroupId>
31             artifactId>spring-contextartifactId>
32             version>${spring.version}version>
33         dependency>
34
35         dependency>
36             groupId>org.springframeworkgroupId>
37             artifactId>spring-expressionartifactId>
38             version>${spring.version}version>
39         dependency>
40
41
42         dependency>
43             groupId>org.springframeworkgroupId>
44             artifactId>spring-aopartifactId>
45             version>${spring.version}version>
46         dependency>
47
48         dependency>
49             groupId>org.aspectjgroupId>
50             artifactId>aspectjrtartifactId>
51             version>1.9.2version>
52         dependency>
53
54         dependency>
55             groupId>org.aspectjgroupId>
56             artifactId>aspectjweaverartifactId>
57             version>1.9.2version>
58         dependency>
59
60     dependencies>
61 project>
package com.test.aop;

import org.aspectj.lang.JoinPoint;
import org.aspectj.lang.ProceedingJoinPoint;
import org.aspectj.lang.annotation.After;
import org.aspectj.lang.annotation.AfterReturning;
import org.aspectj.lang.annotation.AfterThrowing;
import org.aspectj.lang.annotation.Around;
import org.aspectj.lang.annotation.Aspect;
import org.aspectj.lang.annotation.Before;
import org.aspectj.lang.annotation.Pointcut;
import org.springframework.stereotype.Component;

/**
 * @Auther: chenheng
 * @Date: 2019/7/10 11:56
 * @Description:
 */

@Aspect
@Component
public class SimpleAspect {

    /**
     * 切点表达式:
     *     ..两个点表明多个,*代表一个
     *     表达式代表切入com..service包下的所有类的所有方法,方法参数不限,返回类型不限。
     *  其中访问修饰符可以不写,不能用*,,第一个*代表返回类型不限,第二个*表示所有类,第三个*表示所有方法,..两个点表示方法里的参数不限。
     */
    private final String POINT_CUT = "execution(* com..service.*.*(..))";

    /**
     * 命名切点
     * public 切点可访问性修饰符
     *         与类可访问性修饰符的功能是相同的,它可以决定定义的切点可以在哪些类中可使用。
     * pointCut 切点名称
     * void   返回类型
     *
     *     因为命名切点仅利用方法名及访问修饰符的信息,
     *  一般定义方法的返回类型为 void ,并且方法体为空
     */
    @Pointcut(POINT_CUT)
    public void pointCut(){}


    /**
     * 在切点方法之前执行
     * @param joinPoint
     */
    @Before(value="pointCut()")
    public void doBefore(JoinPoint joinPoint){
        System.out.println("@Before:切点方法之前执行.....");
    }


    /**
     * 在切点方法之后执行
     * @param joinPoint
     */
    @After(value="pointCut()")
    public void doAfter(JoinPoint joinPoint){
        System.out.println("@After:切点方法之后执行.....");
    }


    /**
    * 切点方法返回后执行
    *     如果第一个参数为JoinPoint,则第二个参数为返回值的信息
    *     如果第一个参数不为JoinPoint,则第一个参数为returning中对应的参数
    *     returning:限定了只有目标方法返回值与通知方法参数类型匹配时才能执行后置返回通知,否则不执行,
    *     参数为Object类型将匹配任何目标返回值
    */
    @AfterReturning(value = "pointCut()",returning = "result")
    public void doAfter(JoinPoint joinPoint,Object result){
        System.out.println("@AfterReturning:切点方法返回后执行.....");
        System.out.println("返回值:"+result);
    }


    /**
     * 切点方法抛异常执行
     *     定义一个名字,该名字用于匹配通知实现方法的一个参数名,当目标方法抛出异常返回后,将把目标方法抛出的异常传给通知方法;
     *     throwing:限定了只有目标方法抛出的异常与通知方法相应参数异常类型时才能执行后置异常通知,否则不执行,
     *     对于throwing对应的通知方法参数为Throwable类型将匹配任何异常。
     * @param joinPoint
     * @param exception
     */
     @AfterThrowing(value = "pointCut()",throwing = "exception")
     public void doAfterThrowing(JoinPoint joinPoint,Throwable exception){
         System.out.println("@afterThrowing:切点方法抛异常执行.....");
     }


     /**
      *
      * 属于环绕增强,能控制切点执行前,执行后,,用这个注解后,程序抛异常,会影响@AfterThrowing这个注解
      *
      * org.aspectj.lang.JoinPoint 接口表示目标类连接点对象,它定义这些主要方法。
      * Object[] getArgs():获取连接点方法运行时的入参列表。
      * Signature getSignature():获取连接点的方法签名对象。
      * Object getTarget():获取连接点所在的目标对象。
      * Object getThis():获取代理对象。
      * @param pjp
      * @return
      * @throws Throwable
      */
     @Around(value="pointCut()")
     public Object doAround(ProceedingJoinPoint pjp) throws Throwable{
         System.out.println("@Around:切点方法环绕start.....");
         Object[] args = pjp.getArgs();
         Object o = pjp.proceed(args);
         System.out.println("@Around:切点方法环绕end.....");
         return o;
     }

}
 1 package com.test.service;
 2
 3 import org.springframework.stereotype.Service;
 4
 5 @Service
 6 public class AspectService {
 7
 8     public String sayHi(String name)
 9     {
10         System.out.println("方法:sayHi 执行中 ....");
11         return"Hello, " + name;
12     }
13
14     public void excuteException()
15     {
16         System.out.println("方法:excuteException 执行中 ....");
17         int n = 1;
18         if(n > 0) {
19             throw new RuntimeException("数据异常");
20         }
21     }
22
23
24 }
xml version="1.0" encoding="UTF-8"?>
beans xmlns="http://www.springframework.org/schema/beans"
    xmlns:xsi="http://www.w3.org/2001/XMLSchema-instance"
    xmlns:context="http://www.springframework.org/schema/context"
    xmlns:aop="http://www.springframework.org/schema/aop"
    xmlns:mybatis-spring="http://mybatis.org/schema/mybatis-spring"
    xmlns:tx="http://www.springframework.org/schema/tx"
    xsi:schemaLocation="http://www.springframework.org/schema/beans http://www.springframework.org/schema/beans/spring-beans.xsd
        http://mybatis.org/schema/mybatis-spring http://mybatis.org/schema/mybatis-spring-1.2.xsd
        http://www.springframework.org/schema/tx http://www.springframework.org/schema/tx/spring-tx-4.0.xsd
        http://www.springframework.org/schema/context http://www.springframework.org/schema/context/spring-context-4.0.xsd
        http://www.springframework.org/schema/aop http://www.springframework.org/schema/aop/spring-aop-4.0.xsd">


    context:component-scan base-package="com.test">context:component-scan>


    aop:aspectj-autoproxy proxy-target-class="true" />

beans>
 1 package com.test.main;
 2
 3 import org.springframework.context.ApplicationContext;
 4 import org.springframework.context.support.ClassPathXmlApplicationContext;
 5
 6 import com.test.service.AspectService;
 7
 8 public class TestMain {
 9
10     public static void main(String[] args) {
11
12         // ClassPathXmlApplicationContext默认是加载src目录下的xml文件
13         ApplicationContext context = new ClassPathXmlApplicationContext("applicationContext.xml");
14
15         AspectService aservice = context.getBean(AspectService.class);
16         System.out.println("\n===========普通调用=============\n");
17
18         aservice.sayHi("hd");
19
20         System.out.println("\n===========异常调用=============\n");
21
22         aservice.excuteException();
23
24         System.out.println("\n========================\n");
25     }
26
27 }
