标签:style blog http io color ar os 使用 for
自己琢磨Socket刚刚几天,所以整理出来和大家共享一下。废话少说直接进入正题。
在C#中提供了两种网络服务,一种是Socket类,另一种是TcpListener(服务器),TcpClient(客户端);
至于这两种有什么区别那;MSDN上是这样解释的:
TcpClient 类,TcpListener 类提供了一些简单的方法,用于在同步阻止模式下通过网络来连接、发送和接收流数据。
Socket 类为网络通信提供了一套丰富的方法和属性。 Socket 类允许您使用 ProtocolType 枚举中所列出的任何一种协议执行异步和同步数据传输。
个人理解就是一个是用于简单的业务,一种用于复杂的业务。所以感觉是一样的。本文事例主要用Socket类来实现。一般来说复杂的会了,简单的应该也差不多了。
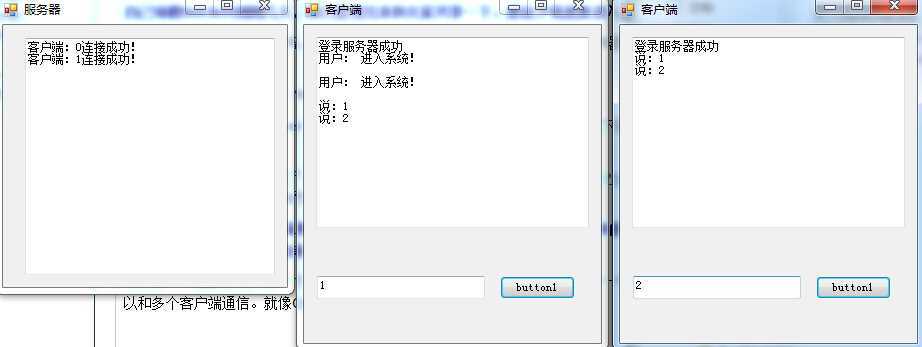
先从第一个情景来说:第一个就是建立多人聊天的模式,就是多个客户端连接一个服务器,然后可以和多个客户端通信。就像QQ里的群聊。

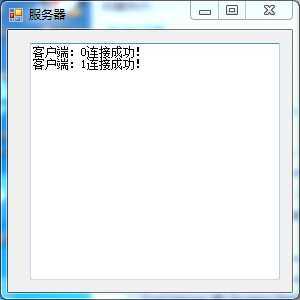
首先我们来见一个服务器:

就包含一个文本框就行了,里边具体代码如下:
 1     public partial class server : Form
 2     {
 3         private IPEndPoint ServerInfo;//存放服务器的IP和端口信息
 4         private Socket ServerSocket;//服务端运行的SOCKET
 5         private Thread ServerThread;//服务端运行的线程
 6         private Socket[] ClientSocket;//为客户端建立的SOCKET连接
 7         private int ClientNumb;//存放客户端数量
 8         private byte[] MsgBuffer;//存放消息数据
 9
10         private object obj;
11
12         public server()
13         {
14             InitializeComponent();
15             ListenClient();
16         }
17
18         ///
19         /// 开始服务,监听客户端
20         ///
21         private void ListenClient()
22         {
23             try
24             {
25                 ServerSocket = new Socket(AddressFamily.InterNetwork, SocketType.Stream, ProtocolType.Tcp);
26                 IPAddress ip = IPAddress.Parse("127.0.0.1");
27                 ServerInfo = new IPEndPoint(ip, Int32.Parse("3000"));
28                 ServerSocket.Bind(ServerInfo);
29                 ServerSocket.Listen(10);
30
31                 ClientSocket = new Socket[65535];
32                 MsgBuffer = new byte[65535];
33                 ClientNumb = 0;
34
35                 ServerThread = new Thread(new ThreadStart(RecieveAccept));
36                 ServerThread.Start();
37             }
38             catch (System.Exception ex)
39             {
40
41             }
42         }
43
44         ///
45         /// 添加阻塞,监听客户端
46         ///
47         private void RecieveAccept()
48         {
49             while (true)
50             {
51                 //等待接受客户端连接,如果有就执行下边代码,没有就阻塞
52                 ClientSocket[ClientNumb] = ServerSocket.Accept();
53                 //接受客户端信息,没有阻塞,则会执行下边输出的代码;如果是Receive则不会执行下边输出代码
54                 ClientSocket[ClientNumb].BeginReceive(MsgBuffer, 0, MsgBuffer.Length, SocketFlags.None,
55                     new AsyncCallback(ReceiveCallback), ClientSocket[ClientNumb]);
56                 this.Invoke((MethodInvoker)delegate
57                 {
58                     lock (this.textBox1)
59                         this.textBox1.Text += "客户端:" + ClientNumb.ToString() + "连接成功!" + "\r\n";
60                 });
61                 ClientNumb++;
62             }
63         }
64
65         ///
66         /// 回发数据到客户端
67         ///
68         ///
69         private void ReceiveCallback(IAsyncResult ar)
70         {
71             try
72             {
73                 Socket rSocket = (Socket)ar.AsyncState;
74                 int rEnd = rSocket.EndReceive(ar);
75
76                 for (int i = 0; i )
77                 {
78                     if (ClientSocket[i].Connected)
79                     {
80                         //发送数据到客户端
81                         ClientSocket[i].Send(MsgBuffer, 0, rEnd, SocketFlags.None);
82                     }
83
84                     //同时接受客户端回发的数据,用于回发
85                     rSocket.BeginReceive(MsgBuffer, 0, MsgBuffer.Length, 0, new AsyncCallback(ReceiveCallback), rSocket);
86                 }
87             }
88             catch (System.Exception ex)
89             {
90
91             }
92         }
93     }
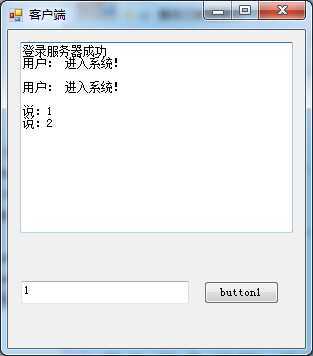
然后我们添加客户端代码,客户端要一个按钮和两个文本框

具体代码如下:
 1     public partial class Client : Form
 2     {
 3         private IPEndPoint ServerInfo;
 4         private Socket ClientSocket;
 5         private object obj;
 6
 7         //信息接收缓存
 8         private Byte[] MsgBuffer;
 9         //信息发送存储
10         private Byte[] MsgSend;
11
12         public Client()
13         {
14             InitializeComponent();
15             ConnectServer();
16             this.button1.Click += new EventHandler(button1_Click);
17         }
18
19         /// 20         /// 打开客户端,即连接服务器
21         /// 22         private void ConnectServer()
23         {
24             try
25             {
26                 ClientSocket = new Socket(AddressFamily.InterNetwork, SocketType.Stream, ProtocolType.Tcp);
27                 MsgBuffer = new byte[65535];
28                 MsgSend = new byte[65535];
29                 IPAddress ip = IPAddress.Parse("127.0.0.1");
30                 ServerInfo = new IPEndPoint(ip, Int32.Parse("3000"));
31                 ClientSocket.Connect(ServerInfo);
32                 //发送信息至服务器
33                 ClientSocket.Send(Encoding.Unicode.GetBytes("用户: 进入系统!" + "\r\n"));
34                 ClientSocket.BeginReceive(MsgBuffer, 0, MsgBuffer.Length, SocketFlags.None,
35                     new AsyncCallback(ReceiveCallback), null);
36                 this.textBox1.Text += "登录服务器成功" + "\r\n";
37             }
38             catch (System.Exception ex)
39             {
40
41             }
42         }
43
44         /// 45         /// 回调时调用
46         /// 47         ///
48         private void ReceiveCallback(IAsyncResult ar)
49         {
50             int rEnd = ClientSocket.EndReceive(ar);
51             this.Invoke((MethodInvoker)delegate
52                  {
53                      lock (this.textBox1)
54                      {
55                          this.textBox1.Text += Encoding.Unicode.GetString(MsgBuffer, 0, rEnd) + "\r\n";
56                      }
57                  });
58             ClientSocket.BeginReceive(MsgBuffer, 0, MsgBuffer.Length, 0, new AsyncCallback(ReceiveCallback), null);
59         }
60
61         /// 62         /// 发送信息
63         /// 64         ///
65         ///
66         private void button1_Click(object sender, EventArgs e)
67         {
68             MsgSend = Encoding.Unicode.GetBytes("说:\n" + this.textBox2.Text + "\n\r");
69             if (ClientSocket.Connected)
70             {
71                 ClientSocket.Send(MsgSend);
72             }
73         }
74
75     }
76 }
这样先运行服务器,在多运行几个客户端就可以了。
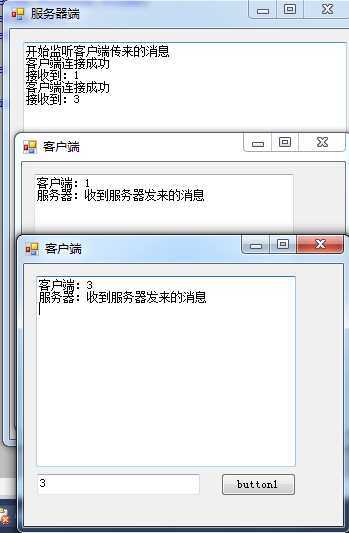
下边讲一下第二种案例:这种是多个客户端和服务器连接,每个客户端都可以和服务器通信,但是客户端之间没有通信,而且每个客户端和服务器通信时,不会影响其他客户端。
具体样式如图:

接着我们来看看具体的代码:
先来看看服务器的,样式和第一种一样,
具体代码:
 1     public partial class Server : Form
 2     {
 3         private Socket socket = null;
 4         private Thread thread = null;
 5
 6         public Server()
 7         {
 8             InitializeComponent();
 9             StartListening();
10         }
11
12         ///
13         /// 开始监听客户端
14         ///
15         private void StartListening()
16         {
17             try
18             {
19                 socket = new Socket(AddressFamily.InterNetwork, SocketType.Stream, ProtocolType.Tcp);
20                 IPAddress ipaddress = IPAddress.Parse("127.0.0.1");
21                 IPEndPoint endPoint = new IPEndPoint(ipaddress, int.Parse("3000"));
22
23                 socket.Bind(endPoint);
24                 socket.Listen(20);
25
26                 thread = new Thread(new ThreadStart(WatchConnection));
27                 thread.IsBackground = true;
28                 thread.Start();
29
30                 this.listBox1.Text = "开始监听客户端传来的消息" + "\r\n";
31             }
32             catch (System.Exception ex)
33             {
34                 this.listBox1.Text += "SocketException" + ex;
35             }
36         }
37
38         Socket[] socConnection = new Socket[12];
39         private static int clientNum = 0;
40
41         ///
42         /// 监听客户端发来的请求
43         ///
44         private void WatchConnection()
45         {
46             while (true)
47             {
48                 socConnection[clientNum] = socket.Accept();
49                 this.Invoke((MethodInvoker)delegate
50                 {
51                     this.listBox1.Text += "客户端连接成功" + "\r\n";
52                 });
53
54                 Thread thread = new Thread(new ParameterizedThreadStart(ServerRecMsg));
55                 thread.IsBackground = true;
56                 thread.Start(socConnection[clientNum]);
57                 clientNum++;
58             }
59         }
60
61         ///
62         /// 接受客户端消息并发送消息
63         ///
64         ///
65         private void ServerRecMsg(object socketClientPara)
66         {
67             Socket socketServer = socketClientPara as Socket;
68             try
69             {
70                 while (true)
71                 {
72                     byte[] arrServerRecMsg = new byte[1024 * 1024];
73                     int length = socketServer.Receive(arrServerRecMsg);
74
75                     string strSRecMsg = Encoding.UTF8.GetString(arrServerRecMsg, 0, length);
76                     this.Invoke((MethodInvoker)delegate
77                     {
78                         this.listBox1.Text += "接收到:" + strSRecMsg + "\r\n";
79                     });
80
81                     byte[] arrSendMsg = Encoding.UTF8.GetBytes("收到服务器发来的消息");
82                     //发送消息到客户端
83                     socketServer.Send(arrSendMsg);
84                 }
85             }
86             catch (System.Exception ex)
87             {
88
89             }
90         }
91     }
再来看看客户端代码:
样式和第一种也一样:
 1     public partial class Client : Form
 2     {
 3         private Socket socketClient = null;
 4         private Thread threadClient = null;
 5
 6         public Client()
 7         {
 8             InitializeComponent();
 9             ConnectionServer();
10             this.button1.Click += new EventHandler(button1_Click);
11         }
12
13         ///
14         /// 连接服务器
15         ///
16         private void ConnectionServer()
17         {
18             socketClient = new Socket(AddressFamily.InterNetwork, SocketType.Stream, ProtocolType.Tcp);
19             IPAddress ipaddress = IPAddress.Parse("127.0.0.1");
20             IPEndPoint endPoint = new IPEndPoint(ipaddress, int.Parse("3000"));
21             try
22             {
23                 socketClient.Connect(endPoint);
24                 threadClient = new Thread(RecMsg);
25                 threadClient.IsBackground = true;
26                 threadClient.Start();
27             }
28             catch (System.Exception ex)
29             {
30
31             }
32
33         }
34
35         ///
36         /// 接收服务器消息
37         ///
38         private void RecMsg()
39         {
40             while (true)
41             {
42                 //内存缓冲区1M,用于临时存储接收到服务器端的消息
43                 byte[] arrRecMsg = new byte[1024 * 1024];
44                 //将接收到的数据放入内存缓冲区,获取其长度
45                 int length = socketClient.Receive(arrRecMsg);
46                 //将套接字获取到的字节数组转换为我们可以理解的字符串
47                 string strRecMsg = Encoding.UTF8.GetString(arrRecMsg, 0, length);
48                 this.Invoke((MethodInvoker)delegate
49                 {
50                     lock (this.listBox1)
51                     {
52                         this.listBox1.Text += "服务器:" + strRecMsg + "\r\n";
53                     }
54                 });
55             }
56         }
57
58         ///
59         /// 向服务器发送消息
60         ///
61         ///
62         ///
63         private void button1_Click(object sender, EventArgs e)
64         {
65             ClientSendMsg(this.textBox1.Text.Trim());
66         }
67
68         ///
69         /// 发送信息到服务器
70         ///
71         ///
72         private void ClientSendMsg(string sendMsg)
73         {
74             //将输入的字符串转化为机器可以识别的字节数组
75             byte[] arrClientSendMsg = Encoding.UTF8.GetBytes(sendMsg);
76             //发送数据
77             socketClient.Send(arrClientSendMsg);
78             this.listBox1.Text += "客户端:" + sendMsg + "\r\n";
79         }
80     }
到此两种方式就说完了,不知道说的对不对,请各位吐槽!!!,转载注明出处。
C#中Socket用法,多个聊天和单一聊天。
标签:style blog http io color ar os 使用 for
原文地址:http://www.cnblogs.com/cn-blogs/p/4076417.html


