第七章 - 线程池应用
2021-05-04 13:29
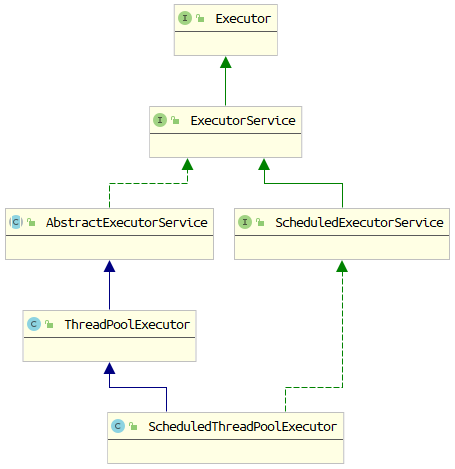
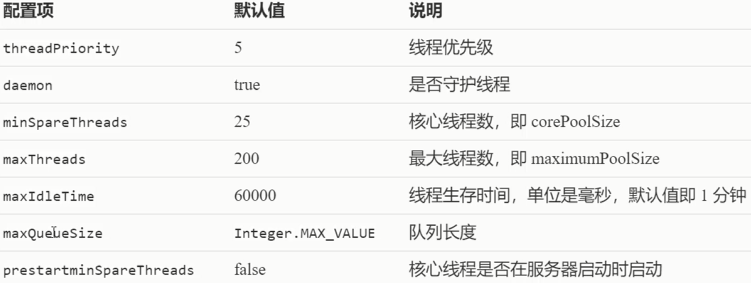
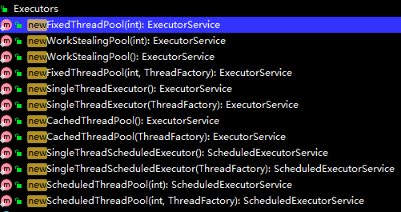
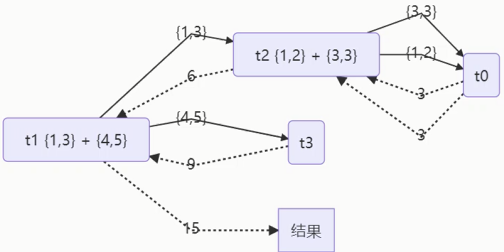
标签:处理 异步 排序 关闭 normal join() can add exception 线程池的组成主要是 核心线程 -- 核心线程是线程池遇到任务默认让核心线程执行(corePoolSize) 急救线程 -- 当核心线程数量不足, 我们救要使用上急救线程(maximumPoolSize - corePoolSize) 但是他存在keepAliveTime 保持时间, 如果急救线程空闲时间超过, 则线程消失 阻塞队列 -- 当任务多于maximumPoolSize , 线程池中的线程 全忙 , 多出任务丢到阻塞队列 任务 -- 线程执行的任务 ThreadPoolExecutor 使用 int 的高 3 位来表示线程池状态,低 29 位表示线程数量5 从数字上比较,TERMINATED > TIDYING > STOP > SHUTDOWN > RUNNING 异常处理, 优先级, 是否守护者线程, 名字, 加载器 工作方式: 线程池中刚开始没有线程,当一个任务提交给线程池后,线程池会创建一个新线程来执行任务。 当线程数达到 corePoolSize 并没有线程空闲,这时再加入任务,新加的任务会被加入workQueue 队列排 如果队列选择了有界队列,那么任务超过了队列大小时,会创建 maximumPoolSize - corePoolSize 数目的线 如果线程到达 maximumPoolSize 仍然有新任务这时会执行拒绝策略。拒绝策略 jdk 提供了 4 种实现,其它 (1) AbortPolicy 让调用者抛出 RejectedExecutionException 异常,这是默认策略 (2) CallerRunsPolicy 让调用者运行任务 (3) DiscardPolicy 放弃本次任务 (4) DiscardOldestPolicy 放弃队列中最早的任务,本任务取而代之 (5) Dubbo 的实现,在抛出 RejectedExecutionException 异常之前会记录日志,并 dump 线程栈信息,方便定位问题 (7) ActiveMQ 的实现,带超时等待(60s)尝试放入队列,类似我们之前自定义的拒绝策略 (8) PinPoint 的实现,它使用了一个拒绝策略链,会逐一尝试策略链中每种拒绝策略 当高峰过去后,超过corePoolSize 的救急线程如果一段时间没有任务做,需要结束节省资源,这个时间由keepAliveTime 和 unit 来控制。 根据这个构造方法,JDK Executors 类中提供了众多工厂方法来创建各种用途的线程池 核心线程数 == 最大线程数 ==> 无急救线程 ===> 无超时时间 队列无界, 随意存放 合适明确数量的耗时任务 核心数 == 0 ==> 急救线程数无限创建(最大Integer.MAX_VALUE个线程同时存在) 队列无界 空闲保留时间60s 合适任务多, 单任务耗时少 永远保证线程池中只有一个线程, 如果意外终止了这个线程, 这会抛弃掉这个线程, 再创建一个新的线程 队列无界 使用包装设计模式, FinalizableDelegatedExecutorService, 可以保证这个ThreadPoolExecutor类内部的一些类似set的方法不会被特殊方法直接调用修改, 也无法被强转成ThreadPoolExecutor, 防止内部的方法暴露 在『任务调度线程池』功能加入之前,可以使用 java.util.Timer 来实现定时功能,Timer 的优点在于简单易用,但由于所有任务都是由同一个线程来调度,因此所有任务都是串行执行的,同一时间只能有一个任务在执行,前一个任务的延迟或异常都将会影响到之后的任务。 整个线程池表现为:线程数固定,任务数多于线程数时,会放入无界队列排队。任务执行完毕,这些线程也不会被释放。用来执行延迟或反复执行的任务。 此方法适用于submit方法提交任务的方法 此方法适用于线程池execute方法的使用, 如果使用submit函数的话,是无效的 详解:submit和execute方法各区别 不过上面这种方式优缺点,发现线程池默认的 defaultfactory 内部使用了很多的其他功能,不仅仅是setUncaughtExceptionHandler,还有线程名字等等 所以完整代码应该是这样 他们都是提交任务到线程池的方法,但是其中的区别还是有的,其中最重要的区别在于: submit方法的异常如果没有使用返回值Future的get方法异常无法被捕获, 即使使用前面的 方案想要捕获异常也是无效的,上面这种方法只适用于execute方法当你想要捕获异常的时候使用 其中底层原理很简单 execute方法底层它把异常抛给线程池,只要我们使用thread.setUncaughtExceptionHandler设置自己的异常捕获机制就能够捕获出来 但是submit底层原理就不是这样了 他会把异常捕获放到它的outcome成员变量中 而要想知道是否出现异常必须使用Future的get方法体现出来 其中的 report 方法就是把异常抛出的 让有限的工作线程(Worker Thread)来轮流异步处理无限多的任务。也可以将其归类为分工模式,它的典型实现就是线程池,也体现了经典设计模式中的享元模式 例如,海底捞的服务员(线程),轮流处理每位客人的点餐(任务),如果为每位客人都配一名专属的服务员,那么成本就太高了(对比另一种多线程设计模式:Thread-Per-Message) 固定大小线程池会有饥饿现象 例如: 饭店里只有两个人, 这两个人既能服务客人也能做饭, 而且每个人只能服务一个客人 , 突然店铺来个两个客人, 饭店两个人都去服务各自选中的客人, 现在没有人做饭了, 程序在这里无法再次运行下去了, 也就是饥饿了 上面的代码就存在饥饿问题, 没有线程去煮饭了 不同任务类型应该使用不同的线程池,这样能够避免饥饿,并能提升效率 通常采用 cpu 核数 + 1 能够实现最优的 CPU 利用率,+1 是保证当线程由于页缺失故障(操作系统)或其它原因导致暂停时,额外的这个线程就能顶上去,保证 CPU 时钟周期不被浪费 CPU 不总是处于繁忙状态,例如,当你执行业务计算时,这时候会使用 CPU 资源,但当你执行 I/O 操作时、远程RPC 调用时,包括进行数据库操作时,这时候 CPU 就闲下来了,你可以利用多线程提高它的利用率。 例如 4 核 CPU 计算时间是 50% ,其它等待时间是 50%,期望 cpu 被 100% 利用,套用公式 例如 4 核 CPU 计算时间是 10% ,其它等待时间是 90%,期望 cpu 被 100% 利用,套用公式 例如 4 核 CPU 计算时间是 50% ,其它等待时间是 50%,期望 cpu 被 100% 利用,套用公式 Tomcat 线程池扩展了 ThreadPoolExecutor,行为稍有不同 如果总线程数达到 maximumPoolSize ? 这时不会立刻抛 RejectedExecutionException 异常 ? 而是再次尝试将任务放入队列,如果还失败,才抛出 RejectedExecutionException 异常 源码 tomcat-7.0.42 TaskQueue.java Connector 配置 Executor 线程配置 我们现在来分析源码 从上面的源码来看, 调用了个构造方法,传入了核心线程数,最大线程数,线程空闲等待时间,时间单位,工作等待队列,线程创建工厂类,队列满拒绝策略 其中创建线程工厂类方法主要就是创建线程,并给线程赋予名字和判断是否daemon线程 分3个步骤进行。 如果小于corePoolSize线程的运行数量,尝试用给定的命令启动一个新线程作为它的第一个任务。对addWorker的调用会原子化地检查runState和workerCount,因此,通过返回false来防止在不应该添加线程的情况下添加线程的错误警报。 如果一个任务可以成功排队,那么我们仍然需要重复检查是否应该添加一个线程(因为上次检查后已有的线程死了),或者是进入这个方法后池子关闭了。所以我们要重新检查状态,如果停止了,我们就重新检查状态,必要时回滚查询,如果没有,就启动一个新的线程。 如果我们无法排队任务,那么我们就尝试添加一个新的线程。如果失败了,我们知道我们已经关机或者饱和了,所以拒绝这个任务。 Fork/Join 是 JDK 1.7 加入的新的线程池实现,它体现的是一种分治思想,适用于能够进行任务拆分的 cpu 密集型运算 提交给 Fork/Join 线程池的任务需要继承 RecursiveTask(有返回值)或 RecursiveAction(没有返回值),例如下面定义了一个对 1~n 之间的整数求和的任务 容易出现栈溢出的版本, 整个过程 优化进阶版本 第七章 - 线程池应用 标签:处理 异步 排序 关闭 normal join() can add exception 原文地址:https://www.cnblogs.com/bangiao/p/13195693.html线程池
自定义线程池
import java.util.ArrayDeque;
import java.util.Deque;
import java.util.HashSet;
import java.util.concurrent.TimeUnit;
import java.util.concurrent.locks.Condition;
import java.util.concurrent.locks.ReentrantLock;
import lombok.extern.slf4j.Slf4j;
/**
* 自定义线程池
*/
@Slf4j(topic = "c.TestMyPool")
public class TestMyPool {
public static void main(String[] args) {
MyThreadPool pool = new MyThreadPool(2, 10, 1000, TimeUnit.MILLISECONDS, (queue, task) -> {
while (!queue.tryPut(task, 1000, TimeUnit.MILLISECONDS)) {
log.debug("拒绝策略重试添加任务到队列");
}
});
for (int i = 0; i log.debug("任务执行...{}", finalI));
}
}
}
/**
* 拒绝策略
*
* @param 扩展自定义链接池
@Slf4j(topic = "c.ConnectionDemo")
public class ConnectionDemo {
	public static void main(String[] args) {
		Pool.INSTANCE.init(2);
		for (int i = 0; i  {
				Connection connection = null;
				try {
					connection = Pool.INSTANCE.borrow();
				} finally {
					Pool.INSTANCE.free(connection);
				}
			}).start();
		}
	}
}
/**
 * 自定义线程池
 */
@Slf4j(topic = "c.Pool")
enum Pool {
	INSTANCE(10);

	private int poolSize;
	private Connection[] connections;
	private AtomicIntegerArray states;

	Pool(int poolSize) {
		init(poolSize);
	}

	/**
	 * 这个函数都是 new 所以是线程安全的, 它可能被无数次的new出来,但是最后一次new的值才是最终我们用的到的, 前面无数次的new最后都会被gc回收
	 * @param poolSize
	 */
	public void init(int poolSize) {
		this.poolSize = poolSize;
		states = new AtomicIntegerArray(new int[poolSize]);
		connections = new Connection[poolSize];
		for (int i = 0; i  opt = Optional.ofNullable(connection);
		for (int i = 0; i
ThreadPoolExecutor

线程池状态
状态名
高 3 位
接收新任务
处理阻塞队列任务
说明
RUNNING
111
Y
Y
SHUTDOWN
000
N
Y
不会接收新任务,但会处理阻塞队列剩余任务
STOP
001
N
N
会中断正在执行的任务,并抛弃阻塞队列任务
TIDYING
010
-
-
任务全执行完毕,活动线程为 0 即将进入终结
TERMINATED
011
-
-
终结状态
这些信息存储在一个原子变量 ctl 中,目的是将线程池状态与线程个数合二为一,这样就可以用一次 cas 原子操作进行赋值class zhazha {
public static void main(String[] args) {
// c 为旧值, ctlOf 返回结果为新值
ctl.compareAndSet(c, ctlOf(targetState, workerCountOf(c))));
// rs 为高 3 位代表线程池状态, wc 为低 29 位代表线程个数,ctl 是合并它们
private static int ctlOf(int rs, int wc) { return rs | wc; }
}
}
构造方法
class zhazha {
public ThreadPoolExecutor(int corePoolSize,
int maximumPoolSize,
long keepAliveTime,
TimeUnit unit,
BlockingQueue

队,直到有空闲的线程。
程来救急。
著名框架也提供了实现
(6) Netty 的实现,是创建一个新线程来执行任务
固定线程池 -- FixedThreadPool
class zhazha {
public static ExecutorService newFixedThreadPool(int nThreads) {
return new ThreadPoolExecutor(nThreads, nThreads,
0L, TimeUnit.MILLISECONDS,
new LinkedBlockingQueue评价
急救线程池 -- CachedThreadPool
class zhazha {
public static ExecutorService newCachedThreadPool() {
return new ThreadPoolExecutor(0, Integer.MAX_VALUE,
60L, TimeUnit.SECONDS,
new SynchronousQueue评价
单例线程池-- SingleThreadExecutor
class zhazha {
public static ExecutorService newSingleThreadExecutor() {
return new FinalizableDelegatedExecutorService
(new ThreadPoolExecutor(1, 1,
0L, TimeUnit.MILLISECONDS,
new LinkedBlockingQueue任务调度线程池 -- ScheduledThreadPool
Timer定时器的缺陷
class zhazha {
	/**
     * Timer的缺点: 一旦出现异常, 这无法再次使用
     */
    private static void func1() {
        Timer timer = new Timer();
        timer.schedule(new TimerTask() {
            @Override
            public void run() {
                log.debug("task 1");
                Sleeper.sleep(2);
            }
        }, 1000);
        timer.schedule(new TimerTask() {
            @Override
            public void run() {
                log.debug("task 2");
            }
        }, 1000);
        log.debug("start ... ");
    }
}
调度器的使用
class zhazha {
	/**
     * 调度器使用
     */
    private static void func2() {
        ScheduledExecutorService service = new ScheduledThreadPoolExecutor(1);
        service.schedule(() -> {
            log.debug("task 1");
            int i = 1 / 0;
        }, 1000, TimeUnit.MILLISECONDS);
        service.schedule(() -> {
            log.debug("task 2");
        }, 1000, TimeUnit.MILLISECONDS);
    }
}
定时器周期执行任务
class zhazha {
	public static void main(String[] args) {
        ScheduledExecutorService threadPool = Executors.newScheduledThreadPool(1);
        /**
         * 相隔 2 秒
         * 程序未执行完毕, 定时间早就开始定时
         *      时间可能按照周期算, 也可以按照程序执行时间算
         * 19:32:08 FixedRate running
         * 19:32:10 FixedRate running
         * 19:32:12 FixedRate running
         */
        threadPool.scheduleAtFixedRate(() -> {
            log.debug("FixedRate running");
            Sleeper.sleep(20_00);
        }, 1, 1, TimeUnit.SECONDS);

        /**
         * 相隔 3 秒, 这里相隔 2 + 1 == 3
         *      程序执行完毕, 定时器才开始定时
         * 19:32:52 FixedDelay running
         * 19:32:55 FixedDelay running
         * 19:32:58 FixedDelay running
         */
        // threadPool.scheduleWithFixedDelay(() -> {
        // 	log.debug("FixedDelay running");
        // 	Sleeper.sleep(2000);
        // }, 1, 1, TimeUnit.SECONDS);
    }
}
评价
线程池正确处理执行任务异常
直接在代码内部捕捉异常
class zhazha {
	public static void main(String[] args) {
	    threadPool.schedule(() -> {
        try {
            log.debug("task 1");
            int i = 1 / 0;
        } catch (Exception e) {
            e.printStackTrace();
        }
    }, 1000, TimeUnit.MILLISECONDS);
	}
}
使用future的get方法获取异常
class zhazha {
public static void main(String[] args) {
Future自定义异常处理方案
class MyUncaughtExceptionHandler implements Thread.UncaughtExceptionHandler {
		@Override
		public void uncaughtException(Thread t, Throwable e) {
			System.out.println("-----------execption-----------");
			System.out.println("线程信息: " + t.toString());
			System.out.println("异常信息: " + e.getMessage());
		}
	}
class Zhazha {
	public static void main(String[] args) {
	    ExecutorService threadPool = Executors.newCachedThreadPool(r -> {
            Thread thread = new Thread(r);
            thread.setUncaughtExceptionHandler(new MyUncaughtExceptionHandler());
            return thread;
        });

        threadPool.execute(() -> {
            log.debug("zhazha");
            int i = 1 / 0; // 代码在这里就会报错
        });
	}
}
-----------execption-----------
线程信息: Thread[Thread-0,5,main]
异常信息: / by zero
static class MyThreadFacorty implements ThreadFactory {
    private static final AtomicInteger POOL_NUMBER = new AtomicInteger(1);
    private final ThreadGroup group;
    private final AtomicInteger threadNumber = new AtomicInteger(1);
    private final String namePrefix;

    MyThreadFacorty() {
        SecurityManager s = System.getSecurityManager();
        group = (s != null) ? s.getThreadGroup() : Thread.currentThread().getThreadGroup();
        namePrefix = "pool-" + POOL_NUMBER.getAndIncrement() + "-thread-";
    }

    @Override
    public Thread newThread(Runnable r) {
        Thread t = new Thread(group, r, namePrefix + threadNumber.getAndIncrement(), 0);
        if (t.isDaemon()) {
            t.setDaemon(false);
        }
        if (t.getPriority() != Thread.NORM_PRIORITY) {
            t.setPriority(Thread.NORM_PRIORITY);
        }
        t.setUncaughtExceptionHandler(new MyUncaughtExceptionHandler());
        return t;
    }
}


static class MyUncaughtExceptionHandler implements Thread.UncaughtExceptionHandler {
    @Override
    public void uncaughtException(Thread t, Throwable e) {
        System.out.println("-----------execption-----------");
        System.out.println("线程信息: " + t.toString());
        System.out.println("异常信息: " + e.getMessage());
    }
}
class zhazha {
	public void test02() throws Exception {
        CountDownLatch latch = new CountDownLatch(1); // 这是测试方案 防止主线程直接就退出
        ExecutorService threadPool = Executors.newCachedThreadPool(new MyThreadFacorty());
        threadPool.execute(() -> {
            log.debug("zhazha");
            int i = 1 / 0;
            latch.countDown();
        });
        latch.await();
    }
}
submit和execute方法各区别
Future> submit(Runnable task);void execute(Runnable command);thread.setUncaughtExceptionHandler(handler);try {
task.run();
afterExecute(task, null);
} catch (Throwable ex) {
afterExecute(task, ex);
throw ex;
}
try {
    result = c.call();
    ran = true;
} catch (Throwable ex) {
    result = null;
    ran = false;
    setException(ex);
}
public V get() throws InterruptedException, ExecutionException {
    int s = state;
if (s @SuppressWarnings("unchecked")
private V report(int s) throws ExecutionException {
// 把捕获的异常放入 x变量判断是否是异常, 这个 s 参数就是是否是异常的判断
Object x = outcome;
if (s == NORMAL)
return (V)x;
if (s >= CANCELLED)
throw new CancellationException();
// 抛出异常
throw new ExecutionException((Throwable)x);
}
提交任务
// 执行任务
void execute(Runnable command);
// 提交任务 task,用返回值 Future 获得任务执行结果
关闭线程池
shutdown
/*
线程池状态变为 SHUTDOWN
- 不会接收新任务
- 但已提交任务会执行完
- 此方法不会阻塞调用线程的执行
*/
void shutdown();
public void shutdown() {
    final ReentrantLock mainLock = this.mainLock;
    mainLock.lock();
    try {
        checkShutdownAccess();
        // 修改线程池状态
        advanceRunState(SHUTDOWN);
        // 仅会打断空闲线程
        interruptIdleWorkers();
        onShutdown(); // 扩展点 ScheduledThreadPoolExecutor
    } finally {
        mainLock.unlock();
    }
    // 尝试终结(没有运行的线程可以立刻终结,如果还有运行的线程也不会等)
    tryTerminate();
}
shutdownNow
/*
线程池状态变为 STOP
- 不会接收新任务
- 会将队列中的任务返回
- 并用 interrupt 的方式中断正在执行的任务
*/
Listpublic List其它方法
// 不在 RUNNING 状态的线程池,此方法就返回 true
boolean isShutdown();
// 线程池状态是否是 TERMINATED
boolean isTerminated();
// 调用 shutdown 后,由于调用线程并不会等待所有任务运行结束,因此如果它想在线程池 TERMINATED 后做些事
情,可以利用此方法等待
boolean awaitTermination(long timeout, TimeUnit unit) throws InterruptedException;
异步模式之工作线程
注意,不同任务类型应该使用不同的线程池,这样能够避免饥饿,并能提升效率
例如,如果一个餐馆的工人既要招呼客人(任务类型A),又要到后厨做菜(任务类型B)显然效率不咋地,分成服务员(线程池A)与厨师(线程池B)更为合理,当然你能想到更细致的分工线程池饥饿
@Slf4j(topic = "c.TestHungerDemo")
public class TestHungerDemo {
private static final List15:07:17.930 [pool-1-thread-1] DEBUG c.TestHungerDemo - 处理点餐服务....
15:07:17.930 [pool-1-thread-2] DEBUG c.TestHungerDemo - 处理点餐服务....
解决方案
ExecutorService waiterPool = Executors.newFixedThreadPool(1);
ExecutorService cookPool = Executors.newFixedThreadPool(1);
waiterPool.execute(() -> {
log.debug("处理点餐服务....");
Future创建多少线程池合适
CPU 密集型运算
I/O 密集型运算
经验公式如下线程数 = 核数 * 期望 CPU 利用率 * 总时间(CPU计算时间+等待时间) / CPU 计算时间
4 * 100% * 100% / 50% = 8
4 * 100% * 100% / 10% = 40
4 * 100% * 100% / 50% = 8
例如 4 核 CPU 计算时间是 10% ,其它等待时间是 90%,期望 cpu 被 100% 利用,套用公式
4 * 100% * 100% / 10% = 40tomcat线程池

public void execute(Runnable command, long timeout, TimeUnit unit) {
    submittedCount.incrementAndGet();
    try {
        super.execute(command);
    } catch (RejectedExecutionException rx) {
        if (super.getQueue() instanceof TaskQueue) {
            final TaskQueue queue = (TaskQueue) super.getQueue();
            try {
                if (!queue.force(command, timeout, unit)) {
                    submittedCount.decrementAndGet();
                    throw new RejectedExecutionException("Queue capacity is full.");
                }
            } catch (InterruptedException x) {
                submittedCount.decrementAndGet();
                Thread.interrupted();
                throw new RejectedExecutionException(x);
            }
        }
        else {
            submittedCount.decrementAndGet();
            throw rx;
        }
    }
}
public boolean force(Runnable o, long timeout, TimeUnit unit) throws InterruptedException {
    if (parent.isShutdown())
        throw new RejectedExecutionException("Executor not running, can‘t force a command into the queue");
    return super.offer(o, timeout, unit); //forces the item onto the queue, to be used if the task
    is rejected
}


jdk线程池源码分析

线程池在Exectors中存在几个线程池方案,不过这些线程池方案都存在问题,ali开发手册上不让用
主要原因是:
CacheTheradPool和FiedThreadPool的阻塞方案不对劲,最大数量是Integer.Max_value数量级,容易出现溢出
还有他的拒绝阻塞策略也是不太完美的,需要我们重新设计public static ExecutorService newFixedThreadPool(int nThreads) {
return new ThreadPoolExecutor(nThreads, nThreads,
0L, TimeUnit.MILLISECONDS,
new LinkedBlockingQueuepublic ThreadPoolExecutor(int corePoolSize,
int maximumPoolSize,
long keepAliveTime,
TimeUnit unit,
BlockingQueue
然后线程队列拒绝策略就是如果队列满了,还往队列中添加,这抛出异常消息
上面分析到这里就已经完成了,现在我们需要分析的师如何执行任务了public void execute(Runnable command) {
if (command == null)
throw new NullPointerException();
// 获取标志位(其中包含线程的几种状态和线程队列的数量)
int c = ctl.get();
// 判断数量是否小于核心线程
if (workerCountOf(c) private boolean addWorker(Runnable firstTask, boolean core) {
retry:
for (int c = ctl.get();;) {
// 检测队列是否为空
if (runStateAtLeast(c, SHUTDOWN)
&& (runStateAtLeast(c, STOP)
|| firstTask != null
|| workQueue.isEmpty()))
return false;
for (;;) {
// 如果 core 为 true 则 返回核心线程数 corePoolSize 判断工作线程数是否超出核心线程数, 超出,返回false,添加任务失败
if (workerCountOf(c)
>= ((core ? corePoolSize : maximumPoolSize) & COUNT_MASK))
return false;
// 自增线程数量标记
if (compareAndIncrementWorkerCount(c))
break retry;
c = ctl.get(); // Re-read ctl
if (runStateAtLeast(c, SHUTDOWN))
continue retry;
// else CAS failed due to workerCount change; retry inner loop
}
}
boolean workerStarted = false;
boolean workerAdded = false;
Worker w = null;
try {
// 创建Worker线程
w = new Worker(firstTask);
final Thread t = w.thread;
if (t != null) {
// 上锁
final ReentrantLock mainLock = this.mainLock;
mainLock.lock();
try {
int c = ctl.get();
// 如果线程池正在运行
if (isRunning(c) ||
(runStateLessThan(c, STOP) && firstTask == null)) {
// 线程正在运行
if (t.isAlive())
throw new IllegalThreadStateException();
// 添加线程到线程池中
workers.add(w);
int s = workers.size();
if (s > largestPoolSize)
largestPoolSize = s;
workerAdded = true;
}
} finally {
mainLock.unlock();
}
// 直接运行
if (workerAdded) {
t.start();
workerStarted = true;
}
}
} finally {
// 添加失败,直接返回 false,(通过这里workerStarted一定为false)
if (! workerStarted)
addWorkerFailed(w);
}
return workerStarted;
}
public boolean offer(E e) {
// 如果发现任务为空则抛出异常
if (e == null) throw new NullPointerException();
// 获取数量
final AtomicInteger count = this.count;
// 判断数量是否为极限值
if (count.get() == capacity)
return false;
final int c;
// 创建节点
final Node
final void runWorker(Worker w) {
    Thread wt = Thread.currentThread();
    Runnable task = w.firstTask;
    w.firstTask = null;
    w.unlock(); // allow interrupts
    boolean completedAbruptly = true;
    try {
        // 如果task不为空则执行,如果为空则从队列中获取任务再去执行
        while (task != null || (task = getTask()) != null) {
            w.lock();
            if ((runStateAtLeast(ctl.get(), STOP) ||
                 (Thread.interrupted() &&
                  runStateAtLeast(ctl.get(), STOP))) &&
                !wt.isInterrupted())
                wt.interrupt();
            try {
                // 执行前处理
                beforeExecute(wt, task);
                try {
                    task.run();
                    // 执行后处理
                    afterExecute(task, null);
                } catch (Throwable ex) {
                    // 错误执行后处理
                    afterExecute(task, ex);
                    throw ex;
                }
            } finally {
                task = null;
                w.completedTasks++;
                w.unlock();
            }
        }
        completedAbruptly = false;
    } finally {
        processWorkerExit(w, completedAbruptly);
    }
}
fork/join任务拆分
所谓的任务拆分,是将一个大任务拆分为算法上相同的小任务,直至不能拆分可以直接求解。跟递归相关的一些计算,如归并排序、斐波那契数列、都可以用分治思想进行求解
Fork/Join 在分治的基础上加入了多线程,可以把每个任务的分解和合并交给不同的线程来完成,进一步提升了运算效率
Fork/Join 默认会创建与 cpu 核心数大小相同的线程池@Slf4j(topic = "c.TestForkJoinDemo")
public class TestForkJoinDemo {
public static void main(String[] args) {
int num = 1000;
// 简单的拆分
forkjoinFunc(num);
// 拆分优化版
forkJoinFuncPro(num);
}
private static void forkJoinFuncPro(int num) {
ForkJoinPool pool = new ForkJoinPool(4);
System.out.println("统计:" + pool.invoke(new MyTaskPro(1, num)));
System.out.println("线程池数量:" + pool.getPoolSize());
}
private static void forkjoinFunc(int num) {
ForkJoinPool pool = new ForkJoinPool(4);
System.out.println("统计:" + pool.invoke(new MyTask(num)));
System.out.println("线程池数量:" + pool.getPoolSize());
}
/**
* 进阶优化版
*/
static class MyTaskPro extends RecursiveTask
